Basic View #
The design blends perfectly with the Ableton Live interface and does not take up much space in your device view when minimized. Nevertheless, the Basic View with its small display already offers the most important information about the current settings at a glance.
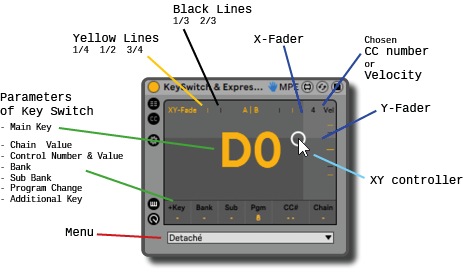
You can see the note / number and the name of the selected key switch as well as its defined parameters.
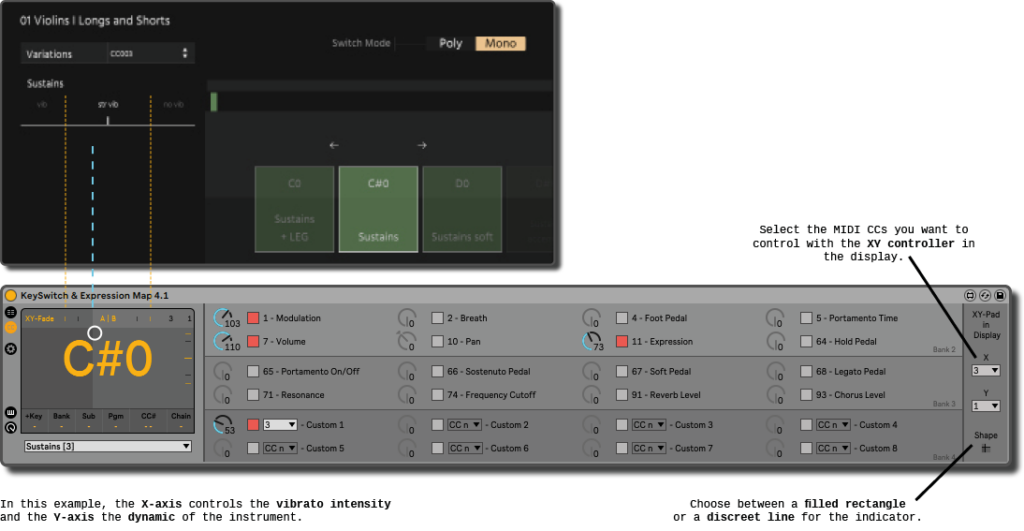
If the player of your VST library offers you to xy-fade between articulations (e.g AB Switch for Runs Up or Down, Crescendo or Diminuendo / Crossfade from Sustain to Tremolo or Non Vibrato to Vibrato etc.), you can display these CC or velocity values as well in the display. The yellow lines indicate 1/4, 1/2 and 3/4. The black lines 1/3 and 2/3.
Additionally, you can use the display as an XY pad to control up to two CC values simultaneously with the mouse.
However, the most important element in the Basic View is for sure the menu. Here you can select a key switch manually with the computer mouse or automate the key switches using automation envelopes in the Arrangement View.
Key Switch Editor #
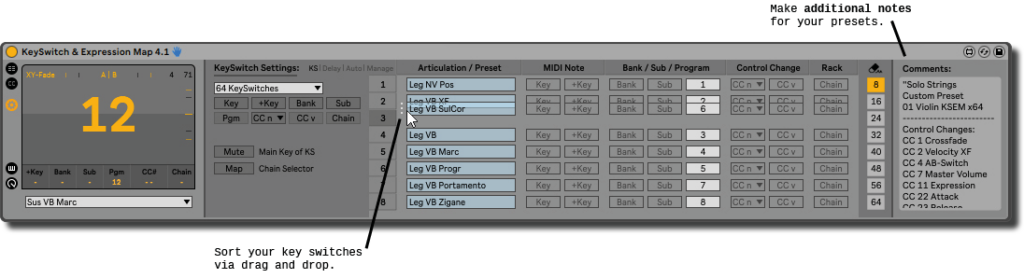
Once you have given a key switch a name, you can define parameters for it. Visually, these parameters are then highlighted while the rest remains greyed out in the background.
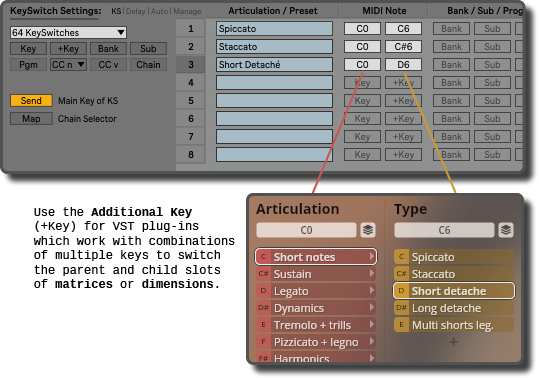
You can combine several parameters, e.g. to adjust multi-layered sound banks of a keyboard or to control matrices or different dimensions in your VST plug-in.
If you move the mouse over the gap between the number and the name of the key switch, three points will appear that allows you to change the order of the list.
Additionally, you can write comments in a text field which might help you to memorize e.g. the functions of the used MIDI CCs. This way you can quickly get back to your project even after a longer break.
Settings #
The settings are divided into four tabs.
Key Switch Settings #
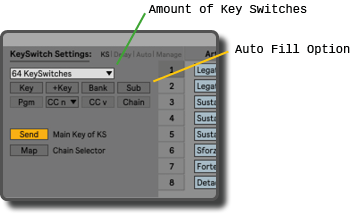
The first tab lets you select the amount of your key switches and helps you to define parameters quickly for all key switches at once with the Auto Fill Option. Thereby, the MIDI notes are distributed upwards in semitone steps to all key switches on the basis of a root key (C, C#, D, D#). The same applies to the chain values, CC value and Program Changes (0, 1, 2, 3). Whereas the values of the bank, sub bank and CC number are only copied to all key switches (4, 4, 4, 4).
Additionally, you will find a few more buttons, which has to be explained in more detail.
Mute the Main Key of KS
As default the device will send the MIDI notes of the key switches for example to your VST instrument to control remotely provided articulation patches. But there might be a situation where you want to filter them out of the signal to avoid unwished sounds (e.g. Oscillator or Synthesizer without restricted pitch range). In this case, only switch the button to mute. Please note that this setting has no impact to the additional keys. They will be always transmitted.
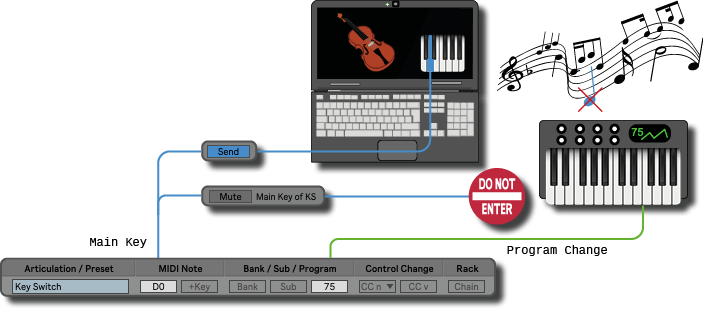
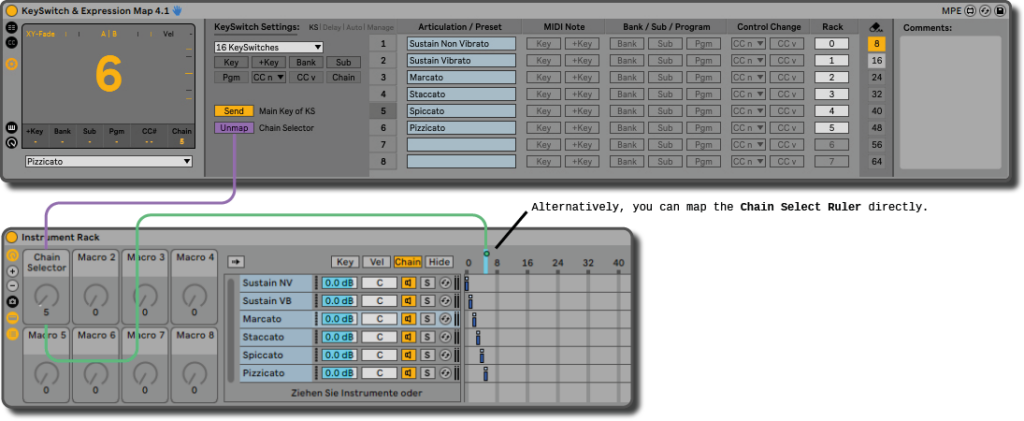
Chain Selector
With the “Map” button, you can connect the device to the chain selector (e.g. Macro 1) of an Ableton Live Rack to control its chain. Please check the chapter about the set-up to find out in detail how to do this.
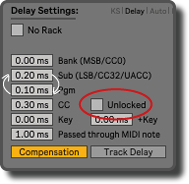
Delay Settings #
In case that you only control the key switches manually on your piano or MIDI controller, normally, you do not need to define any delays.
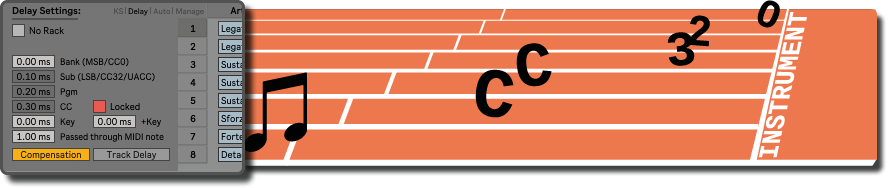
However, when using automation envelopes, it is important to set delay times so that the MIDI note of the melody is sent out only after your VST plug-in, external instrument or Ableton Live Rack has had enough time to receive the sent parameters and to set the correct instrument or articulation.
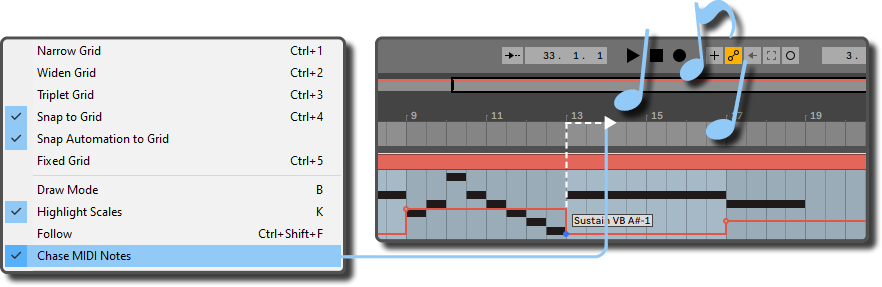
This is particulary important because otherwise you will not be able to use the option Chase MIDI Notes, which since Ableton 10 allows you to always play your song directly with the automation envelope settings, even if playback starts after the MIDI note’s start time. Only then it is possible to hear your composition always with the correct articulation, instrument or effect when you skip through the timeline of the Arrangement View.
Especially with hardware (e.g. a keyboard with banks and sub banks) it can be important in which sequence the parameters are sent. The usual order is set as default. If necessary, this can be unlocked and changed to suit your individual needs.
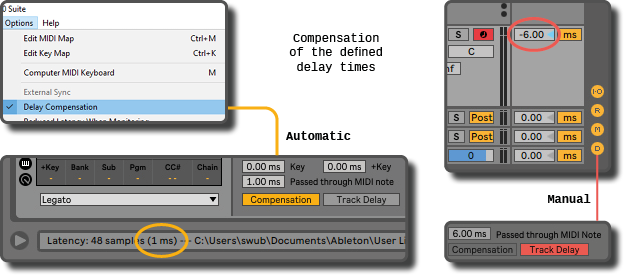
The defined delays will cause a latency. Don’t worry! This can be compensated in Ableton either automatically with the option Delay Compensation or manually in the Track Delay Section.
The subject of delays and their compensation is explained again and in detail in the chapter Automation Envelopes.
Automation Settings #
In the Automation tab of the settings you can configure some behaviors of the KeySwitch & Expression Map regarding the automation envelopes of your key switches.
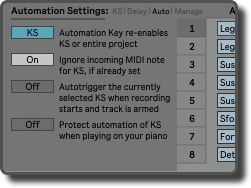
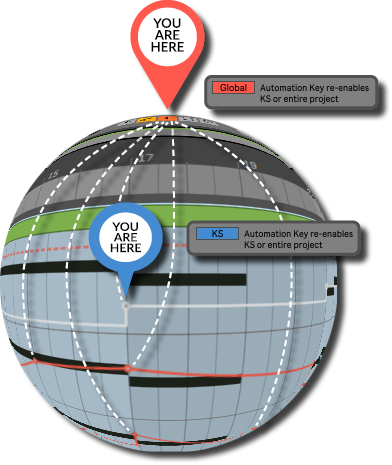
Automation Key re-enables KS or entire project
In the virtual piano’s user interface, you can set an additional key switch to re-enable the automation. Select here whether the Automation Key should re-enable the automation envelopes of the entire project or only those of the key switches.
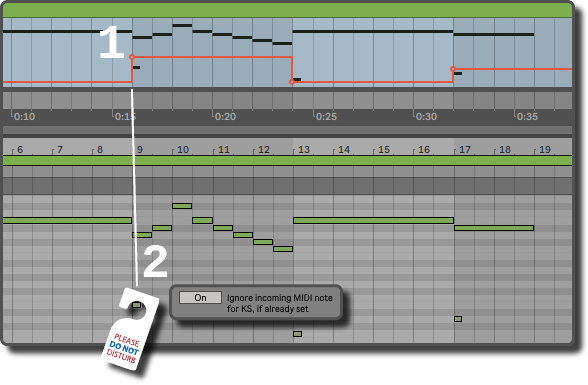
Ignore incoming MIDI note for KS, if already set
When you record articulations or effects with your piano, the corresponding MIDI notes of the key switches are also captured in the MIDI clip. During playback, these “ghost notes” cause the automation envelope of the key switch to be deactivated, as they trigger the already set articulation a second time. To prevent this and to avoid that you have to manually delete the notes for the articulation after recording, you can activate this button.
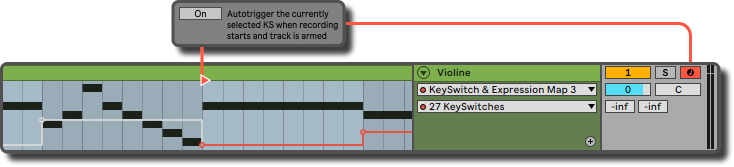
Autotrigger the currently selected KS when recording starts and track is armed
You can let the device trigger the currently selected key switch as soon as you start a recording. In this way, you can conveniently set an articulation before recording, even if the automation of the envelope for the key switch gets deactivated by the manual switching beforehand. If you are used to work with the MIDI Arrangement Overdub it might bother you. Leave it switched off then.
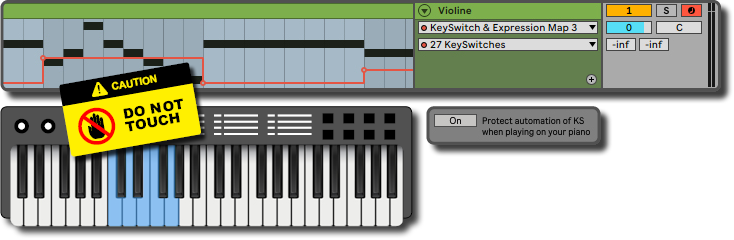
Protect automation of KS when playing on your piano
In case that you play live, but you toggle in the songs between instruments, articulations or effects automatically, you can protect the automation against accidental key switching by activating this button in the settings.
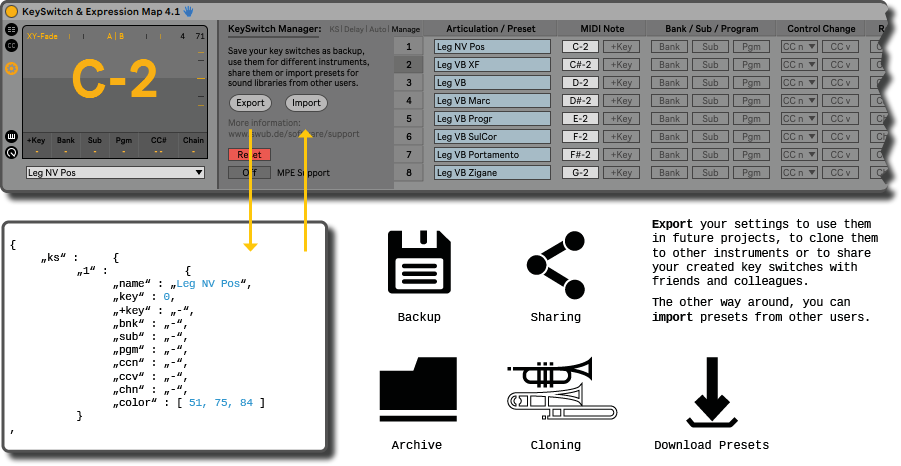
Device Manager #
In the last tab, you can reset the device and activate MPE support for Ableton 11.
From version 4.1 on, the Device Manager lets you additionally export your settings as presets. This allows you to save easily your key switches as a backup, to quickly clone them to other instruments or to share them with other users.
It also makes it possible to download and import presets. The idea is that in this way everybody can save a little work and not all of us have to start from scratch for at least the provided default key switches of the most popular libraries. The same applies to the onboard programs of synthesizers, keyboards, percussion pads or other hardware.
You can download presets here.
If you like the idea and you have also made presets which you would like to share with others, you can upload them as well on the website. With your help, there might be presets for all common libraries and hardware soon!
KS Controller #
Control Pad #
With the control pad you can either operate your key switches with the computer mouse or use the arrow keys on your computer keyboard to navigate inside of the pad controller.
All names are written on the pads. Additionally, you can show as well their numbers, notes or both. For a clear overview it is possible to choose colors for the pads out of three different palettes (“Dark”, “Gradient” or “Ableton”) or to adjust the text justification and font size.
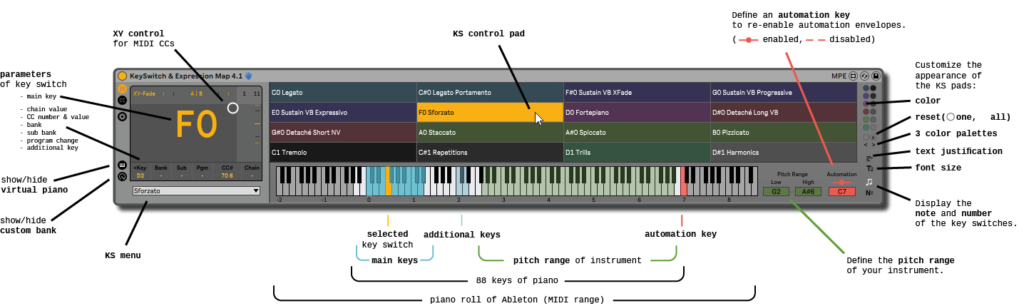
Virtual Piano #
In addition to the pads, you can show or hide a virtual piano. If you have defined notes for you key switches, they will be shown on the piano roll. For a better orientation, the zone of a full-sized piano with 88 keys is visually highlighted and the numbers of the octaves are indicated under the “C”s. The selected key switch is displayed yellow.
If you have specified a pitch range for your instrument, this zone will be displayed in green. The additional keys are as well indicated in a light blue color to inform you that these notes are in use for functional purposes.
In complement to the keys for the key switches, you can assign a further one to easily switch between improvisation and automation by re-enabling the automation envelope – globally for the entire project or only for the key switch automation. This Automation Key allows you for example to control articulations manually during a band rehearsal and to come back easily to automation as soon you stop your improvisation. The default of it is C7 which is easy to access and rarely played. If you do not need it, simply set it down to “-”.
Here you will find more information on how to control your key switches with the piano, where to position them best and so on.
MIDI controls #
The MIDI Control section of the KeySwitch & Expression Map offers you the possibility to record or edit MIDI controls directly in the Arrangement View. The most common MIDI CCs are listed by their names for a good overview. Additionally, you can define up to eight custom CC numbers.
The MIDI controls are organized in four banks for instant mapping which allows you to control dynamically always the selected instance of the KeySwitch & Expression Map with your MIDI controller.
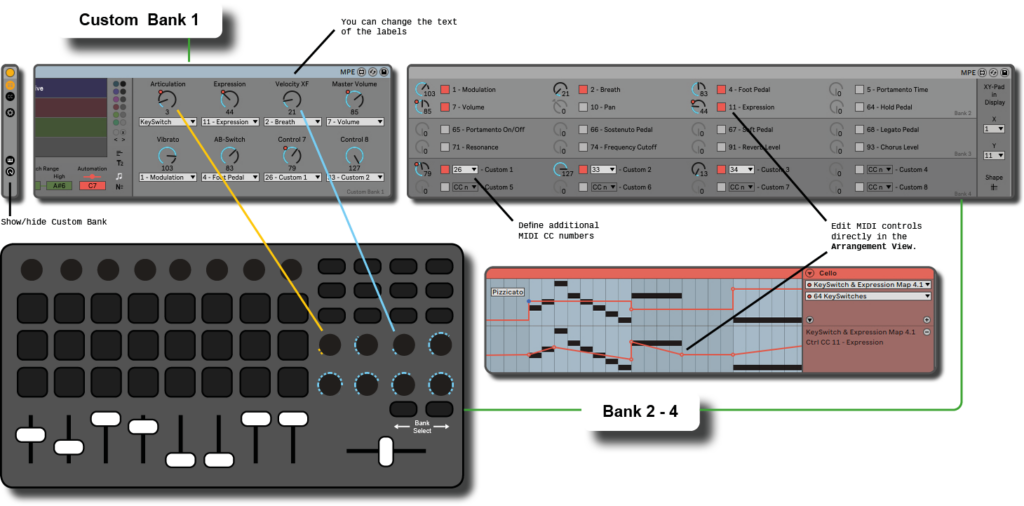
Custom Bank #
For a quick workflow, you can customise the first bank to group your most frequently used MIDI controls into eight device controls, as you know them from other devices in Ableton.
The first dial lets you control additionally your key switches.
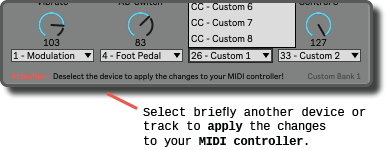
After changes in the custom bank, you need to update your MIDI controller. You can do this by deselecting the device (select briefly another device or track).
If you like, you can rename the labels from their default “Control 1-8” to a more meaningful name so that you can easily remember what they control. (e.g. Dynamics, Vibrato, Legato Blur etc.)
XY Pad #
Above, I mentioned already the XY controller which is located in the display. You can assign up to two MIDI control numbers to control them simultaneously.
Alternatively, you can also show (not control) the velocity of incoming MIDI notes.
Finally, you have the possibility to change the shape of the XY indicators and choose between a filled rectangle or a discreet line.