About Ableton’s Live Racks #
In each MIDI track that you create in Ableton Live, you can place different devices one after the other in the device chain of the device view. The MIDI notes from your MIDI clip or piano are passed from left to right from one device to the next.

However, it is also possible to route the signal parallel to each other through different device chains. Why would you want to do that?
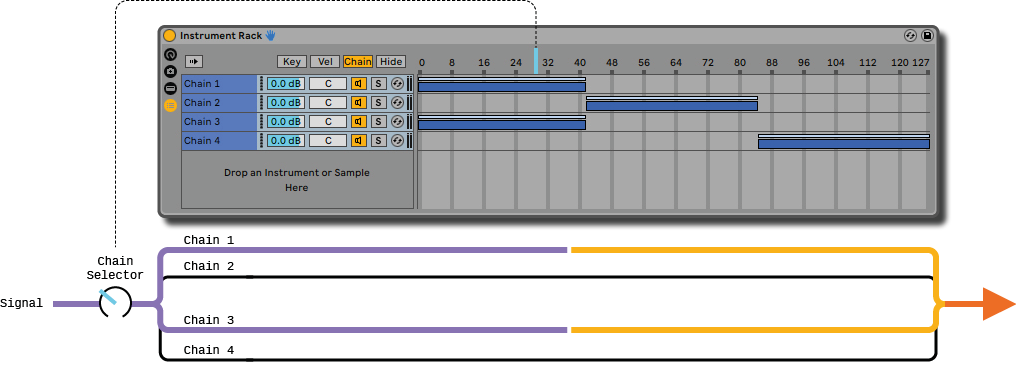
For example, with an Intrument Rack you can create sounds in this way in one track that are generated by several instruments. Normally, you can only install one instrument per track because, as shown above, the MIDI signal behind an instrument turns into an audio signal / frequencies. Racks, allow you to create additional chains of devices and then choose to route the MIDI signal or audio signal through all or only selected chains.
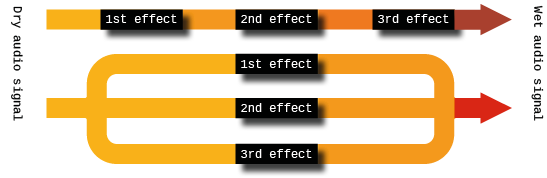
Also for sound design it can be interesting not to pass the audio signal through different audio effects one after the other, but parallel to each other. The result can be very different, since each effect gets the dry audio signal as input instead of the one already converted by the previous effects.
There are four different types of racks in Ableton:
- Instrument Rack
- MIDI Effect Rack
- Audio Effect Rack
- Drum Rack
Since most of you probably want to use the KeySwitch & Expression Map to control instruments and articulations, we will focus on the Instrument Rack in this tutorial. But in principle you can also control Effect Racks in the same way. The Drum Rack works a little bit different though.
Set-up a rack #
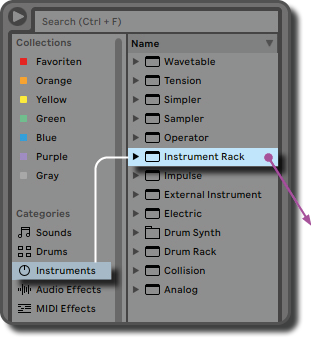
Drag and drop an empty Instrument Rack from the Ableton Browser into a MIDI track, as you would normally do it with a normal instrument.
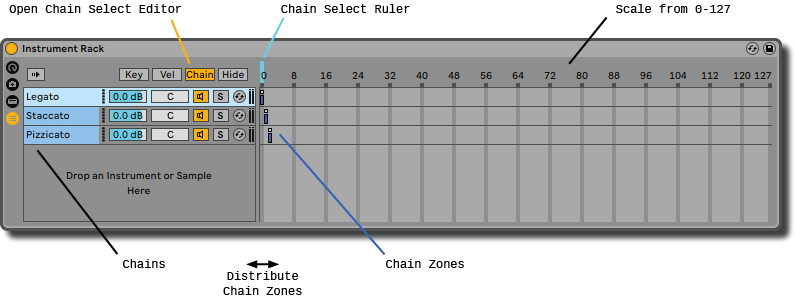
Open the chain list and drag three instruments or articulations one after the other into the empty field as an example. Alternatively, it is also possible to create empty chains with a right mouse click, into which you then drop your instrument. For a better overview you can also rename the chains (e.g. Legato, Staccato and Pizzicato).

Now press the small button with the label “Chain” to open the Chain Select Editor. There you will see a scale from 0-127 and blue rectangles below – so-called Chain Zones. Above the Chain Zones there is the Chain Select Ruler, which is currently set to Chain Value 0. This means that all Chain Zones that are at the position 0 are now active. In the illustration below we will hear only the Legato articulation. If you move the Chain Select Ruler with the mouse e.g. to Chain Value 8, no sound will come out of your speakers, because there are no Chain Zones at this position. Theoretically, you could drag the zones larger at the corners so that they cover a bigger part of the scale and are active in a wider range of chain values. In our case, however, we just distribute them as they are to the Chain Values 0, 1 and 2 so that we can switch between them later. Try it out for yourself! Click on the Chain Select Ruler with the mouse and move it. Depending on whether the Chain Select Ruler is set to 0, 1 or 2, you will now hear the corresponding instrument.
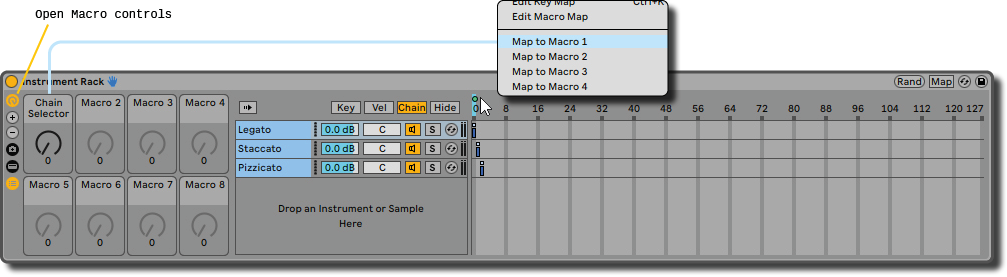
So far, so good! That works already. But we do not want to click around with the mouse every time we change the instrument or the articulation. Therefore, hit the top left button with the knob as label to open the Macro Controls. Now you connect the first one with the Chain Select Ruler using the right mouse button. Click on the Chain Select Ruler and choose “Map to Macro 1” out of the list. The name of the slider should now have changed and instead it should say Chain Selector! If you turn the knob, you will see how the Chain Select Ruler moves.
Perfect, the instrument rack is ready.
Connecting the rack #
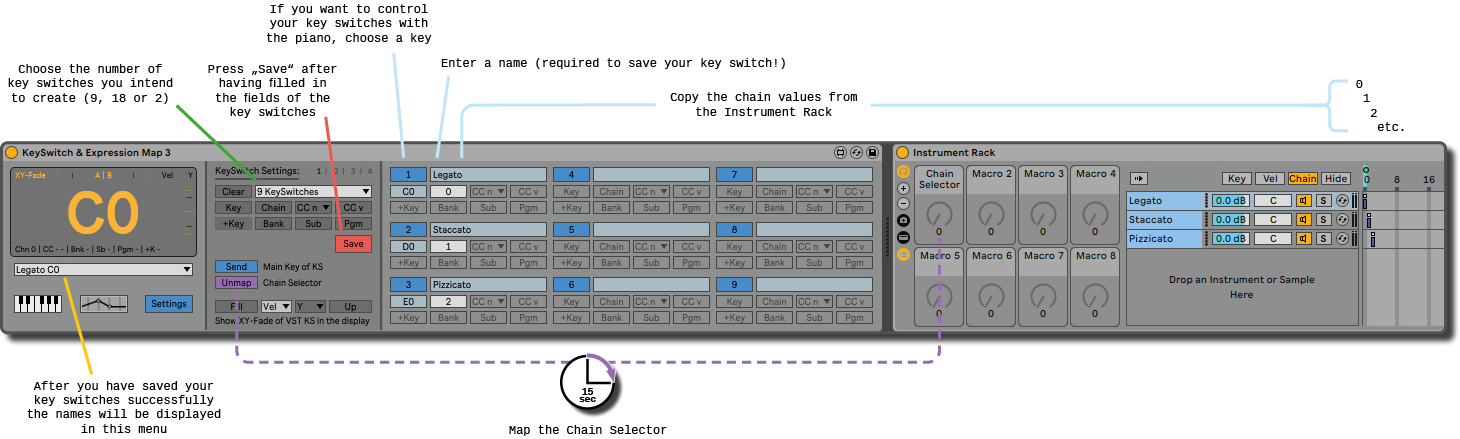
The next step is to connect the Instrument Rack to the KeySwitch & Expression Map. Drag the KeySwitch & Expression Map in front of the Instrument Rack and create three key switches in the KeySwich Editor. To do this, give them a name and copy the respective chain values from the rack into the field “Chain“. If you want to use only automation envelopes or your MIDI controller, that’s all. If you desire to control your key switches with the piano, define additionally a key.
Press Save and then the button Map Chain Selector. Now click with the mouse on the dial of the chain selector in the rack. You have 15 seconds to do this before the mapping function turns itself off. Be careful not to click on another knob, parameter box or button by mistake, otherwise it will be mapped instead!
The dial of the Chain Selector should now be grayed out and the Map button should be labeled Unmap. You can press this button later again if you want to unmap the two devices.
Finally, let’s test if the Chain Select Ruler moves when you select a key switch from the menu.
Info: Instead of mapping the Chain Selector, you can alternatively map directly the Chain Select Ruler to the KeySwitch & Expression Map. This way you do not have to block a macro control for the key switches and you can use it instead for other parameters.


