The KeySwitch & Expression Map allows you to control your keys switches including articulations, instruments or effects with Ableton’s automation envelopes. You can comfortably see their names in the track of the Arrangement View or in the MIDI clip of the Session View.
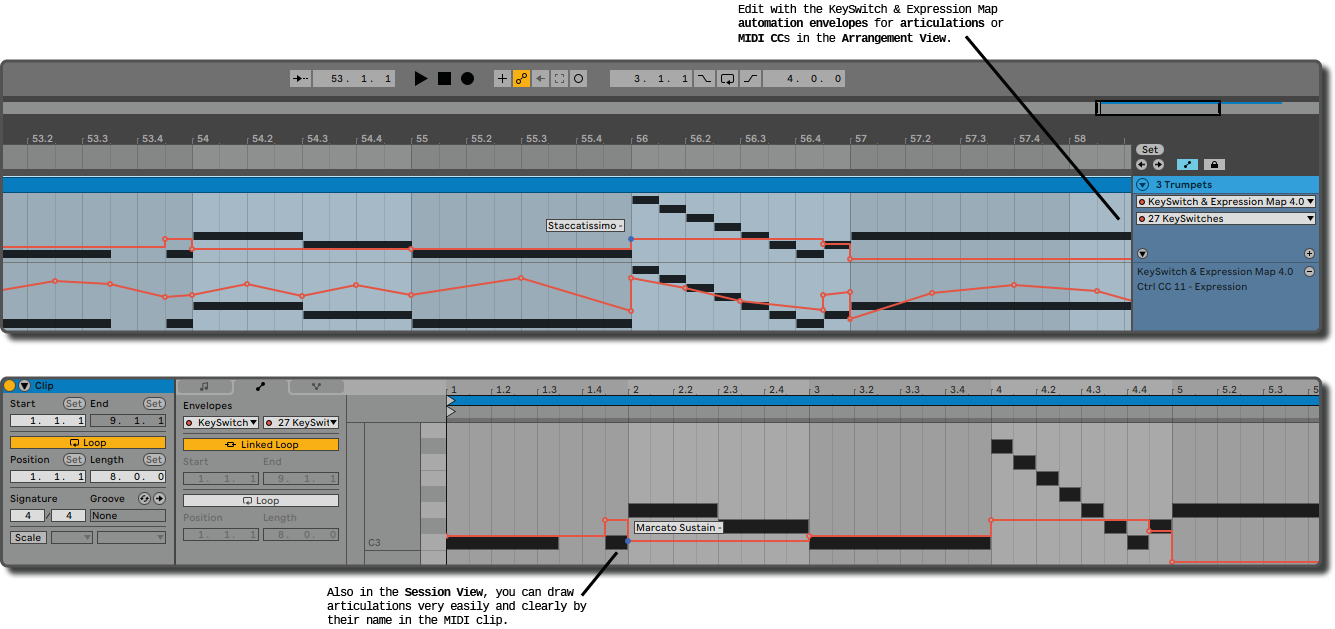
You can also quickly and easily record and edit MIDI controls in the Arrangement View. This way, you can see the dynamics of your instruments or orchestral sections at a glance. You can easily synchronize them and quickly copy from one track to the next without having to open individual MIDI clips.
Key switches #
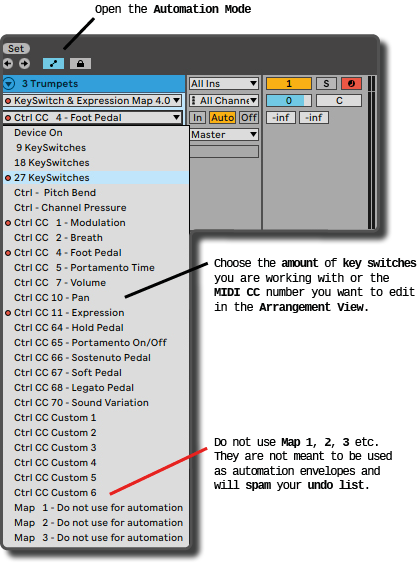
Open Automation Mode, choose the KeySwitch & Expression Map from the top menu and select below the number of key switches you intend to work with. Do not use the parameters named Map 1, 2, 3, etc. If you use those for automation envelopes, they will spam your undo list.
Setting breakpoints #
Now you can draw your “key switches” using the automation envelopes in the timeline. The names are displayed as soon as you hover with the mouse over the red line or the breakpoints.
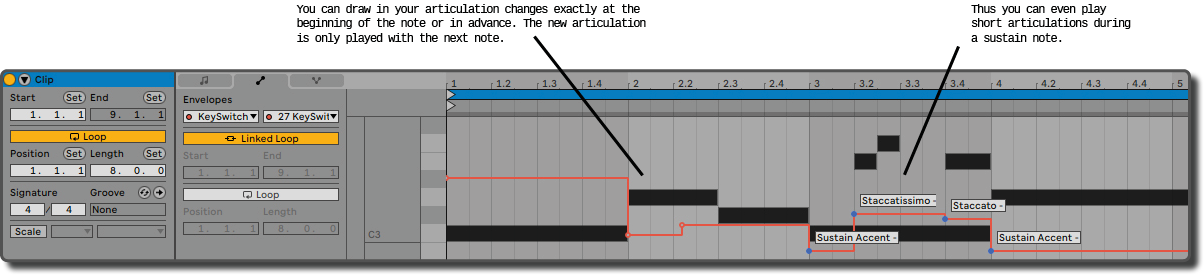
If you switch between software instruments, articulations or MIDI effects, you do not have to set the breakpoints exactly at the beginning of the note. Instead you can draw them in before you change the note. The adjustments should not affect the currently played note, but only the next MIDI note. This is due to the fact that the MIDI signal is an event-based protocol. The currently played note was started with the chosen articulation in your VST plugin and will only respond from that moment on to a note-off or MIDI controls like Pitch Bend, After Touch, Expression, and so on. Furtunately, this means as well that you could even play short staccato or pizzicato notes during longer notes!
In contrast, audio effects that you control with key switches in combination with an Audio Effect Rack, for example, react immediately to the breakpoints. The reason for this is that the audio signal is not event-based, but flows permanently. This means that as soon as there is a switch, it is immediately routed to another chain of the Audio Effect Rack and no longer is received by the previous effect. An effect like chorus or phaser will then stop immediately, reverb or delay will still fade out with the last received bit of sound.
Hardware instruments will also stop the currently played sound instantly, because the preset will be changed directly when you toggle between key switches, so no sound can be produced anymore by it.
In these two cases, you have to set the breakpoint between two notes. This is very close to playing an analog instrument: The player of a guitar also has to take his finger off the fret a little earlier than noted in the sheet music to be able to reach the following note in time.
Chase MIDI notes #
Since version 10, Ableton Live’s Chase MIDI Notes option allows you to play your song directly with the instrument, articulation or effect you set with the automation envelope, even if playback starts after the MIDI note’s start time. This allows real playback jumps at any point of the timeline, and you will always hear directly the sound with the right articulation or effect setting.
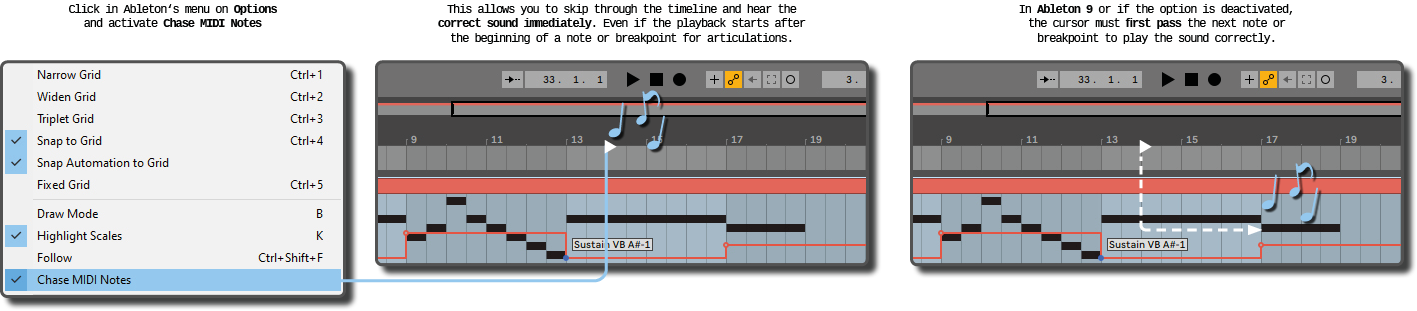
If you are using Ableton Live 9 or have turned off the Chase MIDI notes option in Live 10 or 11, the timeline cursor must first pass the breakpoint to place the articulation change. Hence, only the following note will be played back with the correct sound. In the case of a loop that does not begin with a breakpoint for the articulation, you must therefore draw in an additional breakpoint at the end of the loop to tell the DAW in advance how the first note should be played!
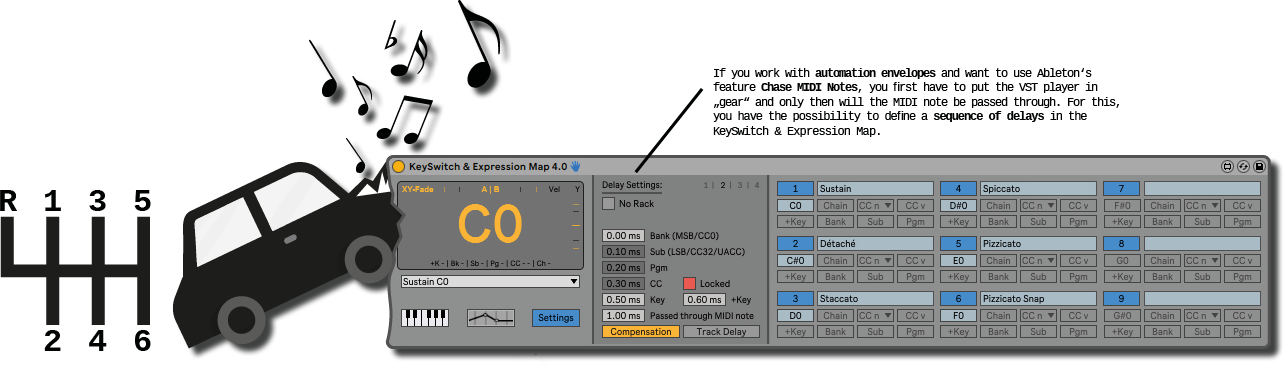
Define delays #
In order to use the Chase MIDI Notes option, it is important that the passed through MIDI note of your melody is sent with a delay of a few milliseconds to give the DAW enough time to make all necessary settings first. This could be switching the chain in the Instrument Rack or selecting the new articulation in the VST player.
If you like, you can compare it to driving a car: Before you step on the gas, you have to put it in the right gear first. Otherwise, only the engine revs up or the car goes backwards instead of forwards.
The delays are only necessary if you want to automate your key switches! In case you play them exclusively live on your piano, you can set all delays to 0 ms, because intuitively you will always press the key switch more than a few milliseconds in advance – unless you are a robot or at least a cyborg;-)
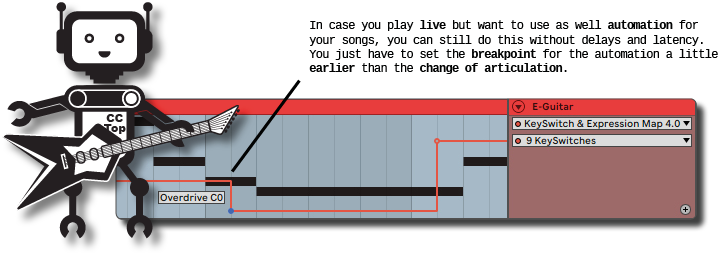
In case you play live but want to use as well automation for your songs, you can still do this without delays and latency. You just have to place the breakpoints with enough distance in front of the note that should be played with the new key switch. The only thing you cannot do when playing live without delays is to jump around in the timeline with the cursor and hearing directly the right sound. In loops you need to set additionally a breakpoint in the end as explained above for users of Ableton 9.
To avoid that you have to spend a lot of time finding the right delay times, it is possible to choose between different presets in the Delay Settings of the KeySwitch & Expression Map.
No rack (for VST plug-in or external hardware) #
Since most users will probably use the KeySwitch & Expression Map in combination with provided key switches of a VST instrument, the preset No Rack is set as default.
In this case, all parameters of the KeySwitch & Expression Map are sent one after the other and the passed through note is delayed by 1 ms in the default setting. You can shorten and lengthen the times or change the order as required.
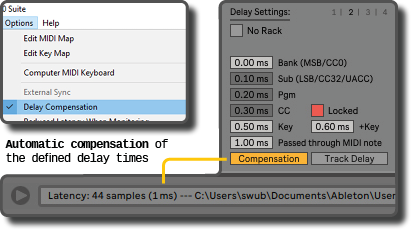
The latency caused by the delays is automatically compensated by the Delay Compensation option, as with other devices in Ableton. The latency of the device is also shown to you in the Status Bar when you hover the mouse over the Title Bar. In the case of the KeySwitch & Expression Map, this should always correspond to the MIDI note that is passed through.
If you are using external hardware, you will most likely have to set a significantly longer delay. With a Korg minilogue synthesizer, for example, this value is around 60 ms. Not something to play live, but should be still okay for composing. However, keep in mind that you also can change presets without delay time and latency when drawing the breakpoint in advance and in a gap between two notes as explained above.
To find out the required delay time, connect your device to the computer as usual. In the article Set-up with an external instrument you will find instructions on how to set up your keyboard, synthesizer or drum pad with the KeySwitch & Expression Map.
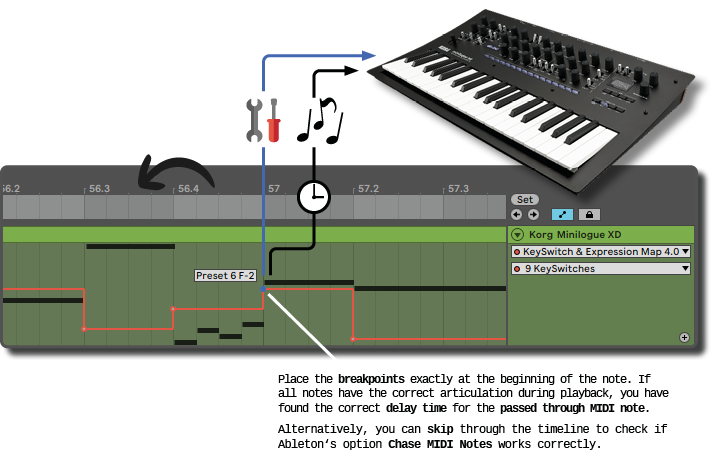
Then create a MIDI clip with a few notes and position the breakpoints for the key switches exactly on the start points of the MIDI notes. You have found the right delay time if the MIDI notes are always played with the correct preset. Additionally you can test if the note is always played with the right sound when skipping through the timeline.
You can use the described method for all other set-ups as well!
Rack #
When using a Live Rack, first choose whether your rack filters MIDI controls or not. You can easily set this by right-clicking on the Chain Select Ruler. By default, the rack only filters the MIDI notes to send them exclusively to the selected chains and their instruments. In contrast, the MIDI controls are sent through all chains. This means that all your instruments in the rack will receive the Program Changes and CC messages from the key switches, regardless of whether the chain is selected or not. If in doubt, activate the MIDI Control Filter, so that especially your connected hardware instruments do not go crazy and change programs wildly. This can lead to nasty surprises when you play live and do not realize that the preset has changed in the meantime. In the worst case your keyboard might play the sound of a piccolo instead of a fat baseline;-)
To change the chain of the Live Rack, the KeySwitch & Expression Map first sends the Chain Value to the Chain Selector or rather Chain Select Ruler. Only when it has jumped to the new position with a small delay, the remaining parameters of the key switch and the passed through MIDI note can be sent. How long this delay has to be depends on your hardware and the used buffer size of your soundcard. I did some tests with different soundcards to create some presets based on buffer sizes as an orientation. The delay times for each preset are chosen generously and should work out of the box for most users.
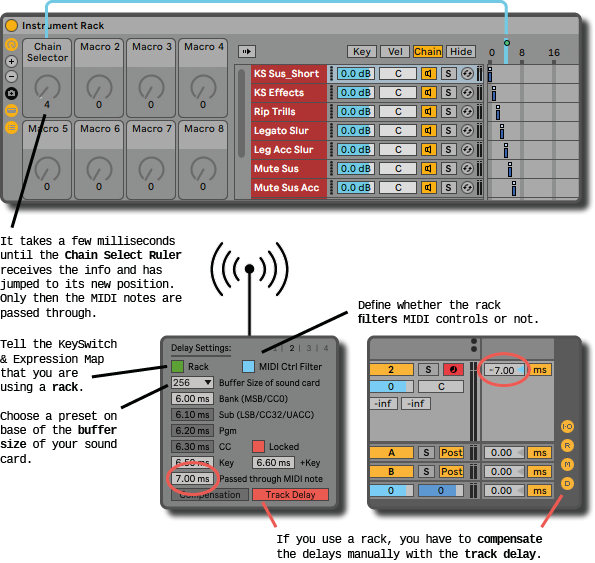
Set the buffer size of your sound card in the menu and test as described above with a MIDI clip whether the sound is played back directly with the correct preset. If not, select a higher value for the buffer if necessary. Basically, the smaller the buffer size, the shorter the delay can be.
If you use a rack, you have to compensate the latency manually via the Track Delay Section. To do this, you set the delay time for the track to the delay of the note that is passed through.
MIDI Controls #
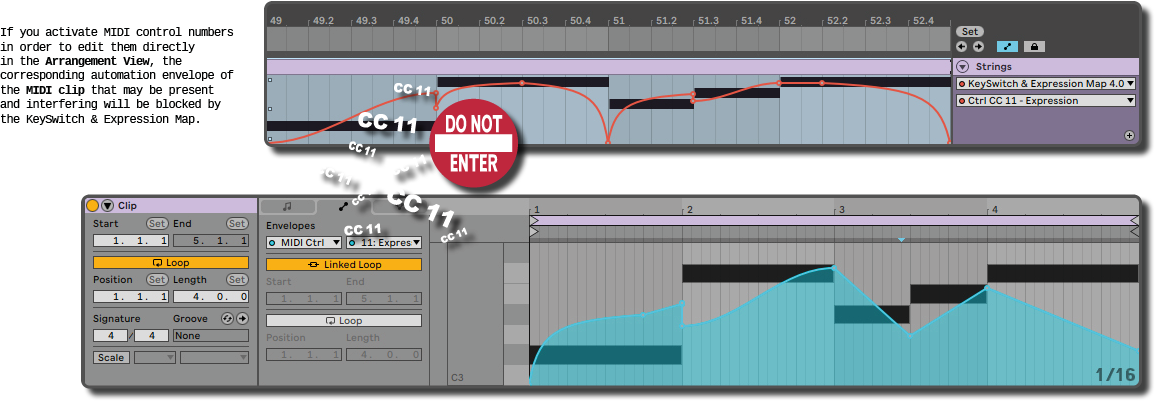
Normally, you can only edit and record MIDI controls and program changes in the MIDI clip with Ableton. However, the KeySwitch & Expression Map allows you to do this in the Arrangement View as well. If necessary, it filters the values of the envelopes defined in the MIDI clip out of the MIDI signal and replaces them in this case with your own values for the MIDI controls you have activated in the KeySwitch & Expression Map.
As described at the beginning, this is especially helpful for things like dynamics, volumes, modulations, expressions, depth of a vibrato, AB switches, crossfades, panning, etc., because you can easily see and edit the automation envelopes of the different instruments in relation to each other in the Arrangement View. MIDI controls such as Hold Pedal or Portamento Time, which are more related to the notes themselves, I personally usually leave them in the MIDI clips with the notes. Theoretically, however, you can also edit them in the Arrangement View.
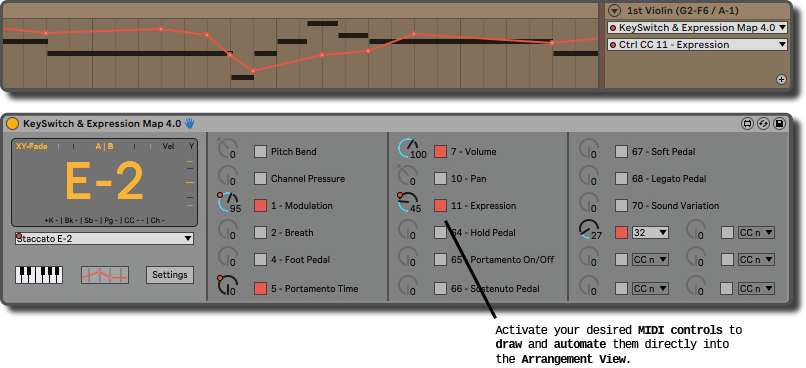
The MIDI control numbers that you do not find in the list can be selected and set as one of the four custom controls from the menu. There you will also find the MIDI Controls CC0 and CC32, which correspond to the Bank and Sub Bank.
Info: The MIDI controls described here are of course not delayed by the delay settings in the KeySwitch & Expression Map. Only the MIDI controls of your key switches.
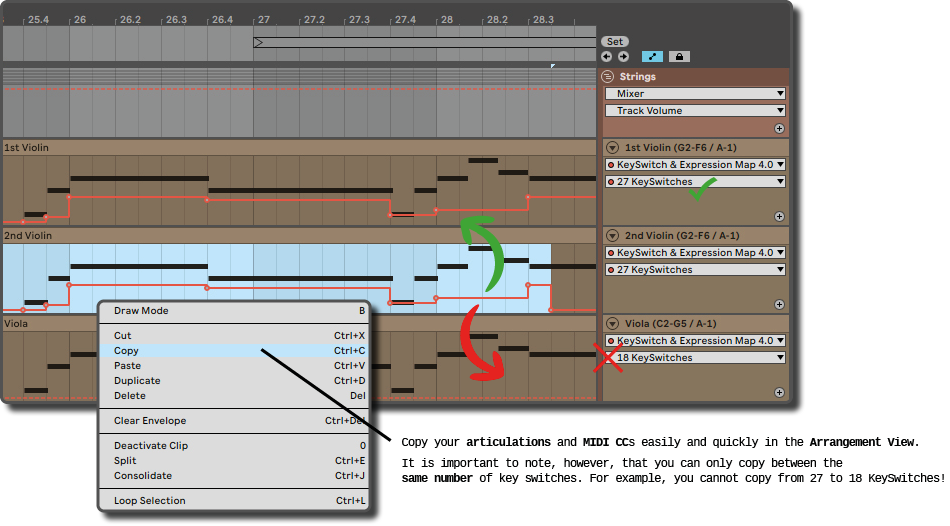
Copying Automation Envelopes #
In case you have several instruments playing more or less the same notes together, it can be very handy and time-saving to copy the envelopes for the key switches or MIDI controls between instruments.
Please note that you can only copy & paste between the same number of key switches. It is not possible to copy from 9 to 18 key switches and vice versa! Therefore I would recommend you to set the same amount of key switches at least for all instruments of an orchestra section, even if there are significantly less articulations available for some instruments. Of course, you need to have the articulations also assigned to the same key switches for each instrument 😉
If necessary, you can also copy the automation envelopes for the MIDI controls from the MIDI clip to the Arrangement View.
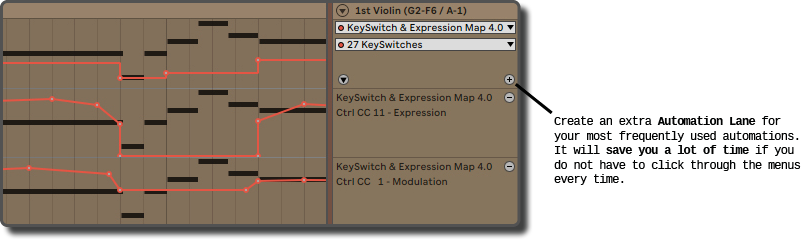
Extra lane for automation envelopes #
If you click on the “+” button, you can permanently display an automation lane for the keyswitches or your most frequently used MIDI controls. This way you do not have to click through the menus every time you want to edit them.
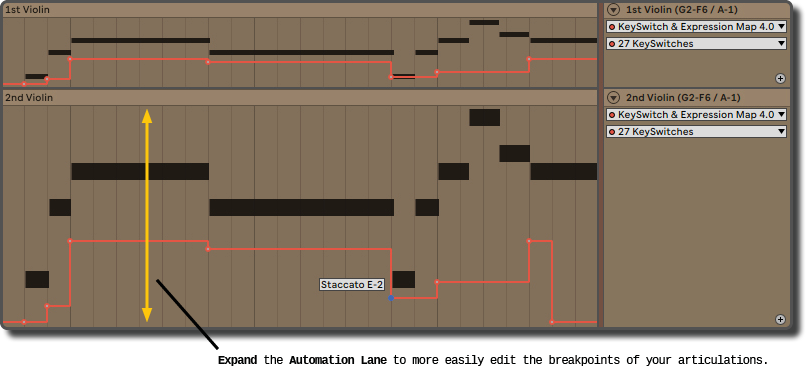
Expand the automation lane #
If you use 27 keyswitches, editing the automation envelopes can become a bit of a fiddly job as the space between each step gets a bit small. In this case, make the automation lane a little larger to make it more comfortable to edit the key switches.
Manual control or automation #
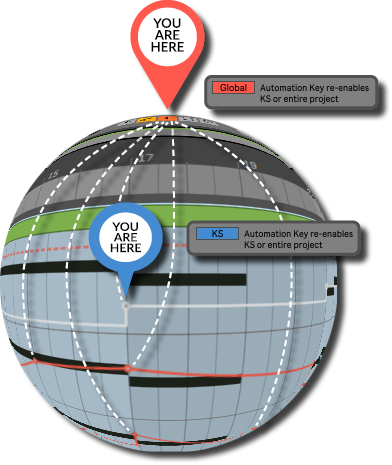
If you want, you can also define a key switch in the virtual piano to re-enable your automation envelopes. This way you can easily switch between manual control and automation with a single keystroke. No matter if you play live or you want to try out articulations or effects spontaneously while composing.
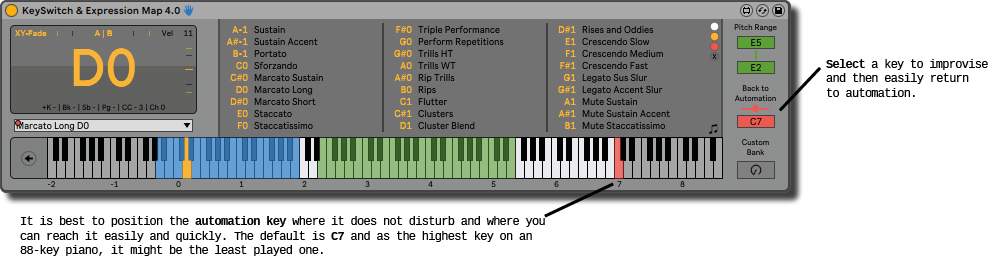
Globally or only the key switches #
Additionally, you can choose whether the selected key for automation should re-enable the automation envelopes of the entire project or only of the key switches.
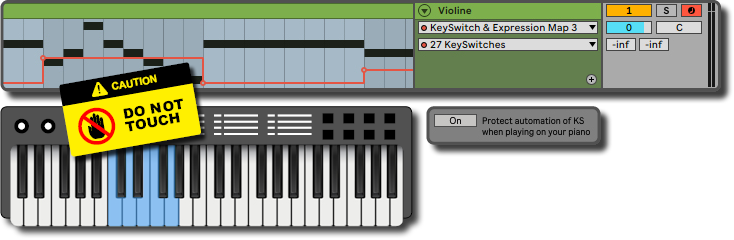
Automation protection #
In case you play live on your piano, but have automated the switching between instruments, articulations or effects with envelopes for your songs, you can protect the automation for the key switches against accidental switching by activating this option in the settings.
Recording Automation Envelopes for Articulations #
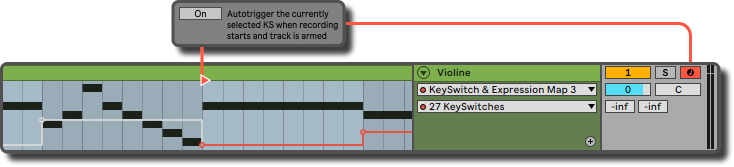
Autotrigger selected KS when recording starts #
You can let the device trigger the currently selected key switch as soon as you start a recording. In this way, you can conveniently set an articulation before recording, even if the automation of the envelope for the key switch gets deactivated by the manual switching beforehand. If you are used to work with the MIDI Arrangement Overdub it might bother you. Leave it switched off then.
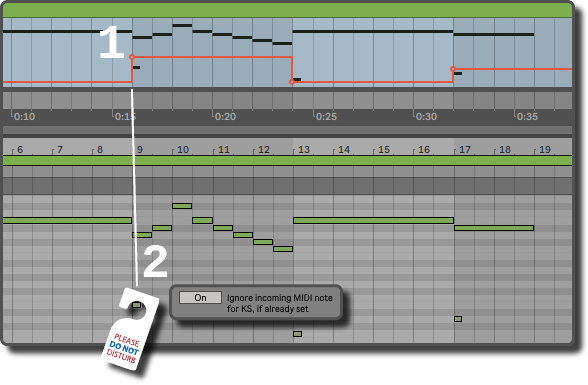
Ignore incoming MIDI note for KS, if already set #
When you play in articulations or effects for a recording with your piano, the corresponding MIDI notes of the key switches are also captured in the MIDI clip. During playback, these “ghost notes” cause the automation envelope of the keyswitch to be deactivated, as they trigger the already set articulation a second time. To prevent this and to avoid that you have to manually delete the notes for the articulation after recording, you can activate this button.