There are numerous providers of sample libraries and virtual instruments. Many companies have developed their own VST plug-ins or players, others use the Kontakt Player as a host. Just as diverse are the possibilities to connect the KeySwitch & Expression Map with them. In this article you will find some examples and tips. The fact that some manufacturers are mentioned here and others are not, should not mean that they are particularly good or recommendable. They are simply those that are available to me. I would have liked to show you more examples!
I would also like to add, that everything written here is neither set in stone nor the last word of wisdom, but only a description of my workflow, which I have developed for myself while working with articulations and the KeySwitch & Expression Map. If you have tips, ideas or improvements, I and other users are very curious to learn more about them and would be happy and grateful to have them supplement in the article!
If your player is not in the list, it is best to read the SINE Player in the first place. The player has a very minimalist design, but nevertheless offers plenty of options. Perfect, to explain you the principle and different possibilities how to connect the KeySwitch & Expression Map. Therefore I have written some general remarks in the description of this player. If you then also skim the texts for the other ones, you will definitely find answers and a lot of inspiration for the player of your sample library.
Orchestral Tools’ SINE Player #
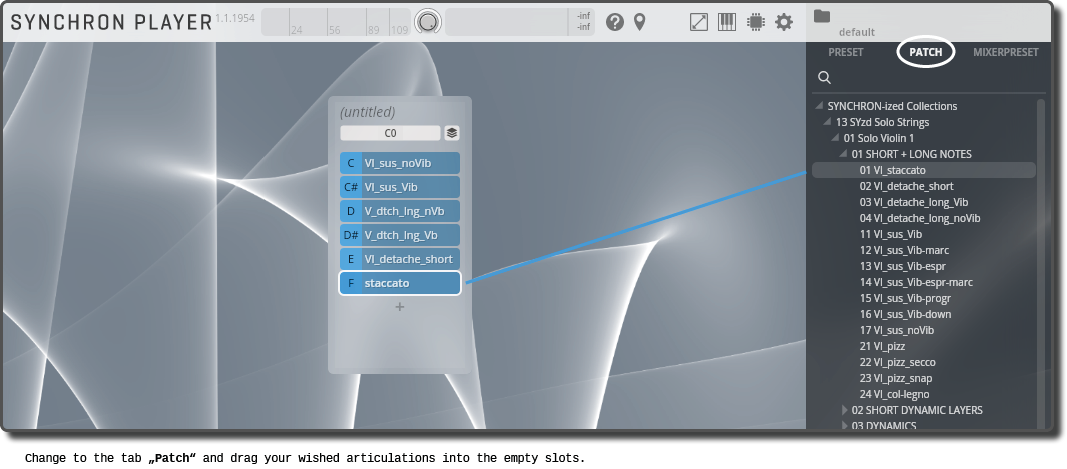
In SINE Player, you can create your own articulation patch with just a few clicks. You only need to drag the wished articulations into the articulation list.
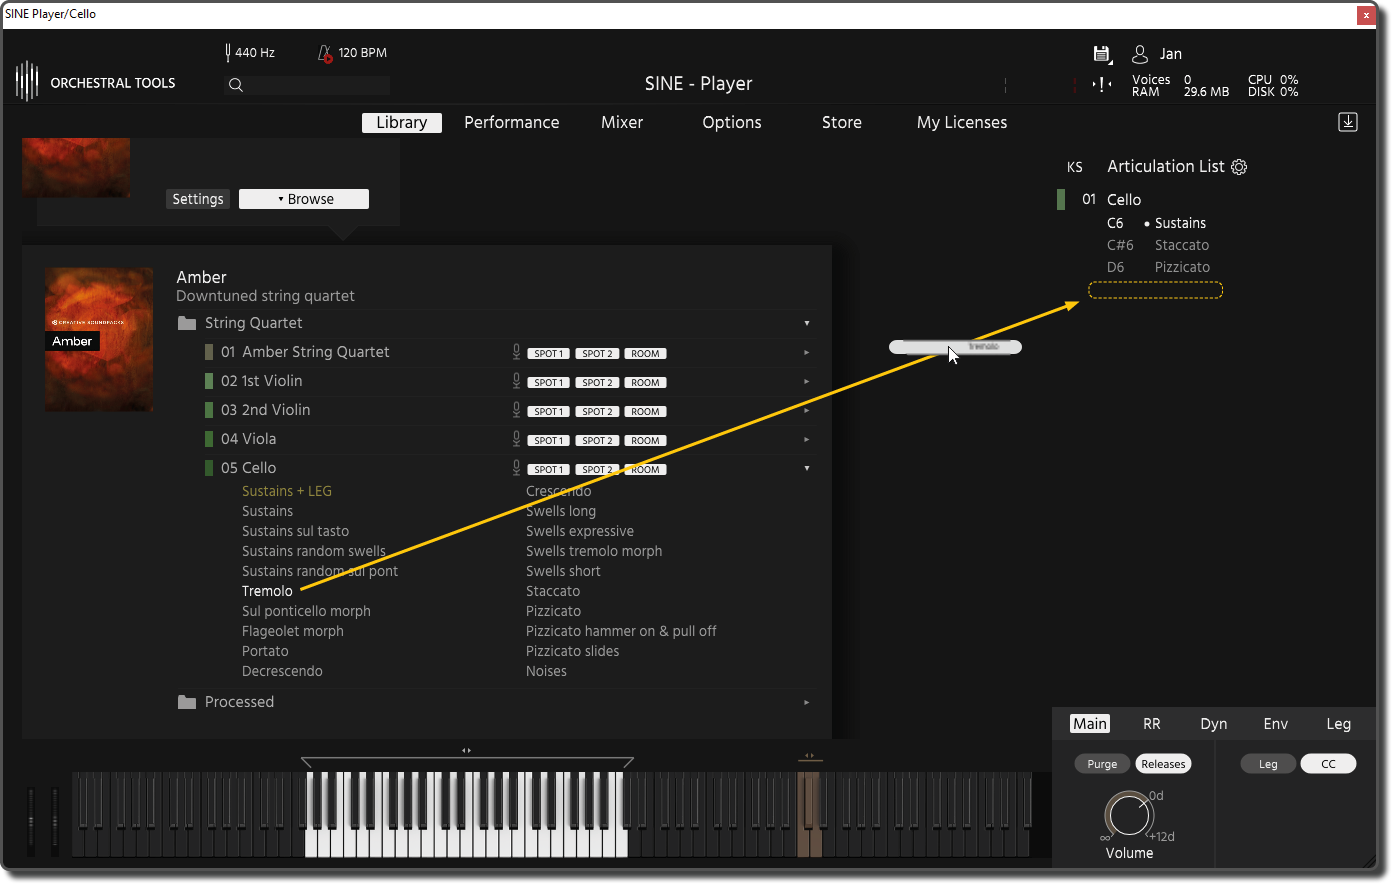
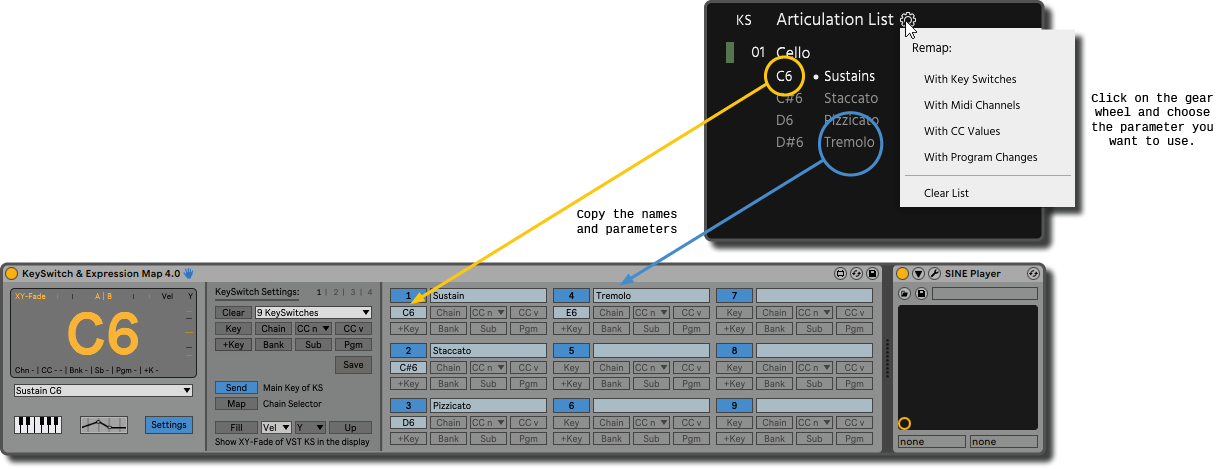
Generally, I would advise you to use this method with any player which offers you that possibility and not to create your own key switches with the help of an Instrument Rack in this case. Creating patches is very easy with most of these types of players and works quickly via drag and drop. To remotely control the resulting patches, all you have to do then is to copy the notes, program changes or CC values into the KeySwitch & Expression Map, give them a name and hit save. Which parameter you use in the SINE player, you can set easily with a right mouse click on the gear wheel.
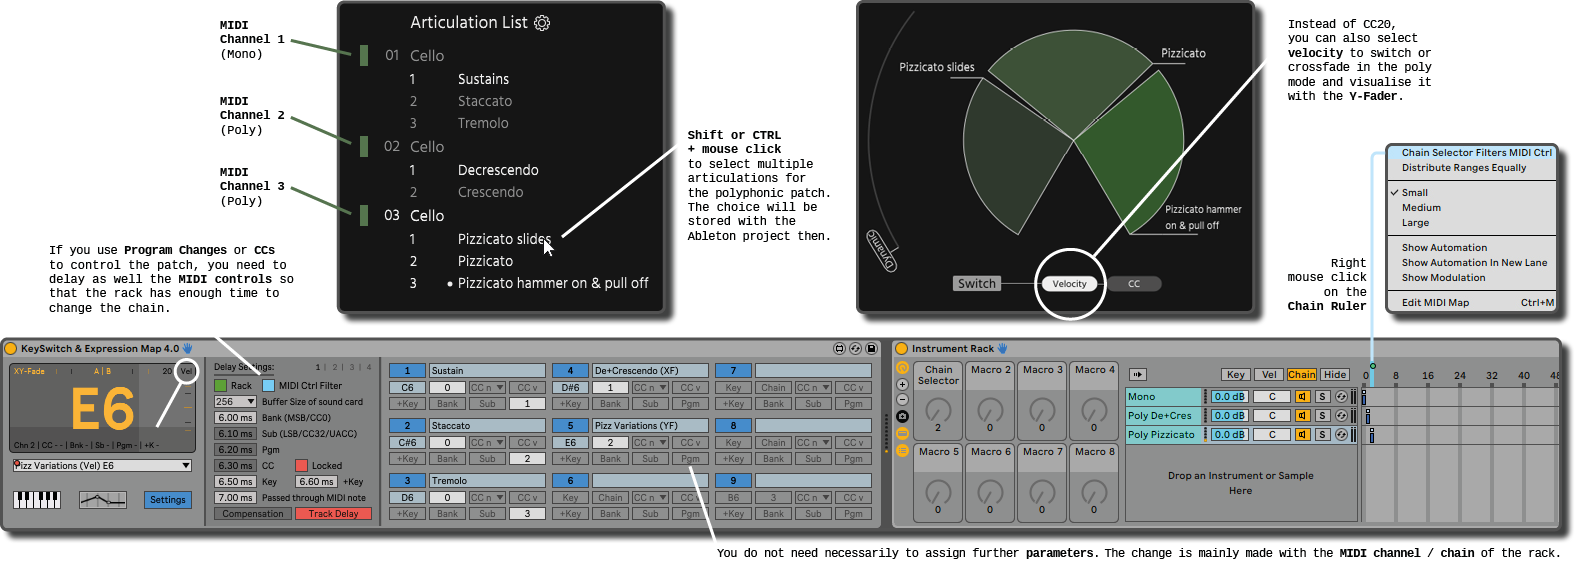
I personally try to use Program Changes as far as possible with all players, because this way you are completely independent and can choose for yourself whether you want to use classic key switches for articulation changes or not. If you only want to control the articulations with automation envelopes or a MIDI controller anyway, there is no need to restrict the keyboard of your piano with key switches. But even when using classic key switches, this can have advantages. For example, you can flexibly decide where they should be positioned and, if necessary, move them quickly with the AutoFill option of the KeySwitch & Expression Map without having to change them in the VST player, too.
Attention: The implementation of Program Changes has changed in VST3. It is not a MIDI message anymore, but a parameter of the VST. Therefore, you cannot successfully send Program Changes from the Keyswitch & Expression Map to your VST3 plugin, nor from Ableton’s MIDI clips. You have to use the VST2 plugin of your player for Program Changes. It’s a pity!
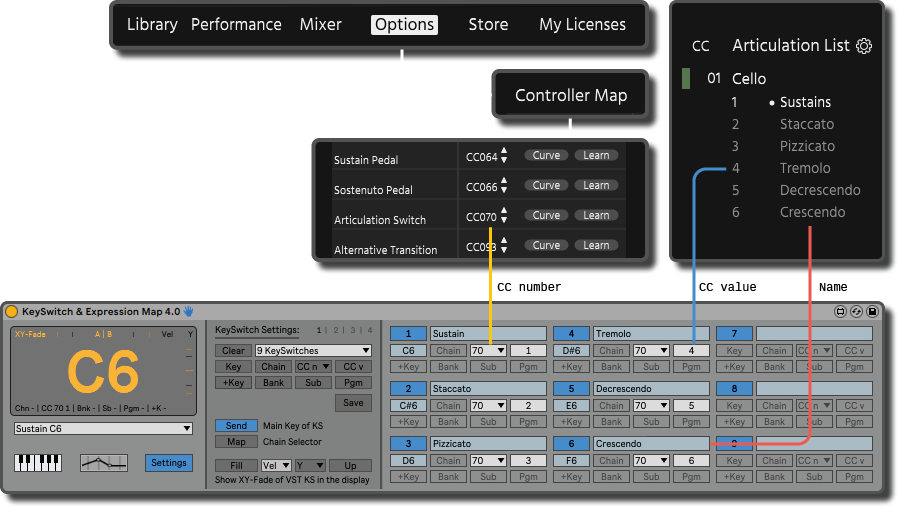
CC values would of course also be suitable for this, but often players distribute them over the whole MIDI spectrum from 0-127 and each articulation is assigned to a MIDI range which is calculated by the player based on the number of articulations. (127/number of articulations = MIDI range of an articulation) If you later decide to add more articulations, this then means that these ranges are recalculated and you have to adjust the values in the KeySwitch & Expression Map again. Program Changes are usually assigned consecutively in the players (1, 2, 3, 4 etc.). If you have 4 articulations like in our example and add two new ones, these simply get the value 5 and 6. The rest of the articulations remains untouched!

Tip: The SINE player allows you to choose if you want to use CC ranges or consecutively numbered values. To do this, click a second time on “With CC values” in the menu as shown in the picture above on the right.
The set-up in the KeySwitch & Expression Map would look with CC values like this:
While in the SINE Player the numbers are comfortably visible next to the articulations, in other players the values for Program Changes or CC values are often not displayed. That might be another argument to use Program Changes instead of CC values when your player uses MIDI ranges for CC values. In this case you always have to try around a bit to find the right value of the articulation. With Program Changes, on the other hand, you would only have to count through the slots and you immediately know which numbers are to be entered in the KeySwitch & Expression Map.
If you want to control the articulations in the player with MIDI notes, you have to make sure that the note of the key switch is sent from the KeySwitch & Expression Map to the VST plug-in. Conversely, you can also filter them out of the MIDI signal if they lead to unwanted sounds. This is for example the case with synthesizers, since they are playable in the whole MIDI range, unlike acoustic instruments with a restricted pitch range.
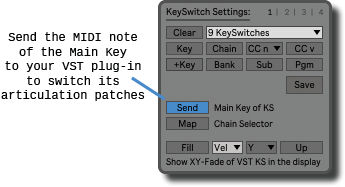
With the SINE Player you can quickly adjust the range of the key switches. If this is not the case with another player and they are not transposable, you can also send the Additional Key (+Key) to the VST Player and have the Main Keys of the KeySwitch & Expression Map available to position them where you want to play your key switches instead. For instance, this can be helpful if you are used normally playing all key switches on a second piano in the octaves C-2 to B-1.
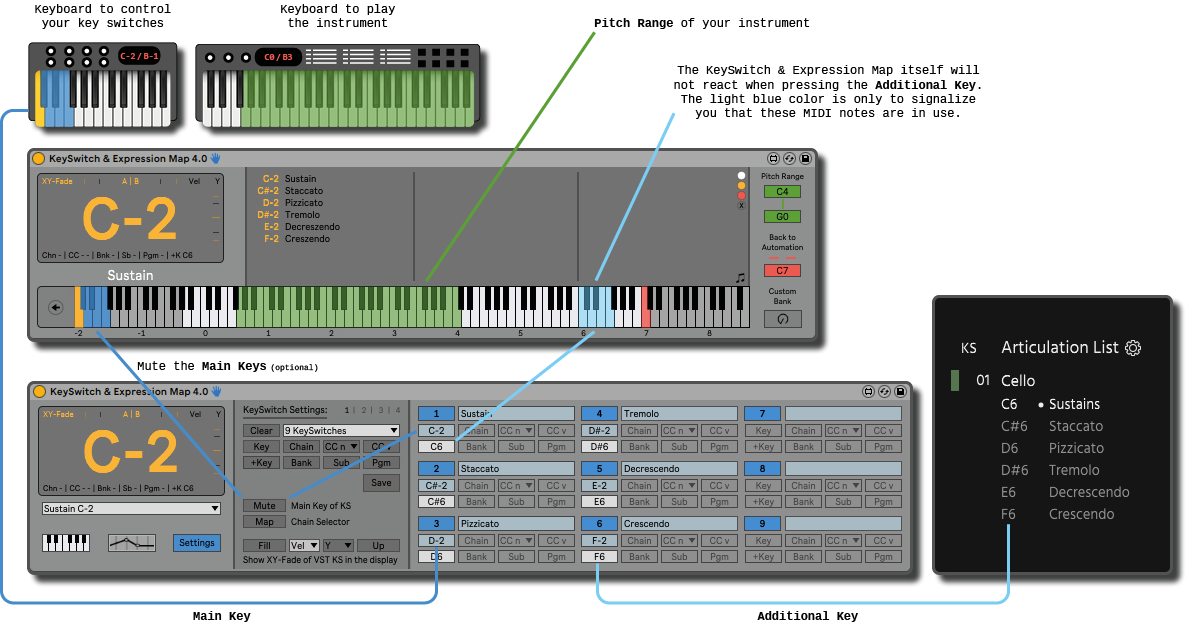
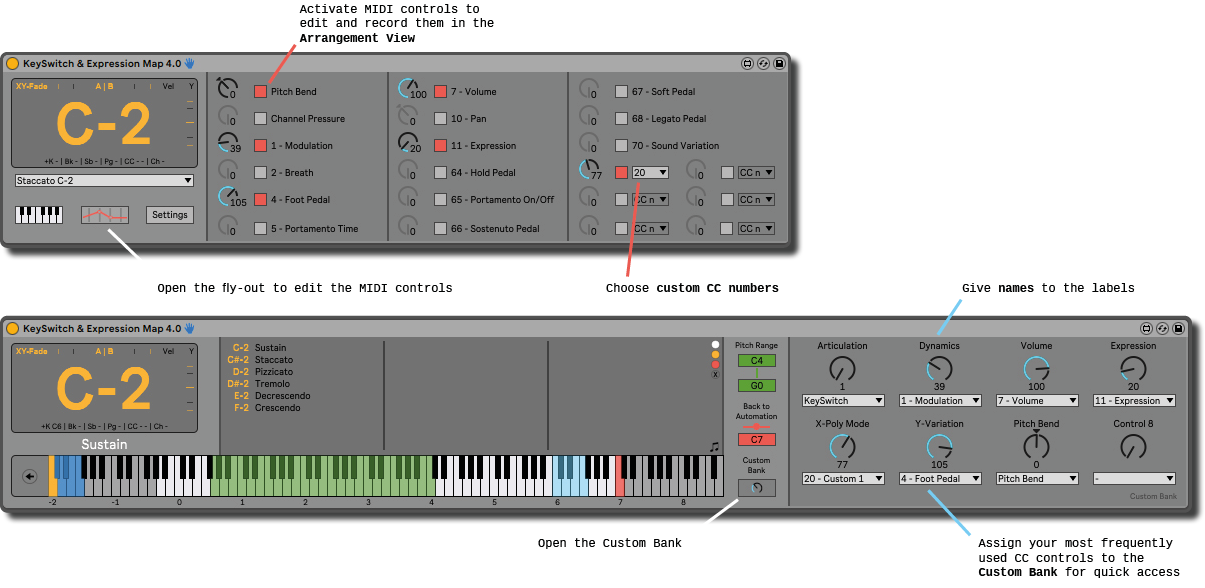
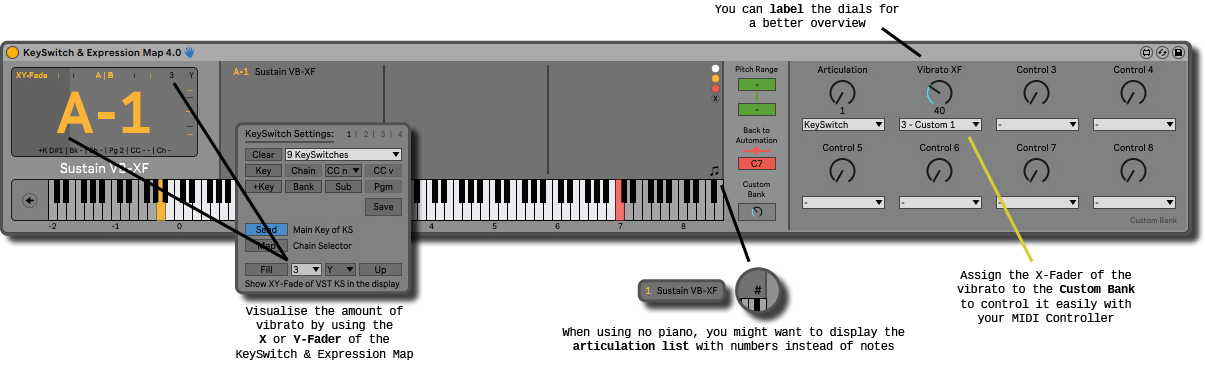
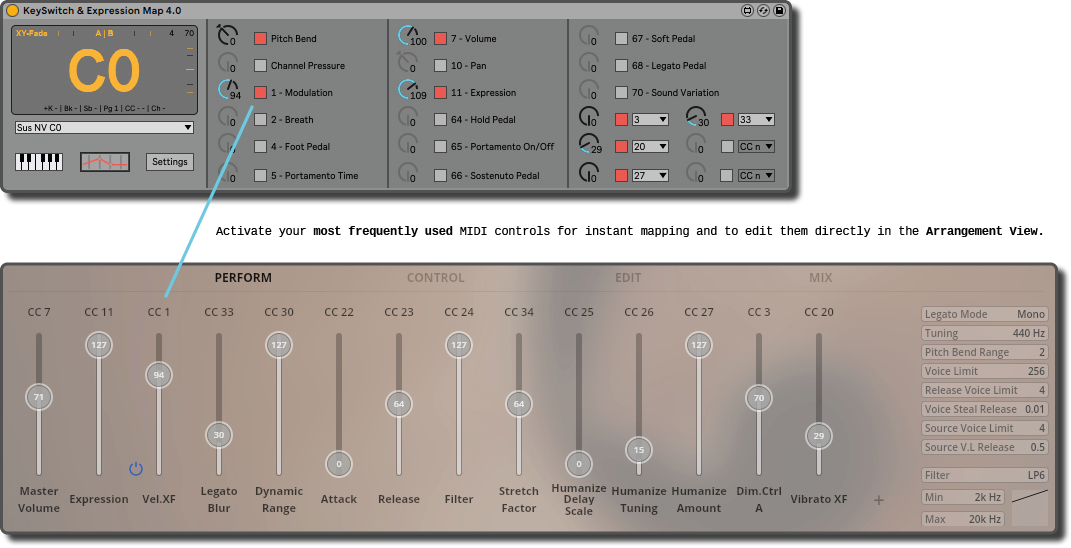
With the KeySwitch & Expression Map you can record and edit MIDI controls in the Arrangement View. Simply activate the corresponding MIDI controls and assign them to the eight device controls in the first Live Bank. This way you always have quick access to them without having to change banks. CC numbers which are not listed by name can be added as Custom CCs if required.
The SINE Player allows you to x-fade polyphonically between articulations in addition to monophonic articulations. In the display of the KeySwitch & Expression Map you can display this X-Fader or Y-Fader to always have a good overview of which articulation is currently set.
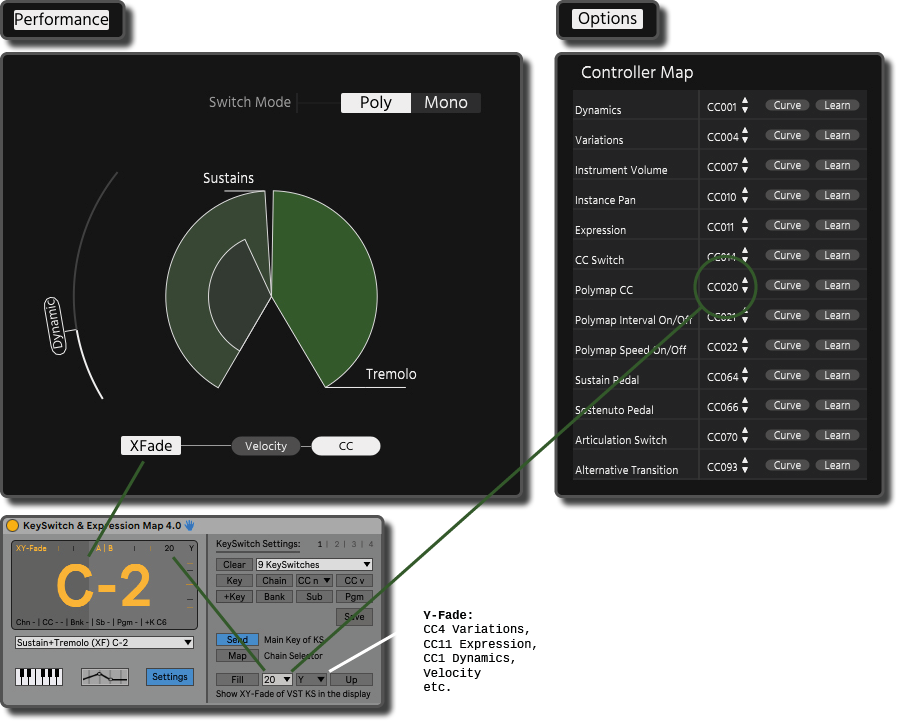
However, I would advise you to use polyphonic key switches in combination with the KeySwitch & Expression Map always in additional MIDI channels.

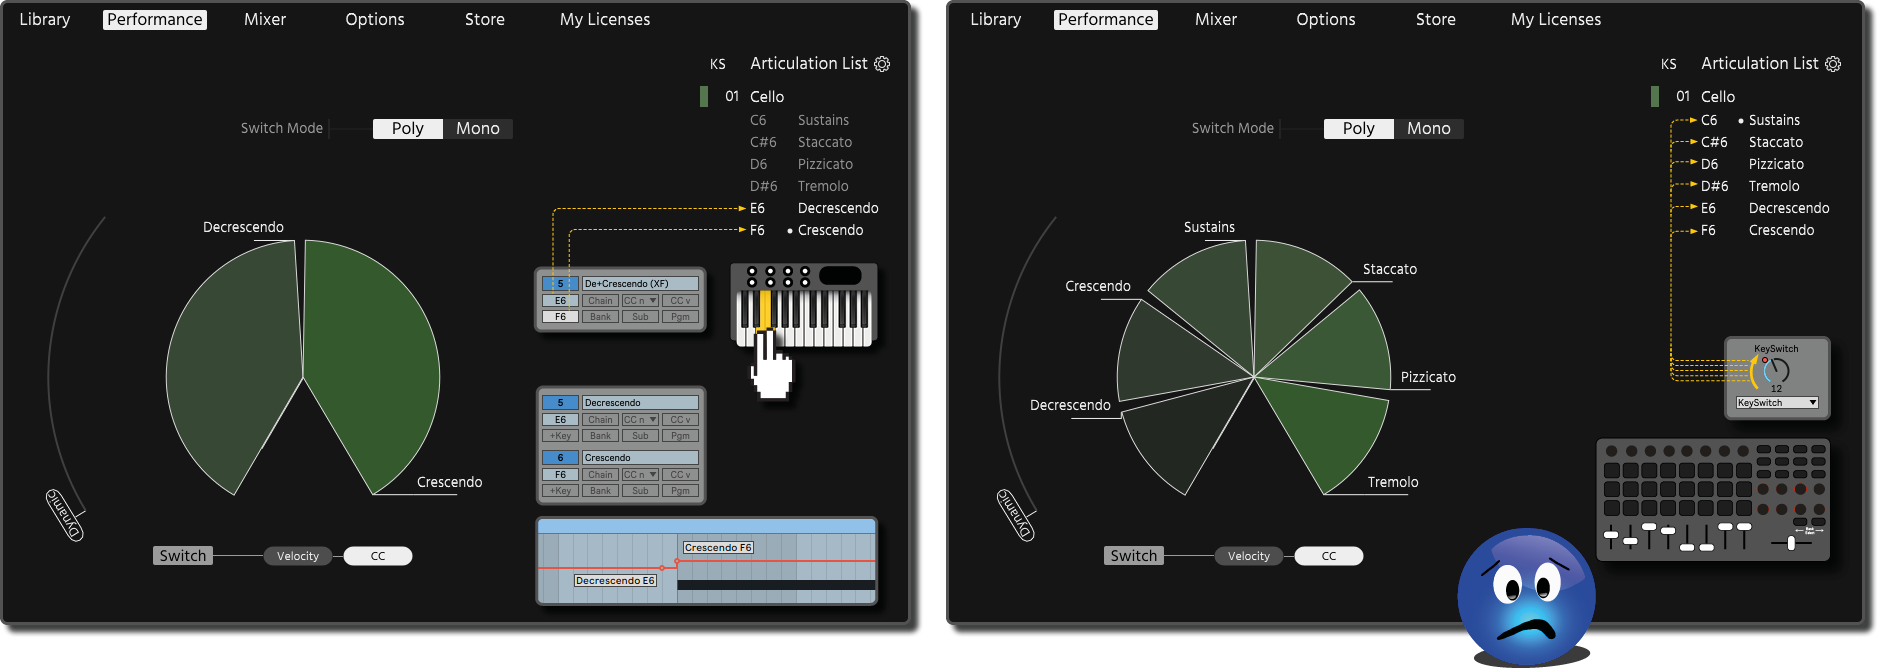
In the chapter Control/Automation Envelopes or under Knowledge/What is MIDI in a nutshell I explain how great it is that the MIDI signal, unlike the audio signal, is based on events. So it only sends a message when there are “news” or a change. In practice, this means that you can change articulations while a sustain note is still playing. Furthermore, you can even play short staccato or pizzicato notes in between.
But this does not work in SINE Player if the articulation list is used in polyphonic mode. The currently played note is then immediately stopped when switching and even disturbing noises can occur. This is not a bug in the player. Rather, the programming of the SINE player and the KeySwitch & Expression Map get in each other’s way. There is the saying “Too many cooks spoil the broth”. Exactly this is the case here. Both softwares actually want to give you a great performance when playing with different articulations. But the result is: no good performance, because mistakes can happen when selecting the articulations.
The reason for this is that in polyphonic mode you can load several articulations into the SINE Player’s Switch Mode by pressing their notes as when playing fast arpeggios in quick succession or together as a chord. This means that with the KeySwitch & Expression Map, you would theoretically be able to load two articulations into the Switch Mode using the main and additional key of a key switch to cross-fade between them. Alternatively, when using automation envelopes, you can accomplish the same thing with a quick sequence of breakpoints. So far, this is actually a cool thing! Unfortunately, the same thing happens when you scroll through the articulations with the dial of your MIDI controller. This action also calls up the different articulations in quick succession and the result is that in the worst case all of them are selected. Not so cool anymore:-(
As mentioned before, in this case you should create the polyphonic patches separately in their own MIDI channels and then control them with an Instrument Rack:
- Create a MIDI track and drag the SINE Player into it.
- Create a monophonic list with the individual articulations in the first MIDI channel.
- Create your polyphonic patches in the channels 2-16.
- Now create a second MIDI track and combine the KeySwitch & Expression Map in this track with an Instrument Rack, as described in the article about Live Racks.
- This time, however, you do not load the instrument itself into the chain of the Instrument Rack, but drag Ableton’s External Instrument into it instead.
- Select the SINE Player in the first menu of MIDI To and the corresponding channel in the second.
- Distribute the Chain Zones in the Chain Editor.
- Add the Chain Values in the Keyswitch & Expression Map and map the KeySwitch & Expression Map to the Chain Selector of the Rack.
- Activate CC20 as custom control in the MIDI control interface and assign it to the X or Y- Fader.
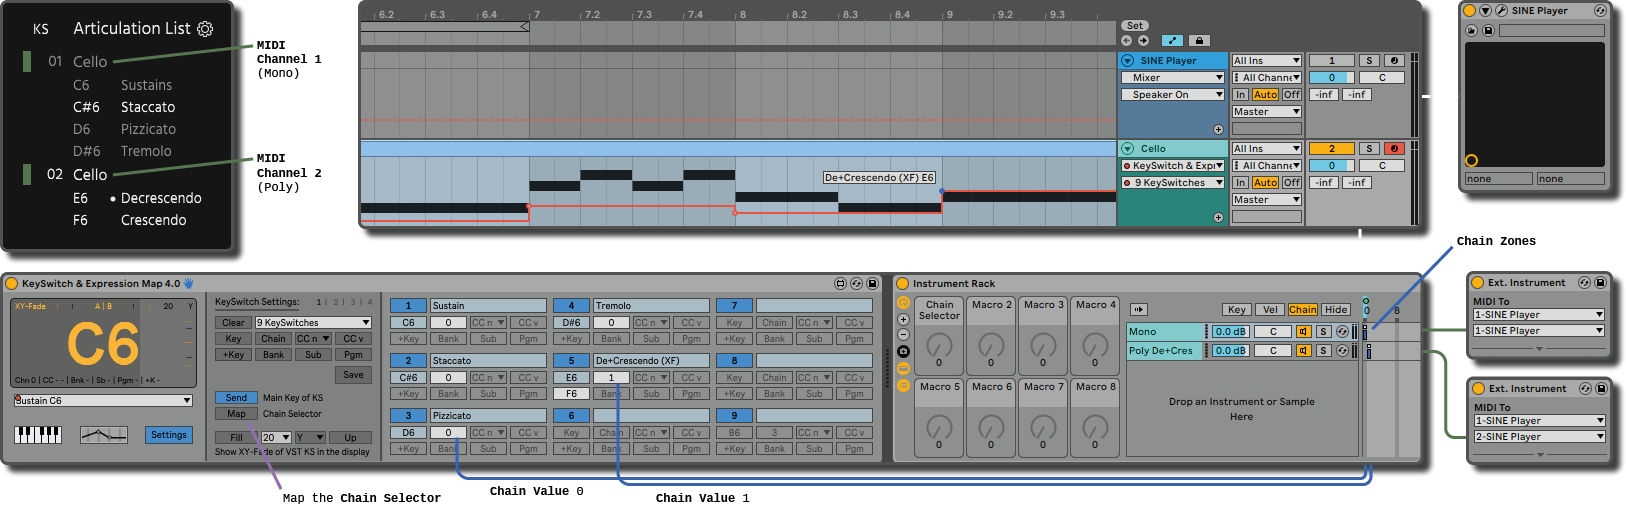
Please note that when using a rack, you still need to set the delays if you want to use automation envelopes with the “Chase MIDI notes” option.
In case that you use several MIDI channels in combination with an Instrument Rack and you assign Program Changes or CC values to your polyphonic patches, it is very important that the Chain Selector filters additionally the MIDI controls. Otherwise, the articulations that you have manually selected with the mouse (shift or CTRL + mouse click) in the patch, will be modified or deselected!
Hence, even if this set-up works as well reliably, defining only two articulations in combination with the main and additional key for a polyphonic patch, would be more rock solid for live gigs. In that case both articulations will be called up by the KeySwitch & Expression Map every time you switch to the polyphonic patch.
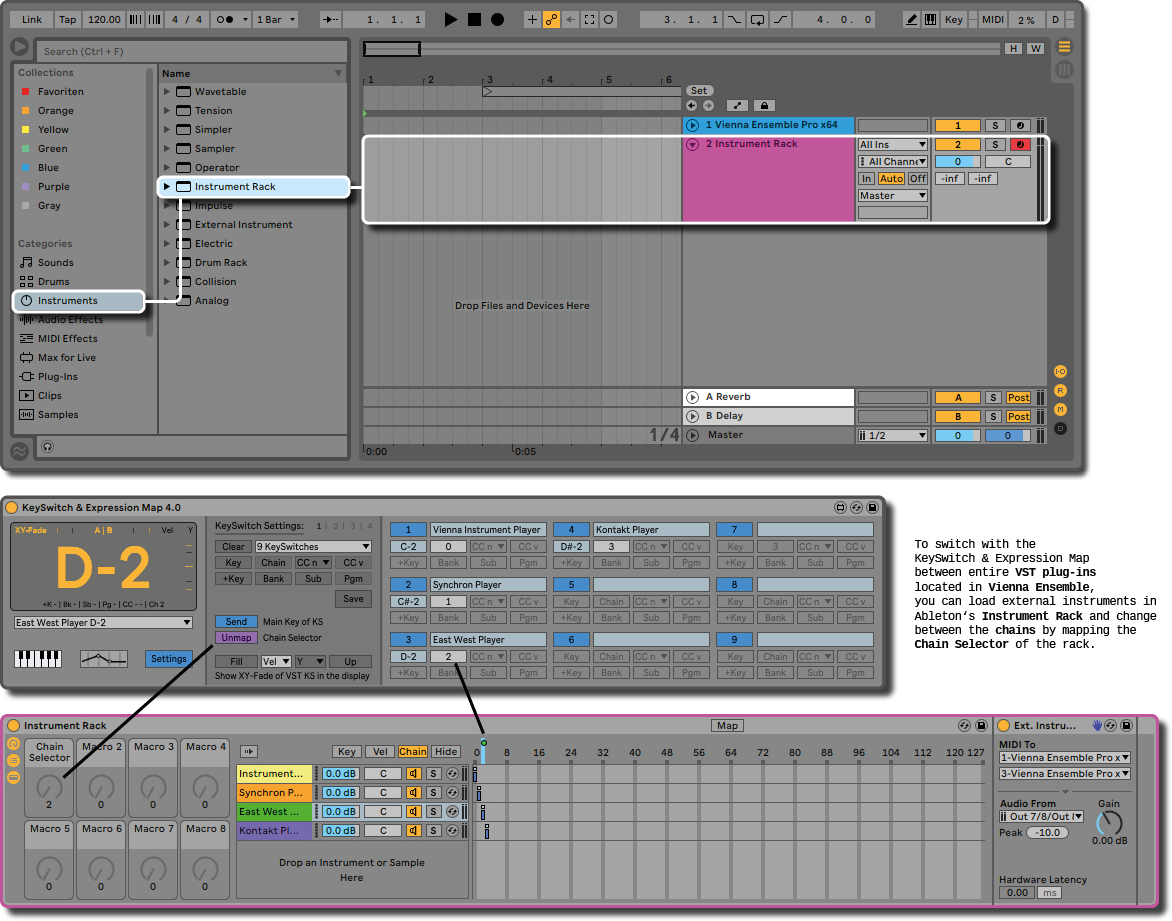
Info: You can always use this method with the Instrument Rack and multiple external instruments if you want to control different instruments or articulations spread over MIDI channels within a player. This is especially interesting for users of Vienna Ensemble Pro 7, Kontakt Player or when creating custom key switches with East West‘s player Play.
User Manual:
Orchestral Tools – SINE Player
Vienna Symphonic Library (VSL) #
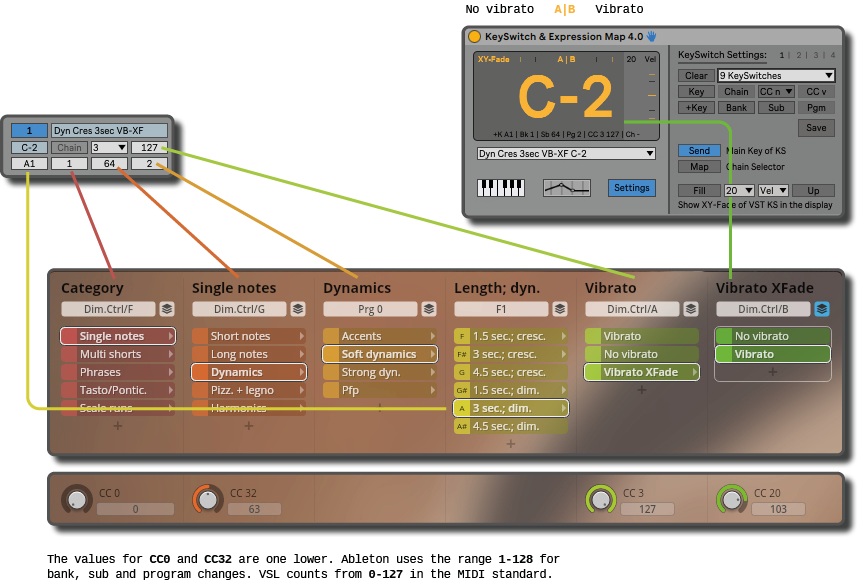
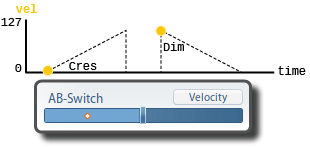
It is possible to use the KeySwitch & Expression Map to remotely control the different matrices or dimensions of the players of VSL and even to show AB-Switches or Crossfades in the display of the KeySwitch & Expression Map with the XY-Faders. As long as you have entered all parameters correctly, this works reliably and flawlessly!
However, I would like to remind you that both players put you like almost no other in the luxurious position to customize your key switches with a few clicks exactly to your needs. In other words, you might not have to go the way of countless slots, matrices and dimensions and make your life so complicated. Often it is easier and quicker to just create the desired articulations in the player.
Vienna Synchron Player #
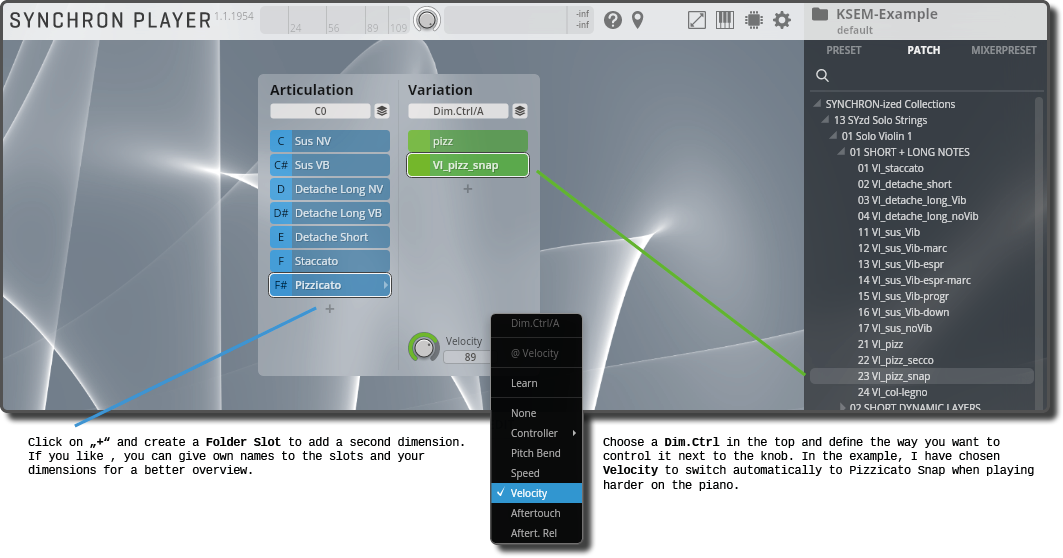
The Vienna Synchron Player allows you to select different articulations of an instrument using a tree view. The vertical rows are called Dimensions and can contain so called Folder Slots and/or Patch Slots. In other words, you have folders, in which either other sub folders or the articulations are located. But the special thing now is that you can open and close these folders, scroll through or select them by notes, program changes or Dimension Controls (CC, Velocity, Speed, After Touch etc.).
Each library comes with ready-made presets that are organized in up to six Dimensions, depending on their complexity.
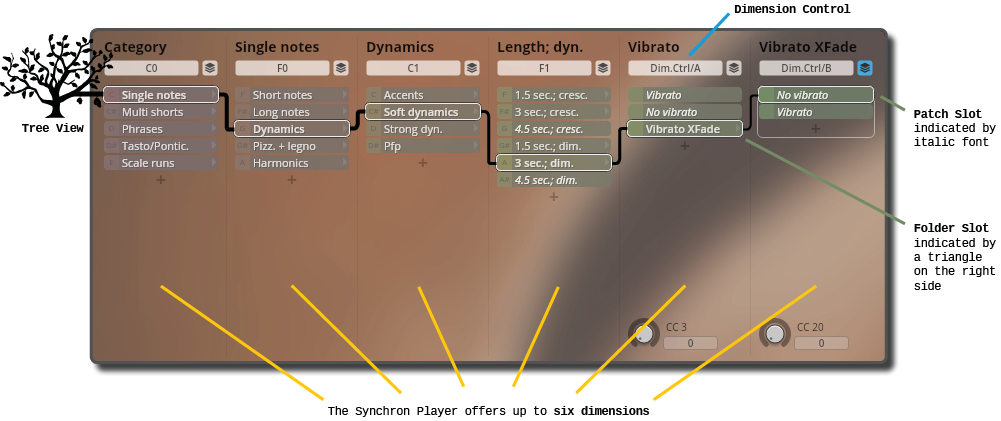
The KeySwitch & Expression Map also provides you with six parameters that can be defined per key switch.
Main Key (Note 1)
Additional Key (Note 2)
Bank (CC0)
Sub Bank (CC32)
Program Changes
Control Changes (CC?)
In other words, theoretically you have enough parameters to control all dimensions of the Synchron Player. In practice, however, it is not very often that you will find six dimensions in the provided presets. And if this is the case, there is usually an X-Fade in the sixth dimension anyway, which you probably want to use and not just select rigidly with your key switch. This you could have done already in the fifth dimension!
In the example above you can see that four different notes are used. Since we only have two available in the KeySwitch & Expression Map, you have to replace two of them.
There are several ways to do this, and there is even the question of whether you should really use the two notes. If you only want to control your articulations with automation envelopes or a MIDI controller, there is no reason not to do so. But if you want to play key switches on your piano, you should only use the Additional Key and keep the Main Key of the KeySwitch & Expression Map to control its key switches. Otherwise you switch with the Main Key only between the slots of a dimension and not the articulations.
Basic Preset
This may sound very complicated and like a lot of work, but it is not really. If you only want to use automation envelopes or your MIDI controller, you do not even need to change anything in the Basic Presets. If you want to use the Main Key for your own key switches, then you just change the first dimension to Program Changes with one click and then transfer all the values to the KeySwitch & Expression Map.
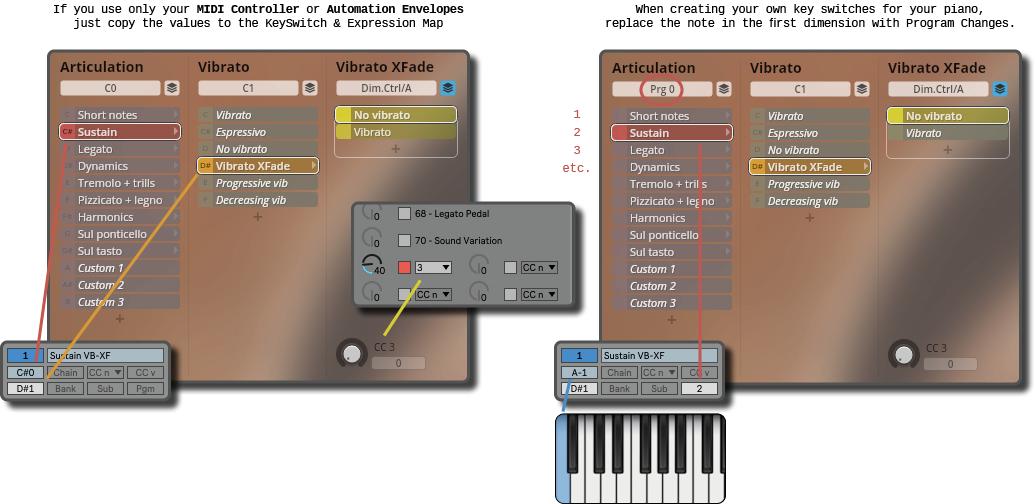
If you like, you can add the X-Fader of the vibrato to the Custom Bank to control it easily with instant mapping. Furthermore you can visualise the value in the display by assigning the CC number to the X or Y-Fader of the KeySwitch & Expression Map. When not using your piano, you might want to display the Articulation List with numbers instead of notes.
Full Preset
With the Full Presets you are fastest or have to think least if you change the first two or three Dimensions. If you want to play the key switches with your piano, it is best to do it as if you would control the sound banks of a keyboard with MIDI signals. First Bank (CC0 / MSB), then Sub Bank (CC32 / LSB) and third Program Changes.
If you only want to use automation envelopes or your MIDI controller, use Sub Bank for the first Dimension and Program Changes for the second. The other Dimensions remain simply as they are.
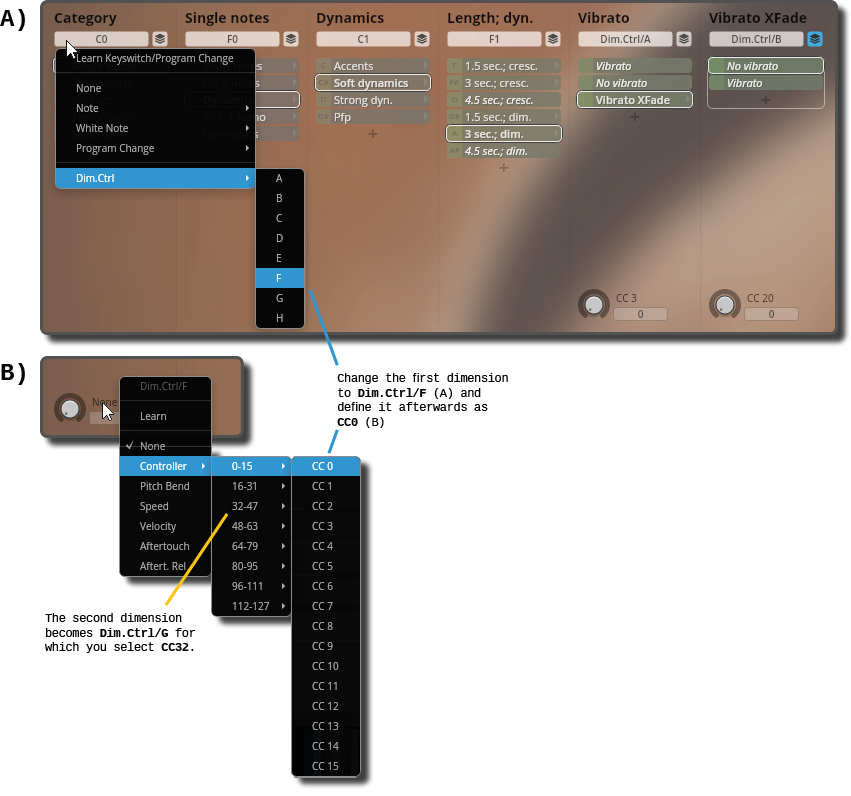
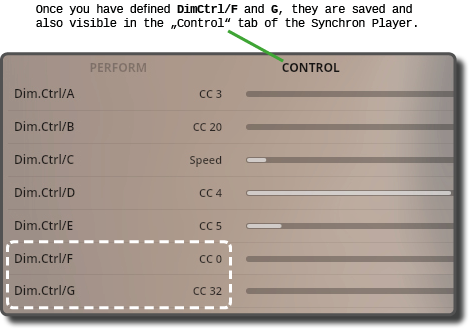
Once you have defined the Dimension Controls F and G, the settings are also shown in the Control tab. Next time, you only have to proceed step A.
For the Program Changes, you simply have to choose the wished range out of the menu.
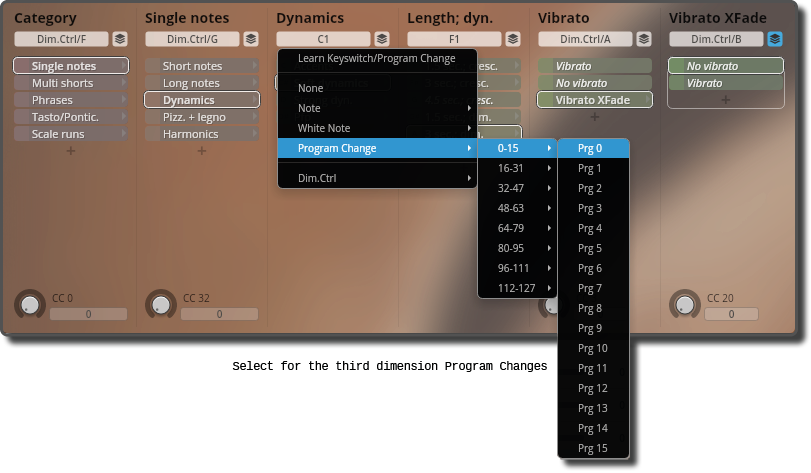
For the second and third dimension, you will most likely have to repeat the procedure a few times, as the property of the dimension changes depending on the parent folder slot. In the case of the solo strings, for example, the third dimension includes dynamics, articulation, key, etc.
Finally, copy the values to the KeySwitch & Expression Map:
User Preset
As mentioned at the introduction, you can of course also create an individualised preset yourself. Since the VSL libraries are known for their large number of samples, it can be useful to first make yourself a cup of tea or coffee and think about which articulations you actually use most often in your projects and really need.
- Are you just doing quick sketches to help you compose? Then you might not need recorded violin runs, crescendos and various vibrato versions.
- On the other hand, if you value authenticity, you may not need a crossfade between non-vibrato and vibrato and rather integrate the patches with the performed espressive, progressive and diminishing vibrato.
Think also about how you want to structure them. Keep in mind that you can load all slots for the 27 possible key switches in the KeySwitch & Expression Map directly into the first dimension.

The second dimension can be used for Crossfades, AB-Switches or for missing articulations that you would like to integrate into your preset. The Dimension Controls, which depend on your playing style, are particularly handy for this. The most interesting ones are Velocity and Speed. But you can also assign a Control Change (CC) to switch between Variations.
Here are a few examples:
| Velocity | ||
| Pizzicato | Snap Pizzicato | |
| Spiccato | Spiccato Harsh | |
| Speed | ||
| Portamento | Legato Slur | |
| CC | ||
| Crescendo | Diminuendo | |
| Runs Down | Runs Up |
At the end, you save it as a user preset so that you can load it next time quickly from the browser. The file is stored in the User Preset Folder.
Windows: C:\Documents and Settings\All Users\Documents\VSL\Vienna Synchron Player
macOS: HD\Your_Username/Documents\VSL\Vienna Synchron Player

If you like, you can clone the preset to other instruments with the same structure and you only have to do the things just explained once!
How to do this is explained here:
https://www.vsl.info/en/manuals/synchron-player/custom-preset-creation
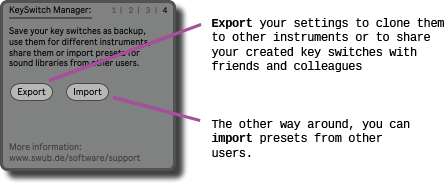
And since we are on the subject. Up from version 4.0, you can also easily export your settings of the KeySwitch & Expression Map. This way you can quickly create a backup, reuse your key switches for similar instruments or exchange them with other users.
As with the other VST players, you can additionally activate your most used MIDI controls in the KeySwitch & Expression Map to have them always in view and to be able to edit them directly in the Arrangement View.
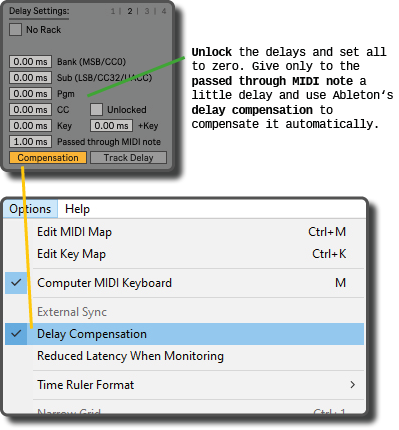
Contrary to what I say about the order of Bank, Sub Bank and Program Changes on hardware instruments in the chapter about the necessary delays, the Synchron Player works best when you send all parameters at once and not one after the other. You only delay the passed through note a little bit to make sure that all settings are done before you play your melody.
User Manual:
Vienna Synchron Player
Vienna Instruments Player #
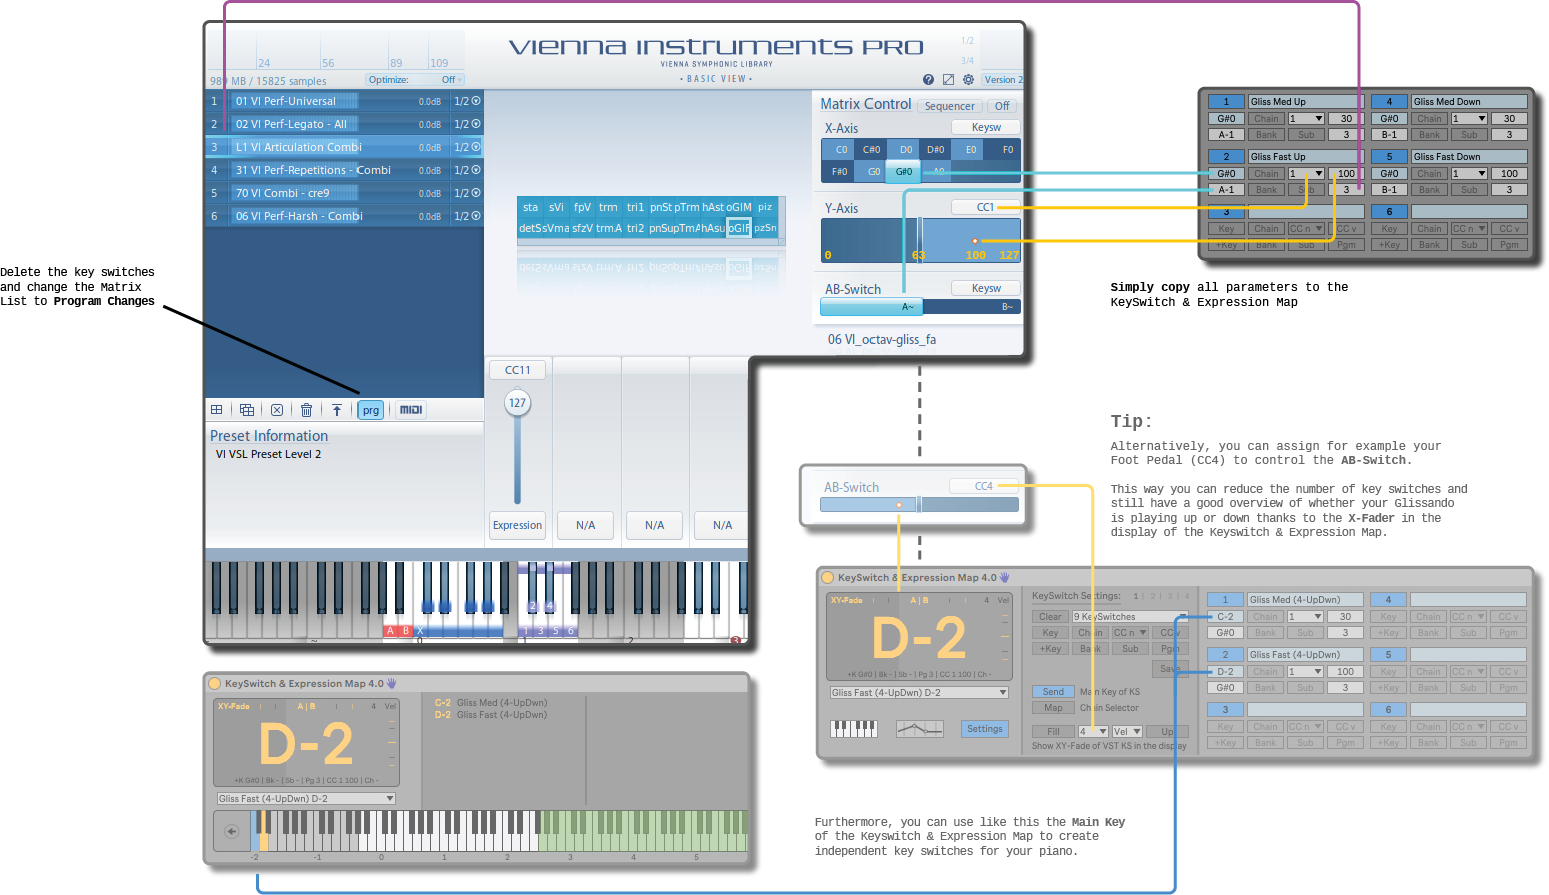
In contrast to the Synchron Player, the articulations of the Vienna Instruments Player are not divided into Dimensions, but into Matrices. Each Matrix consists of one or more Matrix Cells, which can be arranged on an X-Axis and/or Y-Axis. In each of these Matrix Cells you can load Patches with articulations and navigate between them horizontally or vertically with key switches, control changes, velocity, speed control etc. Some patches also offer an AB-Switch. This is mostly used for things like Crescendo or Diminuendo, Run/Grace/Glissando up or down etc.
The matrices themselves can be selected from a Matrix List, which can be controlled with key switches or program changes.
As with the two players above, you simply transfer the values for the Matrix List, X-Axis and Y-Axis from the Vienna Instruments Player to the KeySwitch & Expression Map to control the respective Matrix Cells.
Here are some tips:
Set the selection for the Matrix List to Program Changes and use for the AB-Switch a Control Change (CC) instead of key switches. This brings you two advantages:
- Usually only one of the two axes in the provided presets is controlled with a key switch. The other one is controlled by Control Changes, Velocity or Speed. If you then take the additional key (+Key) as key switch for this axis, you still have the main key available to create independent key switches for your piano with the KeySwitch & Expression Map.
- You can assign the CC number of the AB-Switch to the X-Fader of the KeySwitch & Expression Map. In that way, for example, you can easily see at any time whether you are playing a Crescendo or Diminuendo or if your Glissando goes up or down.
Especially, if you have the Pro version of the Vienna Instrument Player and you are not limited to 12 matrices, I would recommend you to think about creating your own presets.
First, you might be quicker in that way, because you do not have to copy multiple parameters to the KeySwitch & Expression Map.
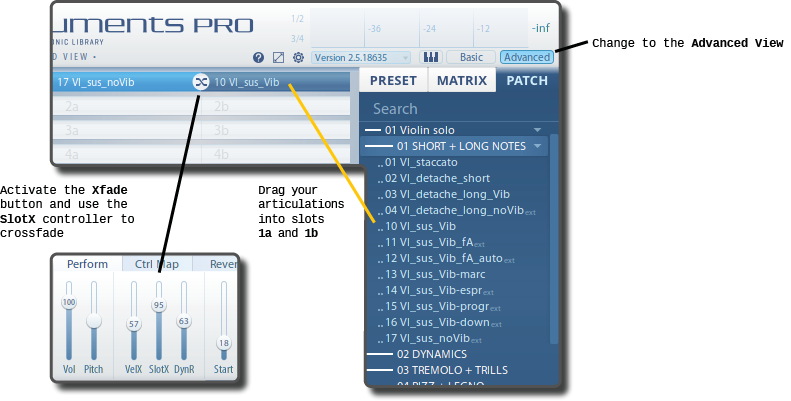
- You create 27 matrices in the list and drag the provided articulation patches into it.
- In the KeySwitch & Expression Map you quickly distribute the keys or program changes with a mouse click using the AutoFill option
- You give your key switches names, press save and you’re done!
Second, you will be amazed how much articulations and variations you will be able to include in your own preset when using additionally the X and Y-Axis for variations.
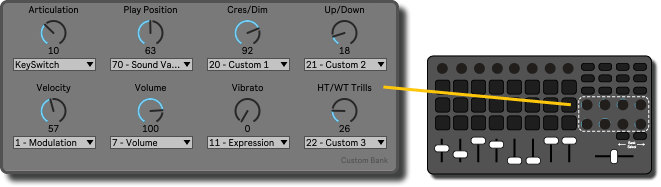
Here’s an example of a user preset I built earlier this year. The focus of the preset is on authenticity (e.g. no vibrato crossfades) and having as many articulations as possible in one instance, but still providing good playability and clarity. Therefore, most of the variations of the articulations are based on velocity. For that reason, I control also the dynamic of short articulations with the Velocity X-Fade of the Vienna Instruments player and not with the note’s velocity. To not be overwhelmed by moving to much dials, sliders, pedals and loosing time by clicking through countless automation lanes in Ableton, I use only two controllers, which are additionally shown as X and Y-Fade in the display of the KeySwitch & Expression Map for a good overview.
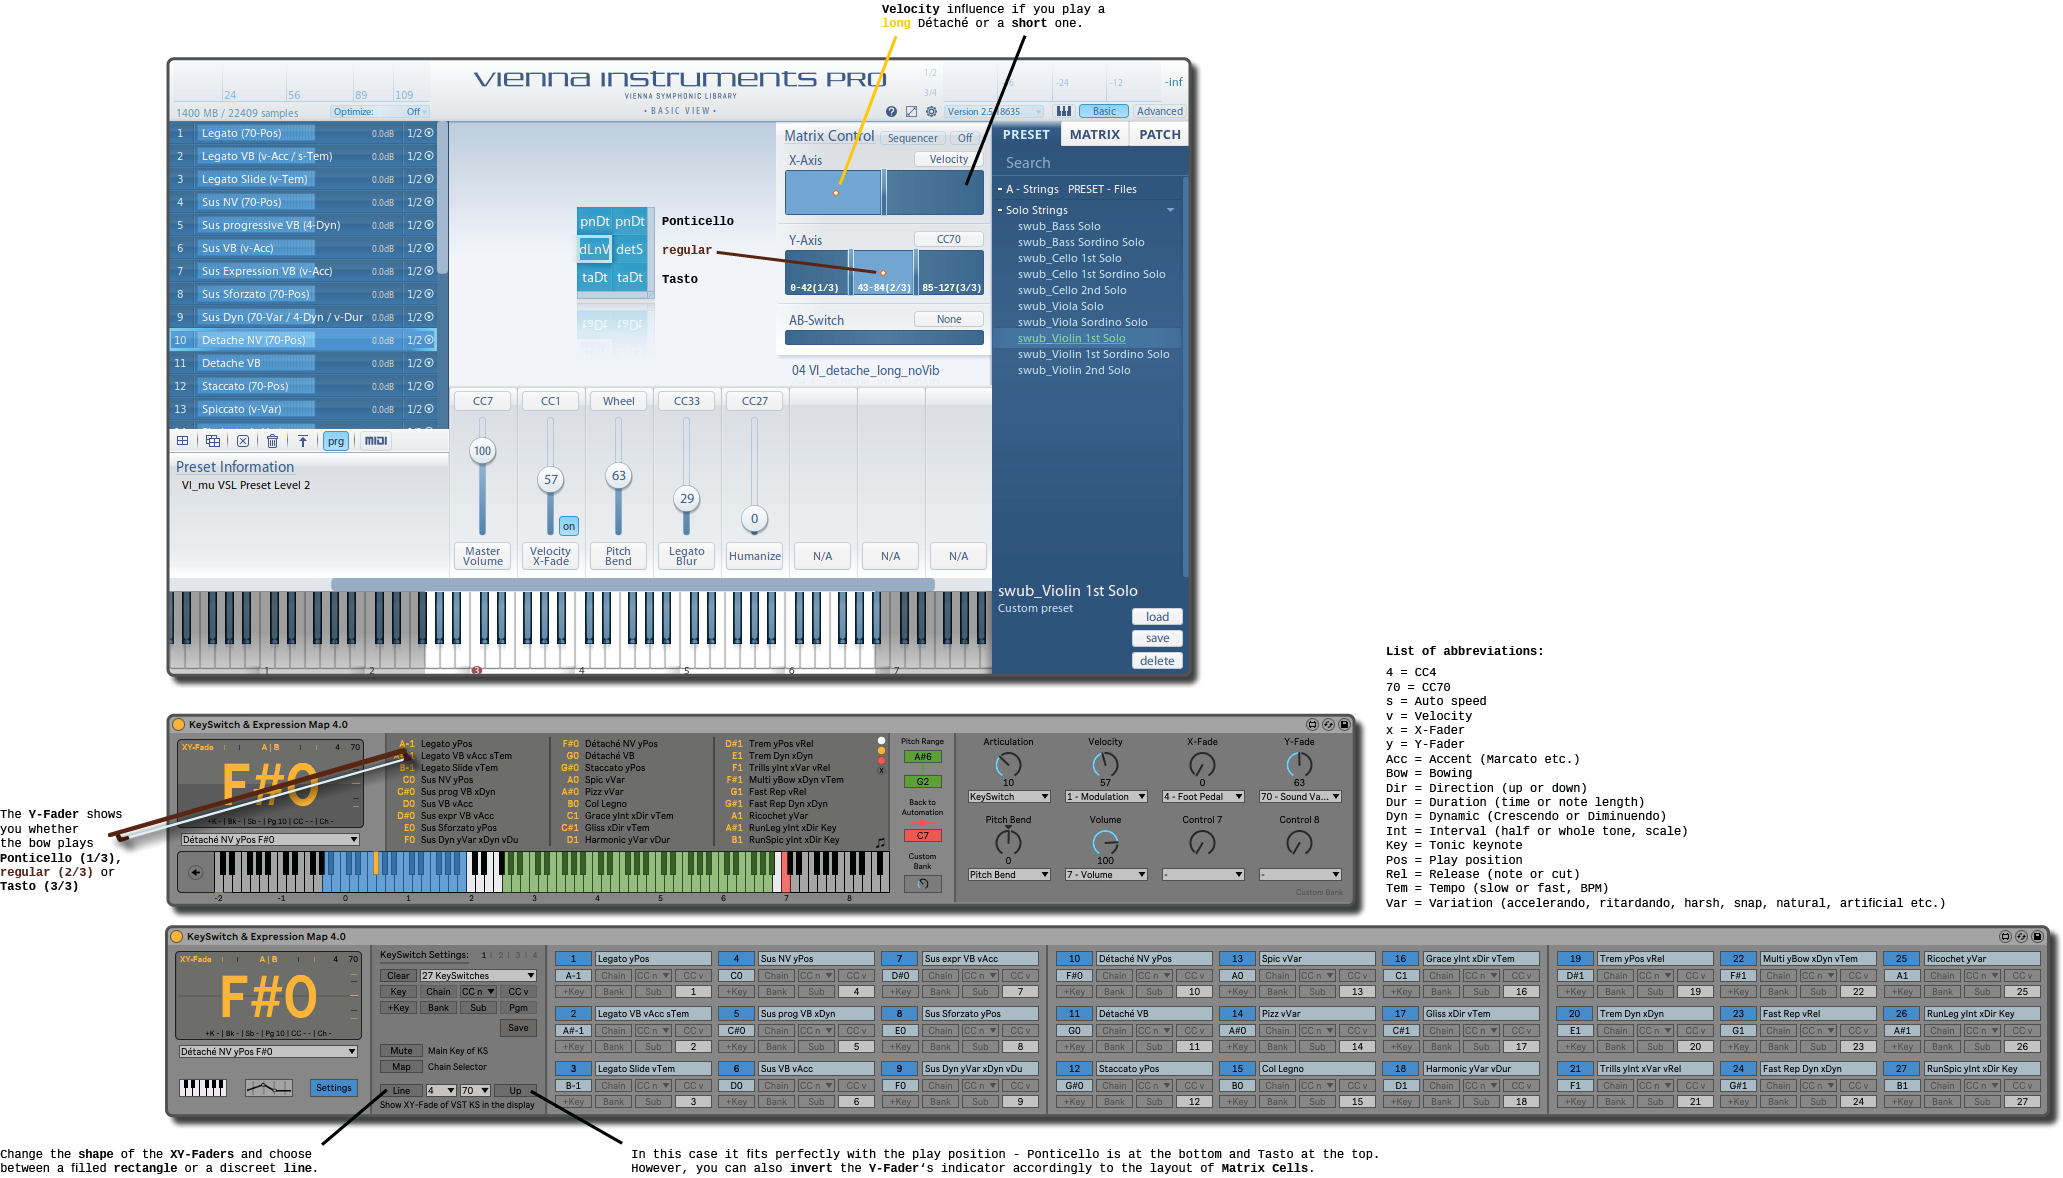
In the example, I use the Y-Axis for everything what influence the tonality, timbre or let’s say generally “sound”. This could be the playing position of a string instrument (ponticello, regular or tasto), interval (half tone or whole tone Trills, major or minor Scale Runs) or sound variations (natural and artificial harmonics etc.)
The X-Axis works as AB-switch to influence the dynamic (Crescendo or Diminuendo) or direction (Grace Note, Glissando or Runs up or down).
The velocity switches between variations connected with the intensity of playing (Pizzicato secco, regular or snap / Spiccato regular or harsh), accents (regular or Marcato vibrato / Sforzato) or fastness (slow or fast Portamento, Glissando, Grace Notes / Trills accelerando or regular).
As mentioned above, needs and preferences are very different and I have several presets myself for different use cases. Let your creativity run free and follow your own logic and needs! This will make you even playing more intuitively your key switches because it follows your way of thinking.
If you are a good piano player and you like to compose by recording your ideas directly into the timeline, why switching between Crescendo and Diminuendo with an additional controller? Perhaps it is just as intuitive and more convenient for you to press simply the key on your piano with a low velocity to trigger a quietly starting Crescendo patch and in contrast with a high value of velocity a Diminuendo.
Or you like to push buttons and to turn dials on your MIDI controller and have all controllers seperated? Then give own CC numbers for playing position, dynamics, direction etc. and assign each of them to the Custom Bank of the KeySwitch & Expression Map. If you label the dials you will be able to control your presets comfortably with instant mapping!
And in case that you have a preference for sound design, you like to control the amount of the vibrato yourself or to crossfade between articulations (e.g. sustain and tremolo), you can even create all this stuff yourself quite easily with the Slot Rack.
User Manual:
Vienna Instruments Player
Vienna Instruments Player Pro
Vienna Ensemble #
Vienna Ensemble 6 is a host for the two VSL players that you load into Ableton instead of the individual VST plug-ins. With Vienna Ensemble Pro 7, you can also integrate third-party VST plug-ins into the host and connect multiple computers in a network.
This way, all your sample libraries can be stored on an external computer and are streamed to your main computer via network. The main computer can then concentrate its resources on Ableton and, most importantly, does not have its memory blocked with all the gibabytes of your samples.
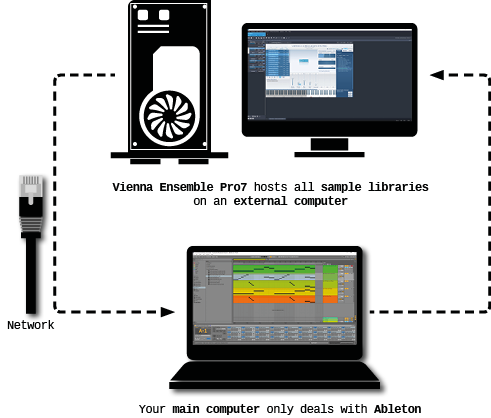
But even without a second computer, Vienna Ensemble Pro 7 can be a good help if you have limited RAM and a lot of VST instruments, as you can easily unload unused instruments from RAM if needed. This way you can build templates for Ableton with all your VST instruments and you load your favourites automatically and the others are potentially only one click away.
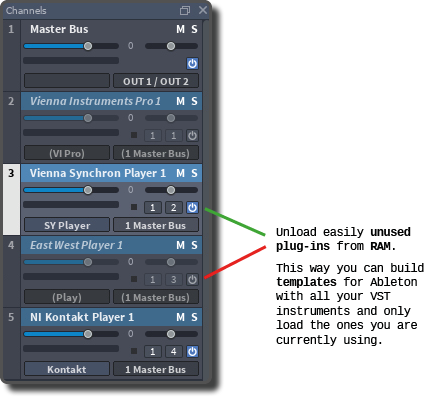
When you use Vienna Ensemble in Ableton, you load the VST plug-in into its own MIDI track.
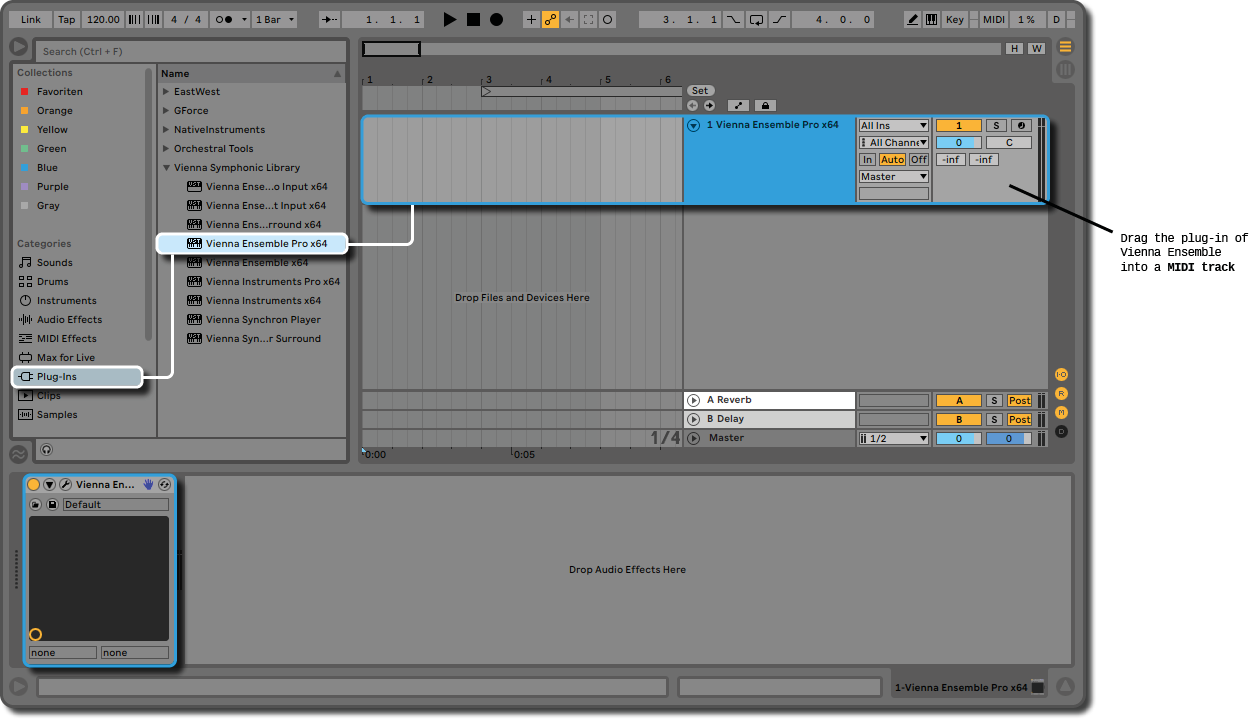
Add your VST plug-ins to the host instead of directly into Ableton and assign MIDI channels to them. You might have to set the corresponding MIDI channel as well in your player. After you have done this, you assign different audio outputs to the instruments in the mixer.
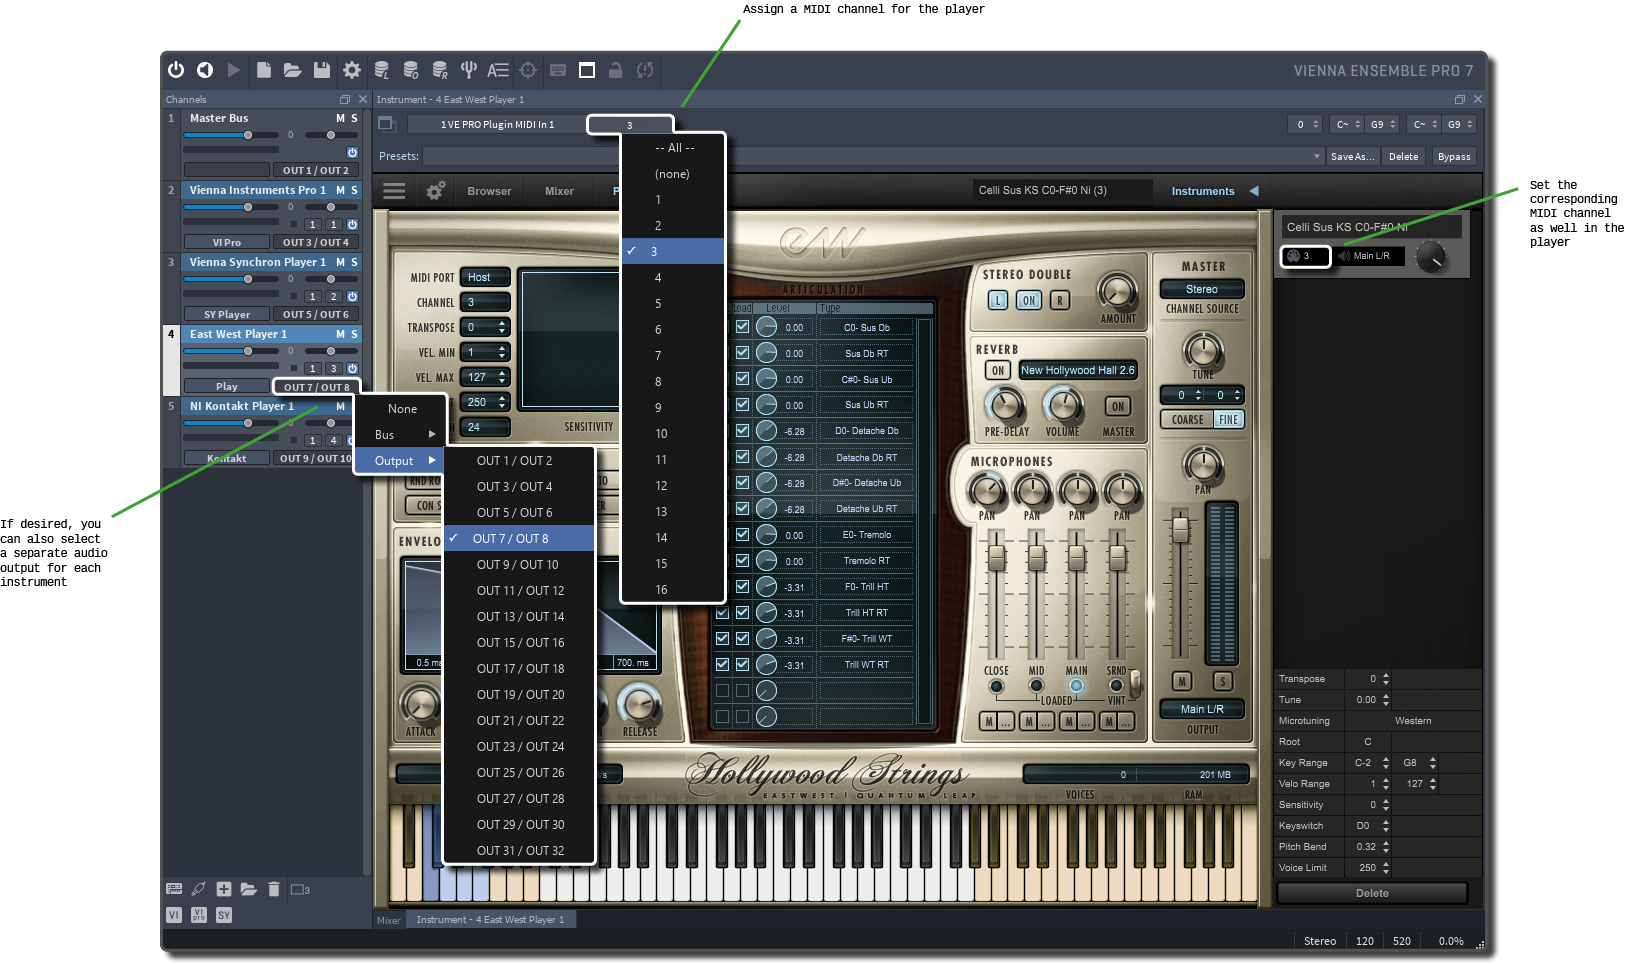
Back in Ableton, you create a separate MIDI track for all your instruments and drag the KeySwitch & Expression Map into it along with an External Instrument. In the External Instrument, select the Vienna Ensemble plug-in as MIDI To in the upper menu and the channel below it. Finally select the audio output that you have set for the respective instruments in the Vienna Ensemble mixer under Audio From.
Now you should hear something when you play a note from your piano. If your setup is correct, continue as described above for the other players and make your settings in the KeySwitch & Expression Map as normal.
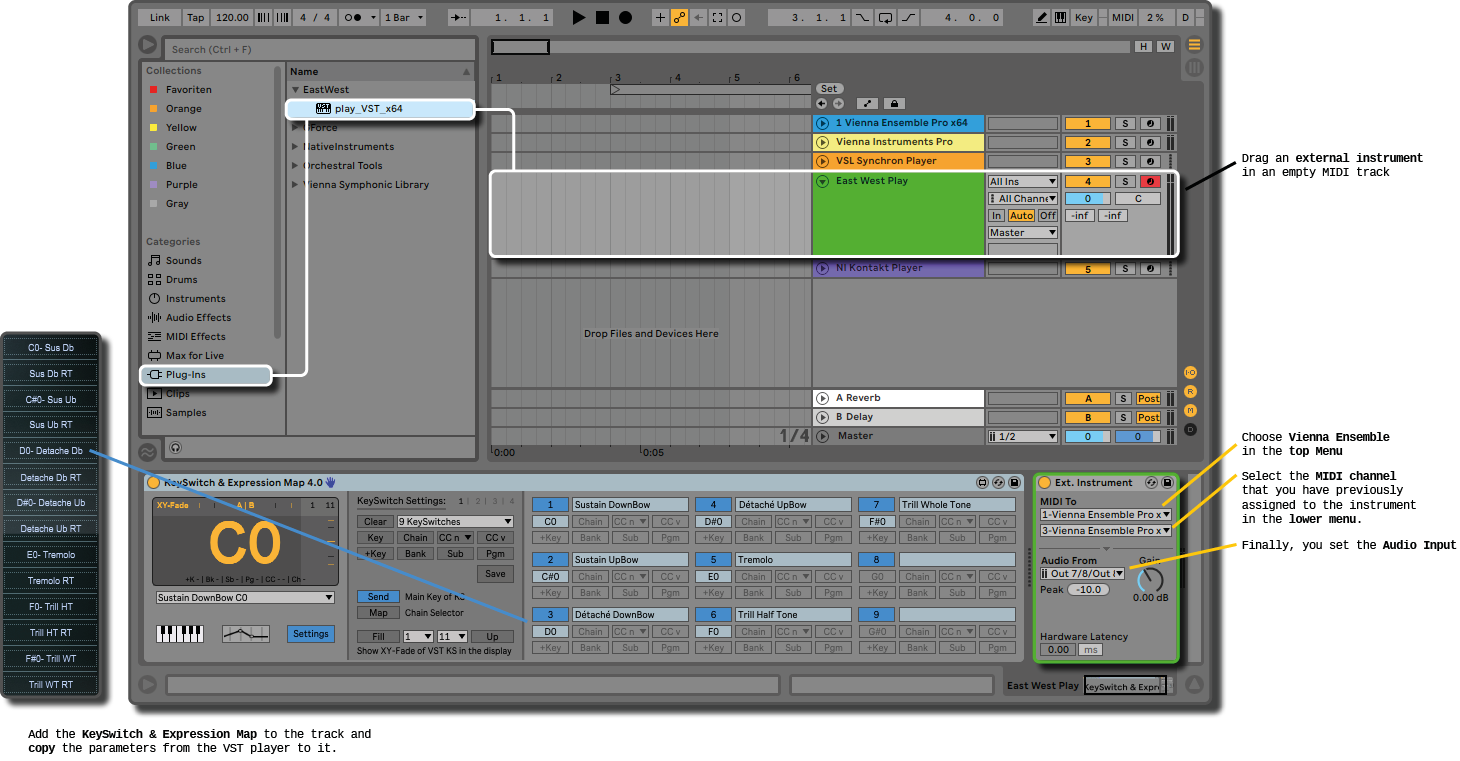
Instead of switching between the articulations of a single instrument, you can use an Instrument Rack to control multiple instruments in Vienna Ensemble and combine them in one MIDI track. To do this, you load several External Instruments into the various chains of an Instrument Rack and switch between them by additionally defining a Chain Value for your key switches. This switches then the Chain Selector of the rack. How to do this exactly is shortly described above in the SINE Player and in detail in the chapter Set-Up with an Ableton Live Rack.
User Manual:
Vienna Ensemble 6
Vienna Enseble Pro 7
NI Kontakt Player #
The Kontakt player is not only the player for all sample libraries from Native Instruments but also host for many, many other sample libraries from small or large producers of VST instruments. Accordingly, there are numerous ways to connect the Kontakt player to the KeySwitch & Expression Map and I can only show you a few use cases as examples.
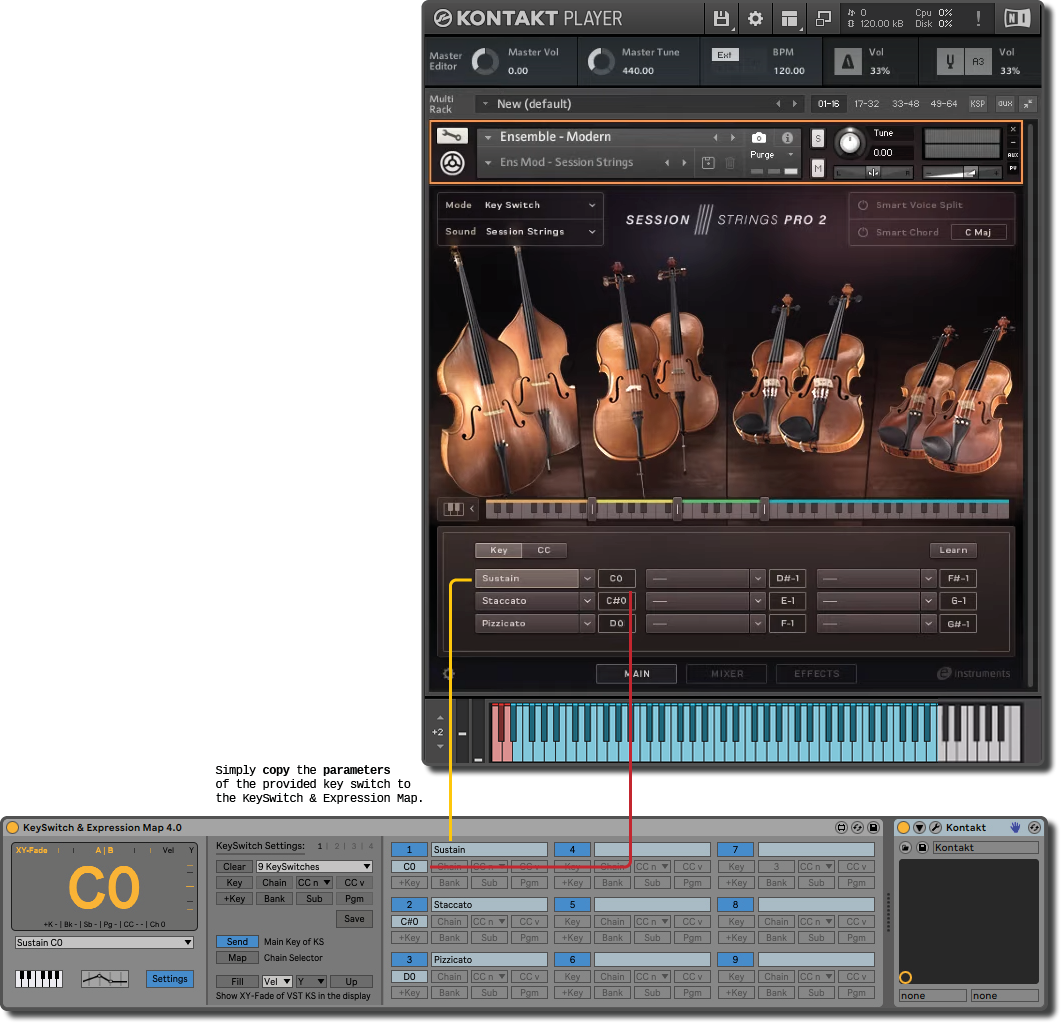
Obviously the most easy use case is that your library contains ready-made key switches. In this case you simply copy the values for the articulations into the KeySwitch & Expression Map – be it classic key switches, program changes or CCs. Here are the Session Strings Pro 2 as an example:
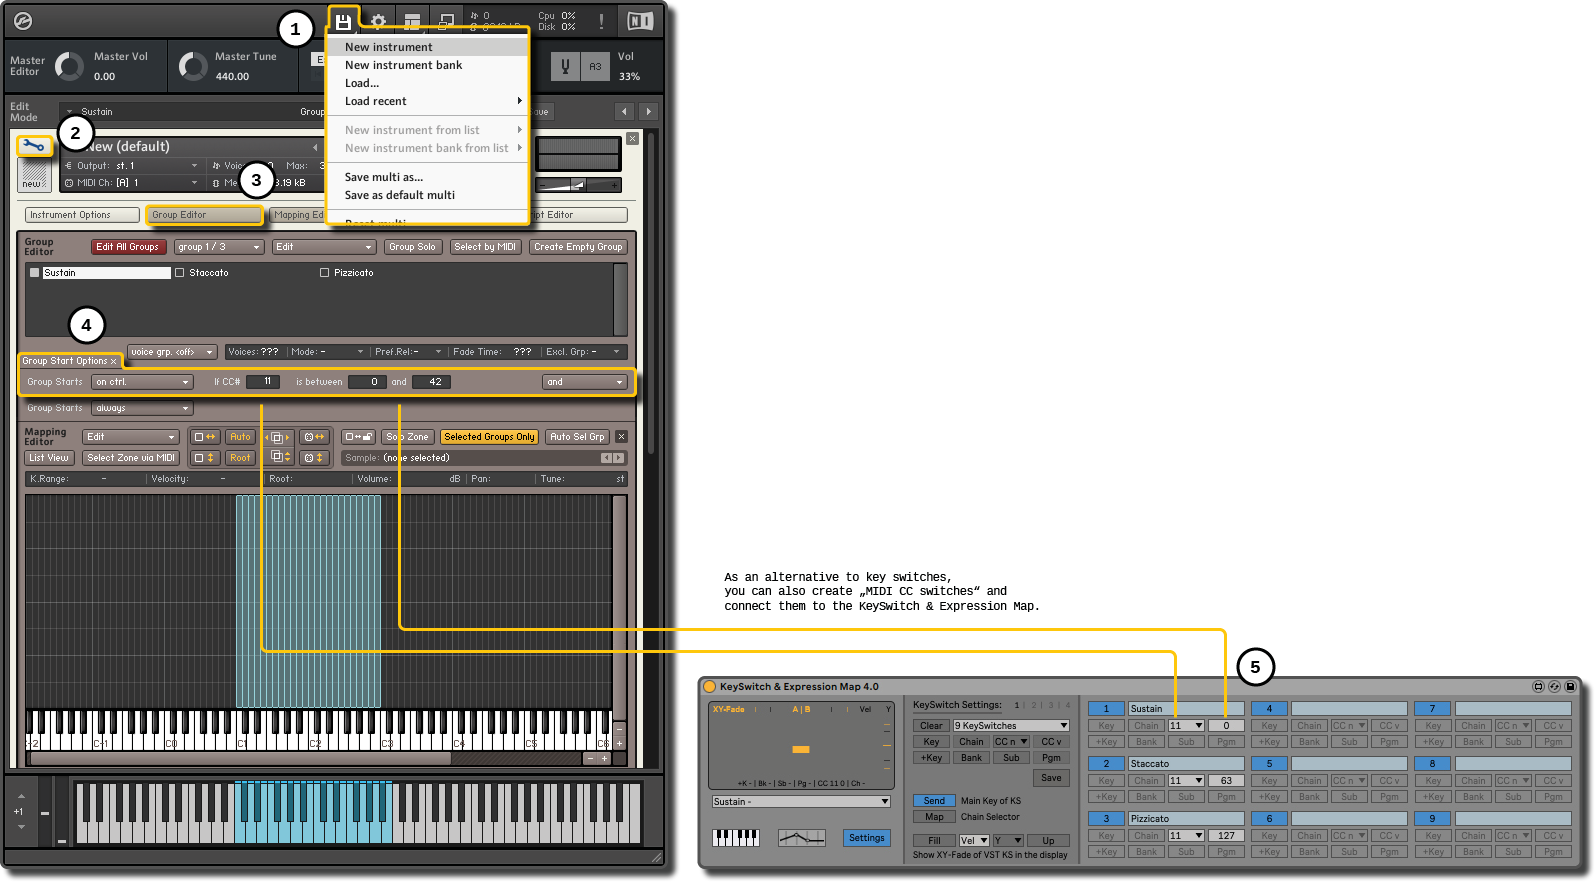
The same applies to all owners of the full version of Kontakt 6, who can build their own instruments with the Group Editor and can create custom key switches with the Group Start Options.
If you only own the free Kontakt Player, you will probably be happy to hear that it allows you as well to load multiple instruments or articulations into a single instance and to switch between them.
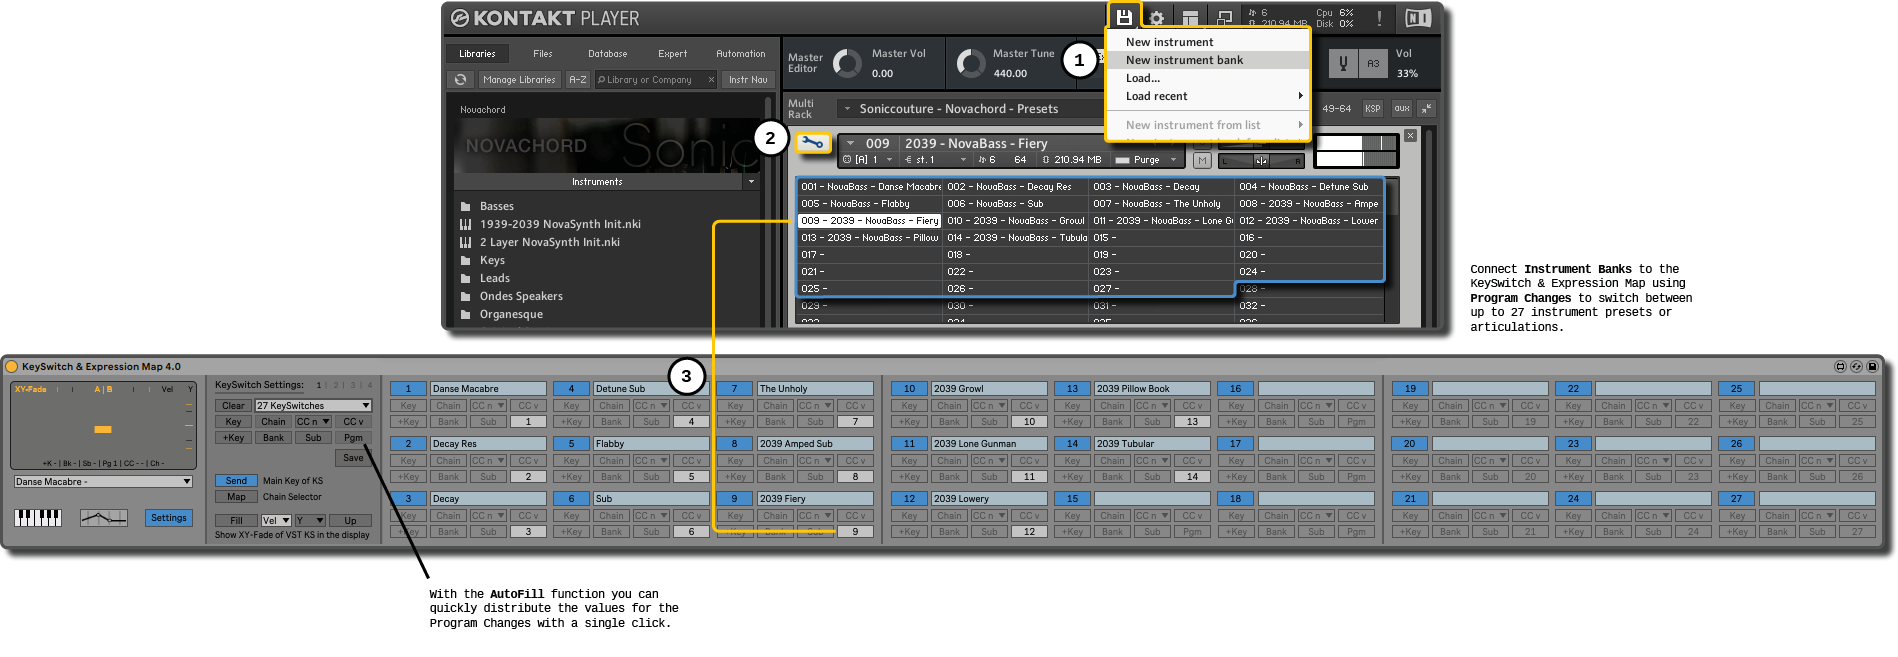
Probably the fastest way to do this is to use the Instrument Bank. There you can quickly drag up to 128 instruments into the different slots and switch between them with Program Changes. In the KeySwitch & Expression Map you enter a name for your key switches and then distribute the Program Changes super easy with the AutoFill option. In the example below I use an instrument bank for example to switch quickly through different presets of an instrument. If you want to control the slots with your piano, only define additionally a key for the key switches.
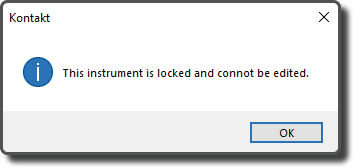
Unfortunately, there is a disadvantage of this method which you will find out quickly by double-clicking on the instrument and reading “This instrument is locked and cannot be edited“. However, as a workaround you can first customize your instrument according to your wishes, save it under a different name and then drag it into the slot.
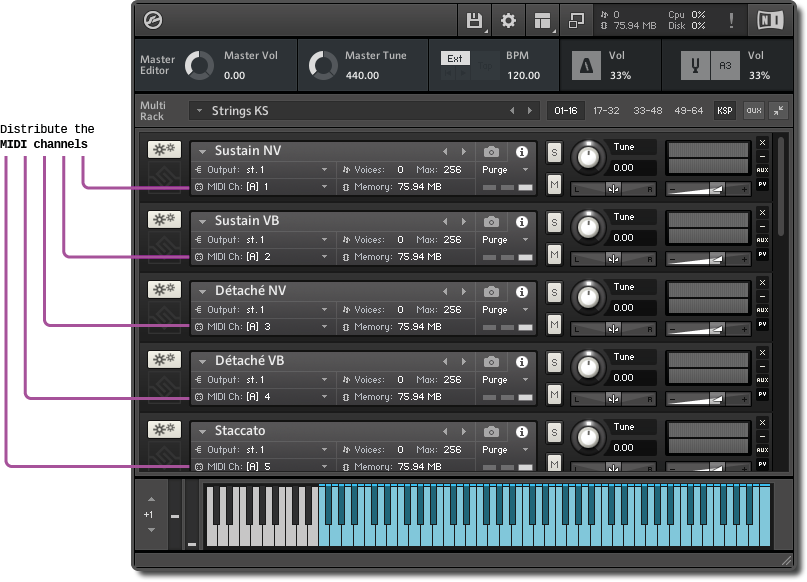
If this seems too complicated or you want to be more flexible, then load the instruments into different MIDI channels and build a Kontakt Multi Instrument Rack instead.
You can control this set-up with the KeySwitch & Expression Map in two different ways:
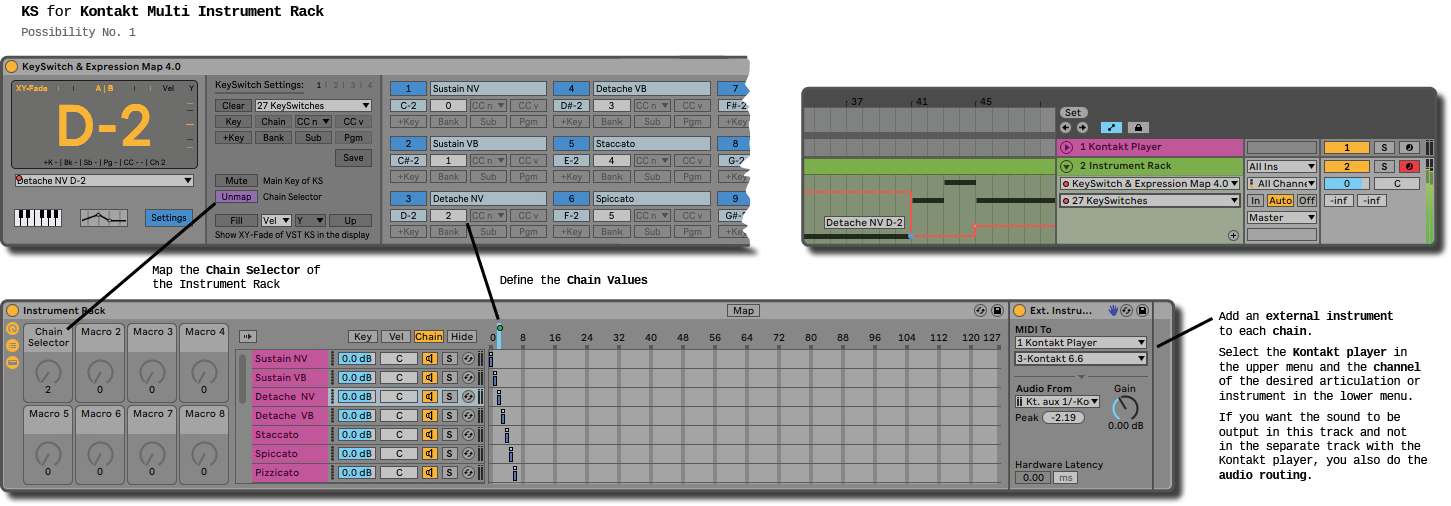
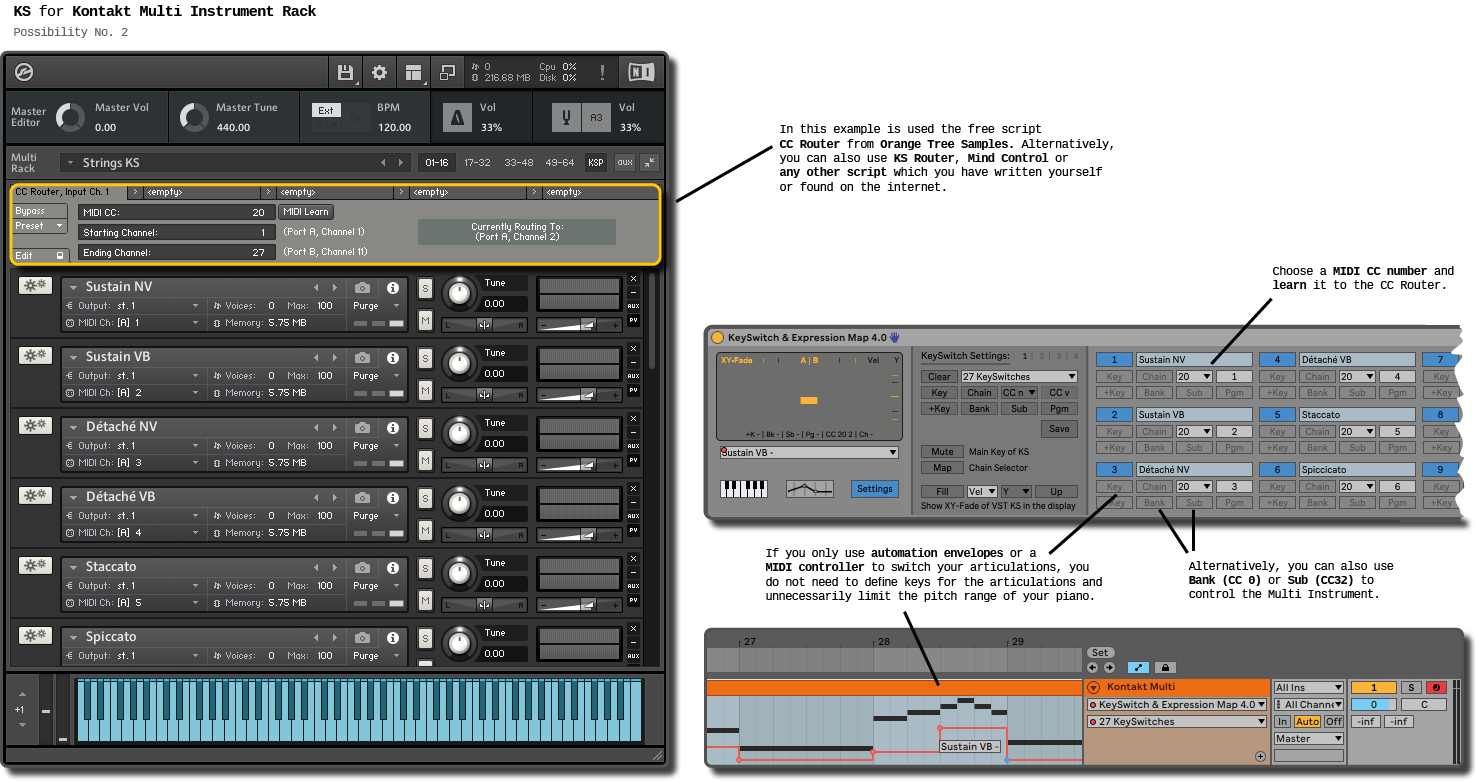
1) As with the other players in the manual, you can again use Ableton’s Instrument Rack and load external instruments into its chains, which you then switch with the Chain Selector of the rack and the defined Chain Values of your key switches. For detailed info on this topic, read the article Set-up with an Ableton Live Rack or also the following part about the East West Player.
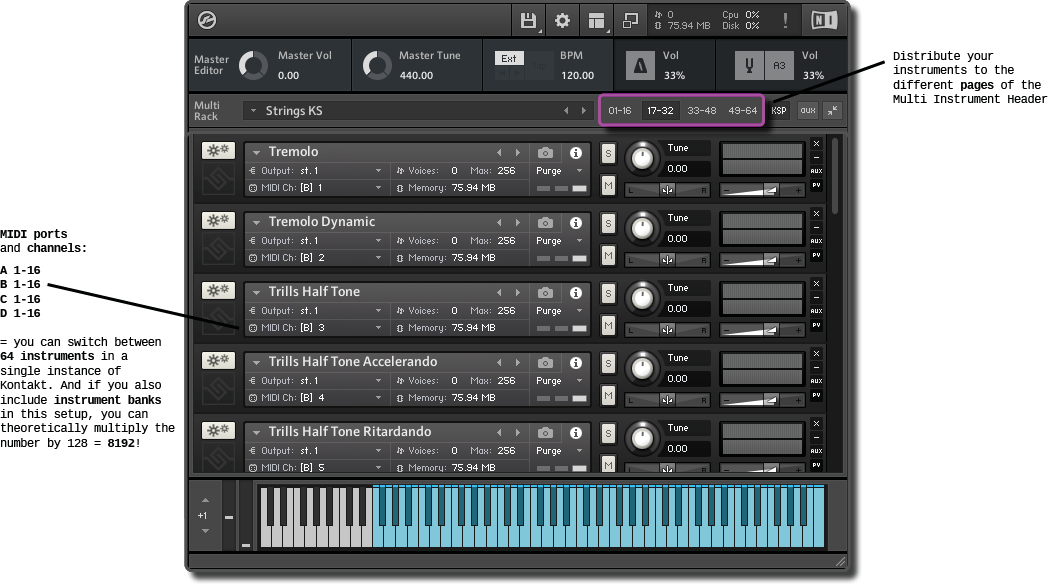
2) However, since you are limited to 16 channels with the external instrument in Ableton Live, but the KeySwitch & Expression Map theoretically gives you the possibility to control up to 64 key switches, I would advise you in the case of the Kontakt Player to use so-called MultiScripts (KSP = Kontakt Script) instead. With these scripts you can use the full potential of the Kontakt Player and theoretically switch between 64 MIDI channels, which are distributed over the four MIDI ports A, B, C and D.
You can either paste a MultiScript directly into the Script Editor or insert it as an .nkp file into Kontakt’s presets and then select it directly from the menu. After adding the script in the folder, you might have to reopen your project to make Kontakt scanning the presets again. The path of the preset folder of Native Instrument’s MultiScripts should be something like this on your computer:
Windows: C:\Users\USERNAME\Documents\Native Instruments\Kontakt\presets\Multiscripts
Mac: HD/Documents/Native Instruments/Kontakt 5 (or Kontakt)/presets/scripts
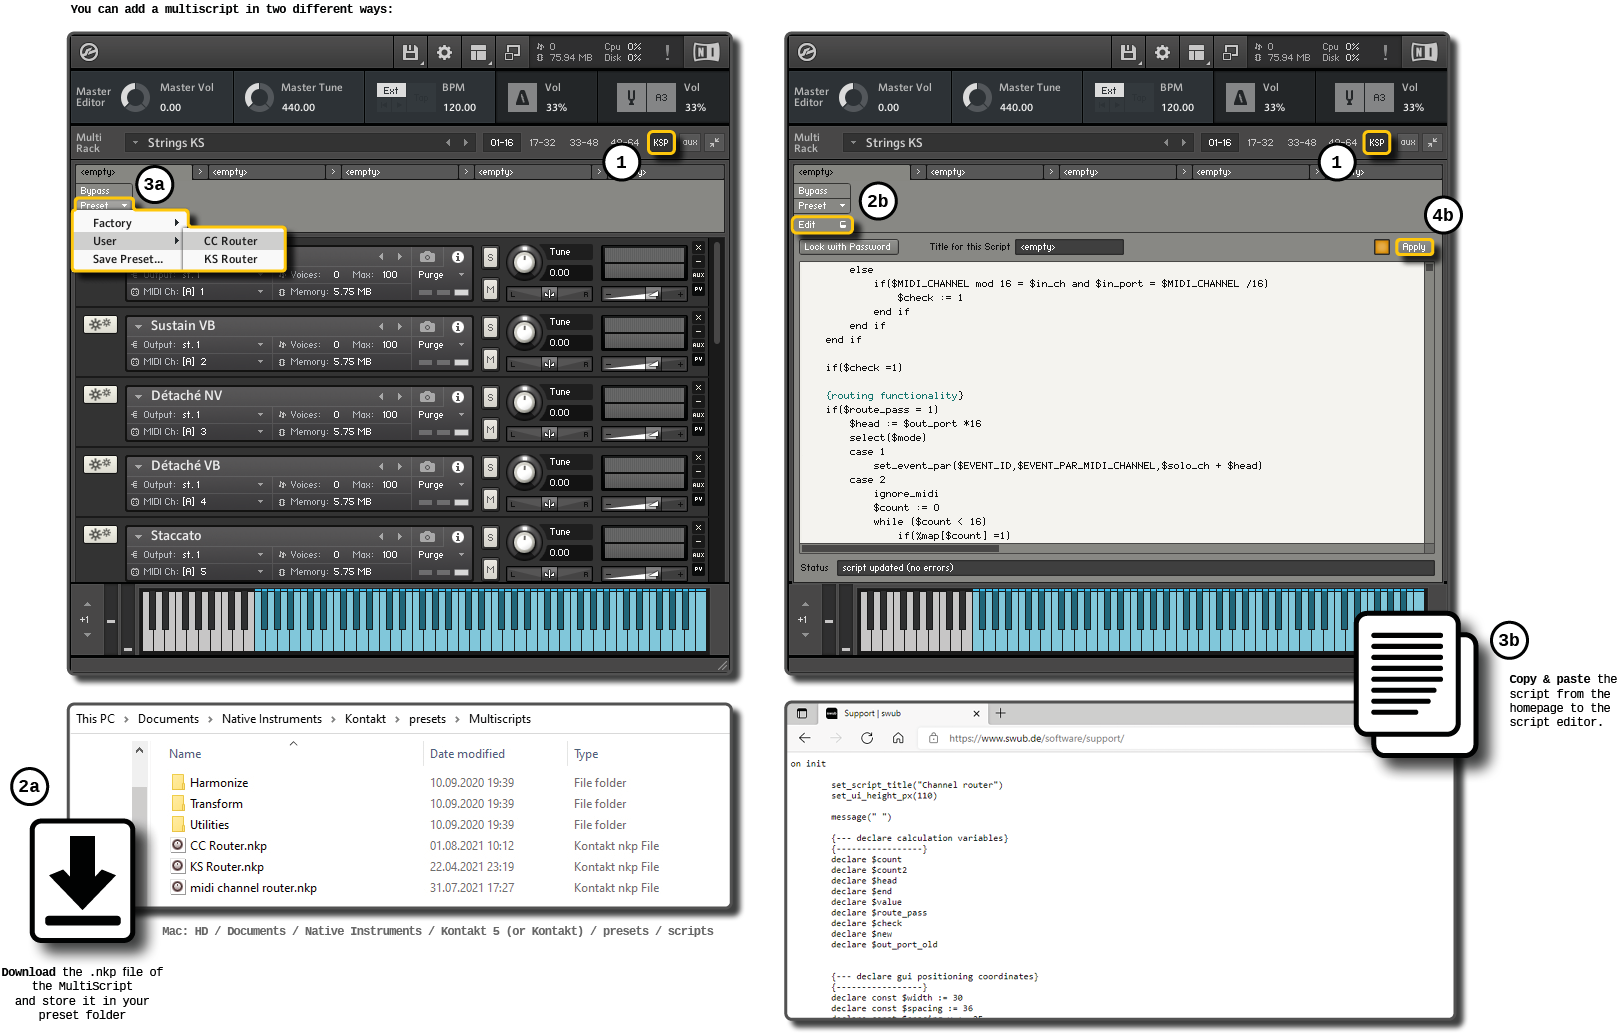
Here is an example with the CC Router MultiScript. You can download it for free from Orange Tree Samples. Alternatively, you can use KS Router or look for other scripts on the internet that will help you in your particular use case. But be careful and test the scripts carefully before you invest a lot of time to build templates. For example, see what happens when you change MIDI channels while a note is playing. Especially scripts from forums sometimes seem to work at first sight and then you have to realize later that e.g. the note-off does not arrive at your instrument after changing the MIDI channel and therefore will not stop playing anymore!
In case that you own the full version of Kontakt, here is additionally a link to Mind Control, which costs $ 25 and offers you many more possibilities to create your own patches for articulations. For example, you could create performance patches based on velocity with it to turn a Sustain VB into a Marcato VB by a hard key stroke.
Efficient RAM management in Kontakt
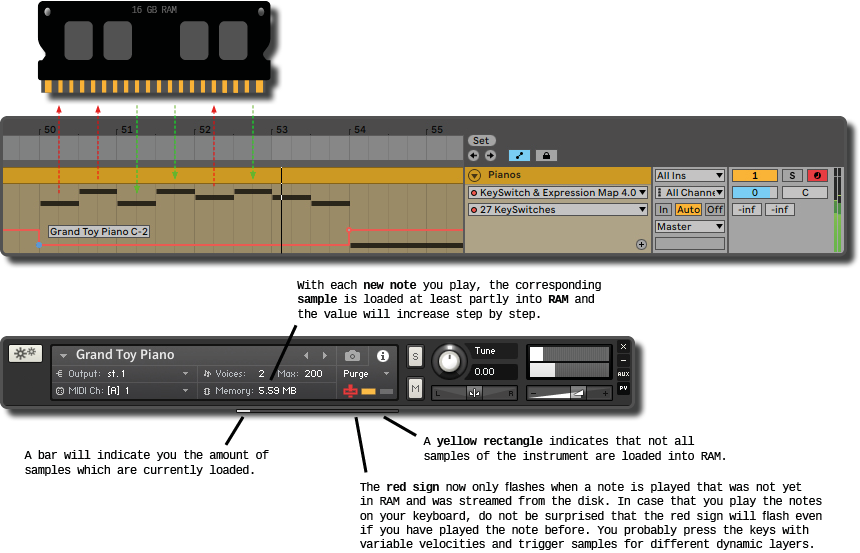
At the end, here are a few tips on how to save RAM with the Kontakt player when using large templates. Kontakt Player gives you the option to unload (purge) instruments from RAM and streams the samples directly from the hard drive instead. However, this only makes sense if your library is at home on a fast SSD. You should also be careful with some sustain or legato articulations, especially if they allow you to fade through many dynamic or vibrato layers. Then it can quickly happen that ten, twenty or even more voices are played simultaneously. Summed up with other instruments playing at the same time, the data flow from the hard drive might be not longer sufficient. Short articulations such as pizzicato, staccato, etc. can usually be removed from the memory without any problems or concerns. You can purge only a single instrument or globally your whole multi rack.
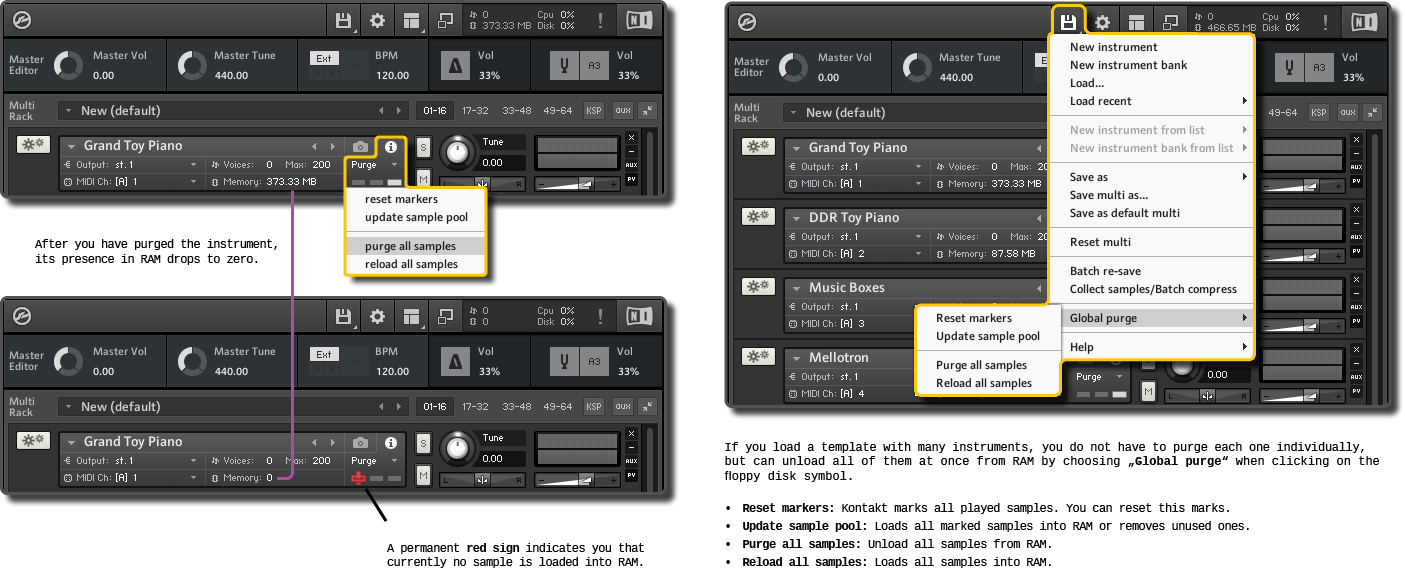
If you hear drop outs that are not caused by the buffer size settings of your sound card, then listen to the song until the end anyway. Kontakt marks all samples that were played. If you now select Update Sample Pool, all used samples will be loaded into the RAM and the next time you will hear the song without artefacts.
You can also do it the opposite way: In case you have already purged your samples before, click on Reload all samples, select Reset markers, play your song and press afterwards Update Sample Pool. This will remove all unused samples from the memory and could be an alternative for you if you do not have a SSD.
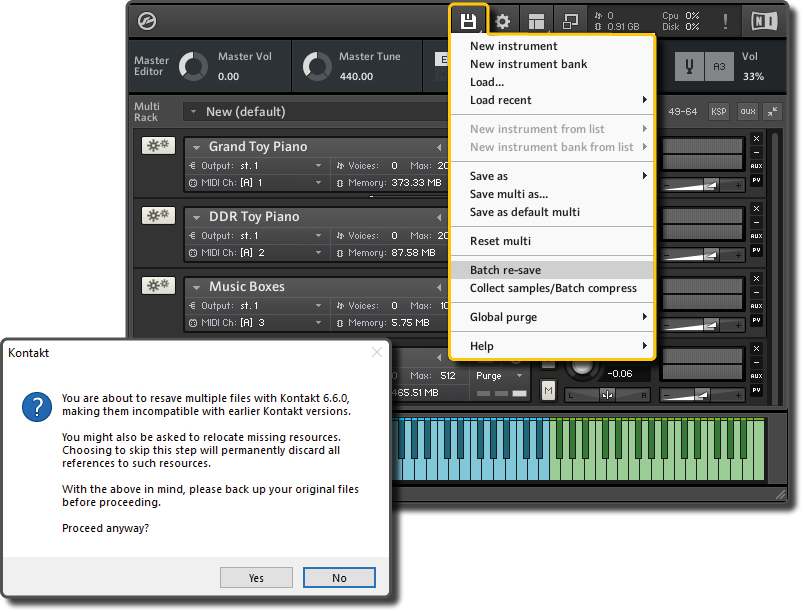
Instead of updating the sample pool, you can try out as well Kontakt’s feature Batch re-save to get rid of artefacts by making Kontakt finding the samples on the hard drive faster. It will renew the references between your instrument.nki / multi.nkm and the samples. There are people who are fully convinced that it works. To be honest, myself, I have not really remarked a difference. But maybe it is also connected to the age of the library and for which Kontakt version it was once made. When re-saving your library, it will be stored for usage in the current version of Kontakt and might be quicker with an advanced file handling afterwards. However, it will be incompatible with earlier versions!!! That’s why you will see a pop-up which warns you about that and potential errors. Hence, if you work with different Kontakt versions – don’t do it!
If you want to try it out, only update one library at a time! Apart from the fact that otherwise you run the risk of spending several hours watching how Kontakt processes your request for all your libraries, it could theoretically also leads to errors if samples of different libraries have the same file naming. Then you might will suddenly hear a flute playing a few notes instead of the distorted electric guitar in your rock song. For that reason and as a precautions, choose the location as well manually when you are asked to locate missing files and do not let Kontakt search it automatically on your whole computer – at least not if you have a lot of libraries installed.
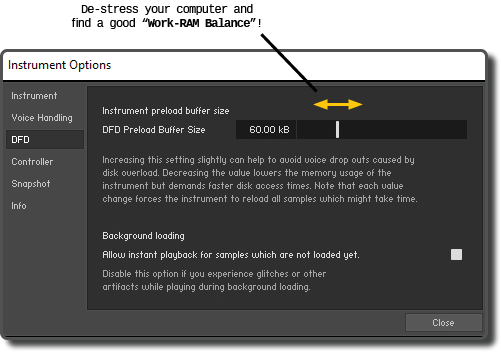
Finally quickly mentioned the term DFD (Direct from Disk) which means that only a small part of the beginning of your samples is loaded into memory. In the best case, just enough so that your hard disk has enough time to find the sample and to start streaming it. To save RAM, you can reduce this value. If you have drop outs in the sound, increase the value. The performance can vary depending on your current project and the number of instruments you play in it at the same time.
User Manuals:
Kontakt (7)
Kontakt Player
KSP Reference Manual (multi script)
Spitfire Audio #
Depending on whether your Spitfire library still uses the Kontakt player or the new company player, here are two examples of how you can connect the libraries to the KeySwitch & Expression Map.
Libraries with UACC #
For older libraries such as Chamber Strings, Studio Orchestra, Symphonic Orchestra, etc. which are hosted by the Kontakt player, everything written in the last chapter applies in principle. However, there is a special feature with Spitfire. Spitfire offers the possibility to control the articulations in the Kontakt patches with UACC (Universal Articulation Controller Channel).
Instead of using key switches to change from one articulation to another, you can change to a particular articulation by setting MIDI CC#32 (Sub) to a corresponding value.
Nothing new, however it also works if you load different patches into a Kontakt Multi and the same MIDI channel: If a patch does not have the selected articulation, it shows None and remains muted. With usual key switches or the CC selector, all patches would normally play simultaneously in that case.
With other words, you can achieve the same as described above in the text section about using multi scripts in Kontakt. But depending on the library, possibly with less effort. For the Chamber Strings as an example, all you need to do is to drop the two Legato patches in combination with the Core and Decorative techniques and you have all the available articulations loaded. Alternatively, you can simply select all individual instruments and drop them into a Kontakt Multi. The order doesn’t matter, because each articulation has a fixed CC32 value.
And that brings us finally to the argument why UACC might give you an advantage. It was also Spitfire’s attempt to develop a standard for switching articulations that allows you to select the same articulation with the same CC 32 value, regardless of instrument or library. For example, the value 40 is the articulation Short, no matter if you have loaded a violin from the library Chamber Strings or Symphonic Strings. You can also use this value to play the short articulation of the concert flutes in the Bernard Herrmann Composer Toolkit.
Conversely, you can use the same preset in KeySwitch & Expression for different instruments and libraries.
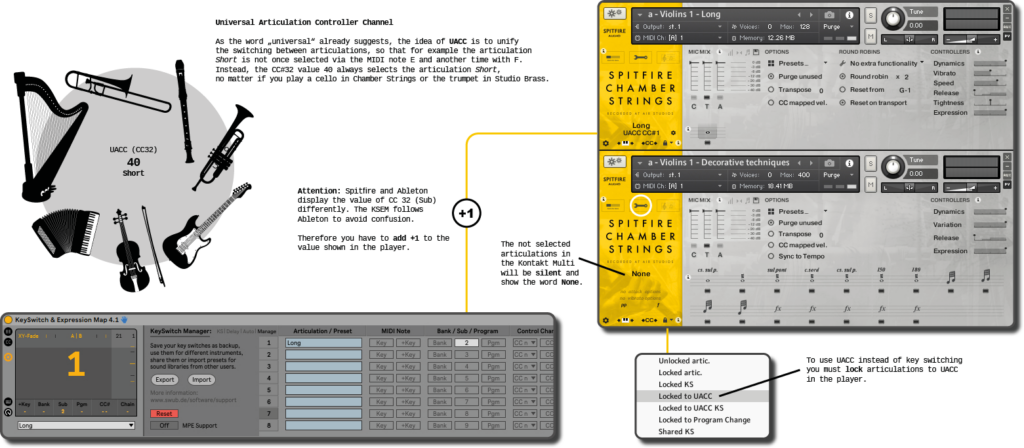
However, there is one trap you can fall into. Spitfire and Ableton display the value of CC 32 (Sub) differently. Spitfire uses the official MIDI range from 0 to 127. Ableton shows 1-128, but sends out 0-127. Why? Since a lot of hardware producers display their programs or presets from 1 to 128, many software developers decided to make it easier for the users and display 1-128 as well. So Spitfire is right and Ableton also has its reasons 😉 The KSEM follows Ableton to avoid further confusion. Therefore you have to add +1 to the value shown in the player.
To make life easier for you, I have created a list adapted for use with Ableton which you can also download as PDF to print it out. Also take a look at the presets. There you will find a universal UACC preset for the KeySwitch & Expression Map providing the most common articulations that you can download and quickly adapt to your needs.
UACC values in Ableton Live
| # | Long | # | Legato |
|---|---|---|---|
| 2 | Generic | 21 | Generic |
| 3 | Alternative | 22 | Alternative |
| 4 | Octave | 23 | Octave |
| 5 | Octave muted | 24 | Octave muted |
| 6 | Small (1/2) | 25 | Small |
| 7 | Small muted | 26 | Small muted |
| 8 | Muted | 27 | Muted |
| 9 | Soft (flaut/hollow) | 28 | Soft |
| 10 | Hard (cuivre/overblow) | 29 | Hard |
| 11 | Harmonic | 30 | Harmonic |
| 12 | Temolo/flutter | 31 | Tremolo |
| 13 | Tremolo muted | 32 | Slow (port/gliss) |
| 14 | Tremolo soft/low | 33 | Fast |
| 15 | Tremolo hard/high | 34 | Run |
| 16 | Tremolo muted low | 35 | Détaché |
| 17 | Vibrato (molto vib) | 36 | Higher |
| 18 | Higher (sul tasto/bells up) | 37 | Lower |
| 19 | Lower (sul pont) | ||
| 20 | Lower muted |
| # | Short | # | Decorative |
|---|---|---|---|
| 41 | Generic | 71 | Trill (minor2nd) |
| 42 | Alternative | 72 | Trill (major 2nd) |
| 43 | Very short (spic) | 73 | Trill (minor 3rd) |
| 44 | Very short (soft) | 74 | Trill (major 3rd) |
| 45 | Leisurely (stac) | 75 | Trill (perfect 4th) |
| 46 | Octave | 76 | Multitongue |
| 47 | Octave muted | 77 | Multitongue muted |
| 48 | Muted | 81 | Synced-120bpm (trem/trill) |
| 49 | Soft (brush/feather) | 82 | Synced-150bpm (trem/trill) |
| 50 | Hard (dig) | 83 | Synced-180bpm (trem/trill) |
| 51 | Tenuto | ||
| 52 | Tenuto Soft | ||
| 53 | Marcato | ||
| 54 | Marcato Soft | ||
| 55 | Marcato Hard | ||
| 56 | Marcato Long | ||
| 57 | Plucked (pizz) | ||
| 58 | Plucked hard (bartok) | ||
| 59 | Struck (col legno) | ||
| 60 | Higher | ||
| 61 | Lower | ||
| 62 | Harmonic |
| # | Phrases | # | Various |
|---|---|---|---|
| 91 | FX 1 | 111 | Disco up (rips) |
| 92 | FX 2 | 112 | Disco down (falls) |
| 93 | FX 3 | 113 | Single string (Sul C/G/etc.) |
| 94 | FX 4 | ||
| 95 | FX 5 | ||
| 96 | FX 6 | ||
| 97 | FX 7 | ||
| 98 | FX 8 | ||
| 99 | FX 9 | ||
| 100 | FX 10 | ||
| 101 | Up (rips/runs) | ||
| 102 | Downs (falls/runs) | ||
| 103 | Crescendo | ||
| 104 | Decrescendo | ||
| 105 | Arc | ||
| 106 | Slides |
Dedicated VST plugin #
The new libraries from Spitfire like BBC Symphony Orchestra, Hans Zimmer Strings etc. come with a dedicated VST plug-in that is basically always the same player, but for some libraries is extended with additional functions. For example, the ensemble patches of Abbey Road 2 have an additional arranger that allows you to control easily which instrument plays which note range.
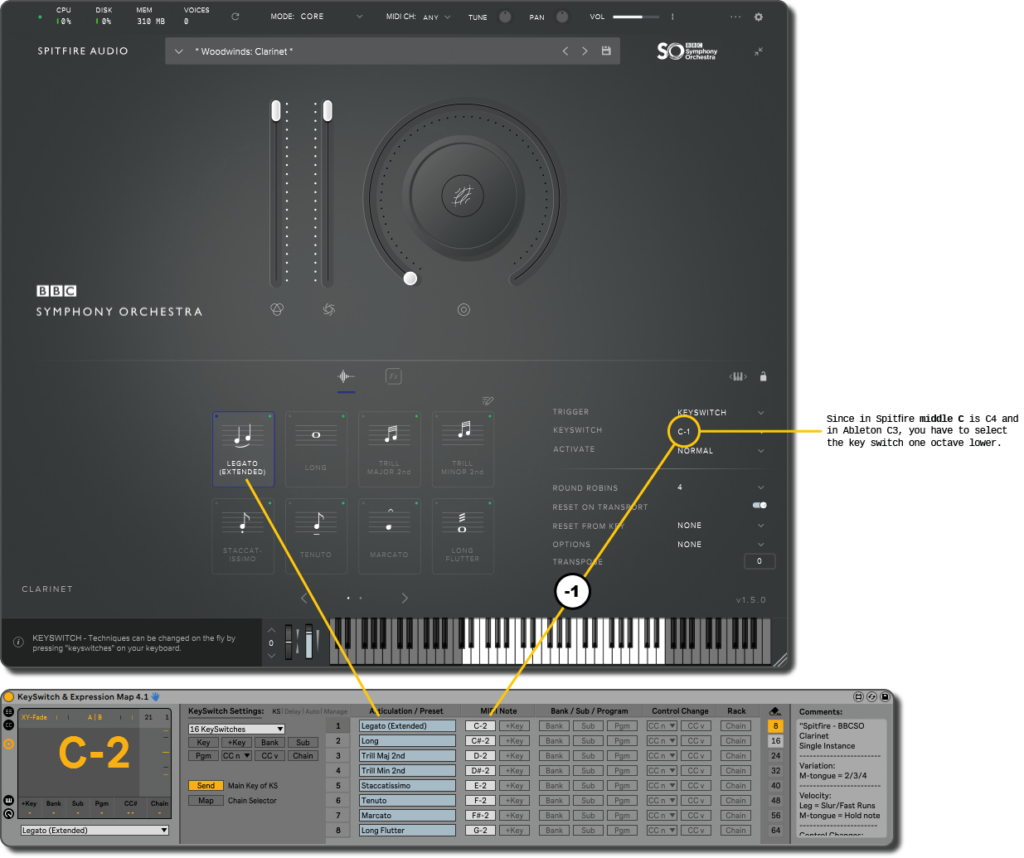
By default, you trigger the articulations in the player with key switches. In this case, the Keyswitch & Expression Map is quickly set up and it does not require much explanation. You just copy the names of the articulations and use the auto-fill option to distribute the notes among them. However, you have to be careful with the naming of the notes, because Spitfire shows Middle C as C4 and Ableton works with C3. Therefore you have to select, for example, C-2 in the Keyswitch & Expression Map for the MIDI note C-1 in the player as shown in the picture above.
However, if you really have a library that does not have key switches, you can build your own with the KeySwitch & Expression Map and Ableton’s Instrument Racks. Here you can find more information about this topic.
Also worth mentioning is that you can easily change the order of the articulations by opening the technique editor with the little pencil icon next to the switchers.
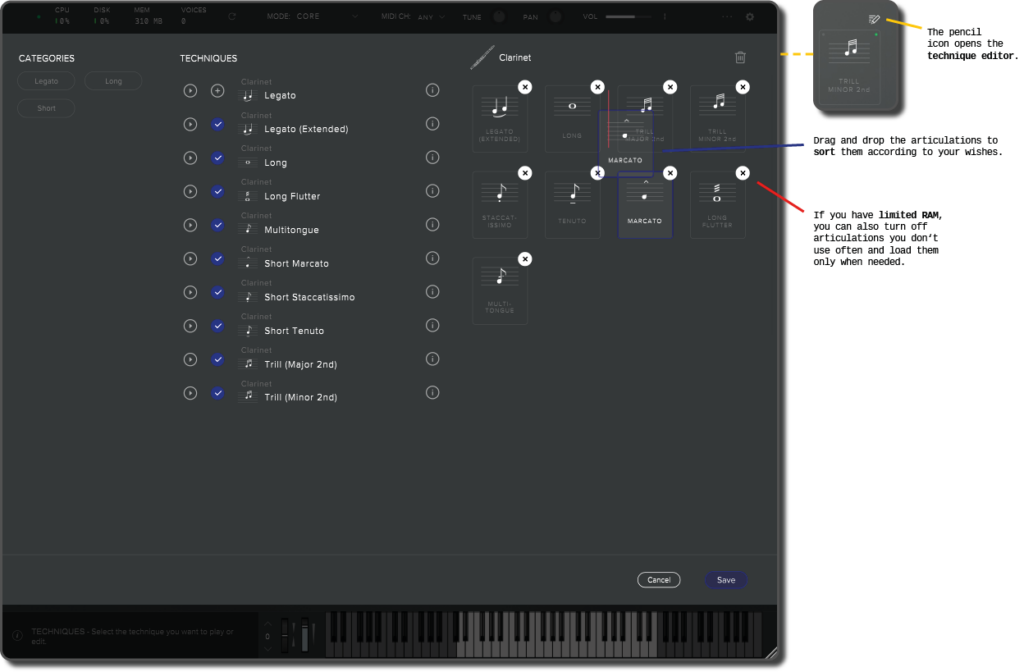
This has been a very welcome feature, at least for me, when building presets, as Spitfire tends to sort the articulations by occurrence. On the one hand, this is handy because if you have a lot of articulations to choose from, you do not have to use the arrow buttons to flip between pages so much. But personally, I always try to follow the same logic when building presets so that I can quickly find my way. Therefore I always sort the articulations from long to short, followed by tremolo, repetitions, trill and finally possibly special effects of the instruments like rips, falls, runs, arpeggios and so on.
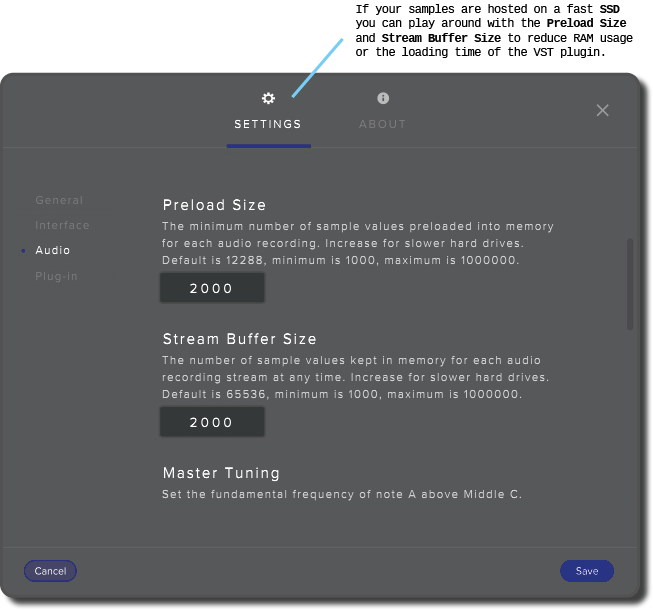
In the settings for the articulations, you can additionally turn off those that you do not use. This can be helpful if you do not have an endless amount of RAM available or just want to shorten the loading times. In that case, you should also take a look at the global settings and experiment with the preload and buffer size.
As with the Kontakt libraries, you can of course set other trigger options. With Speed and Velocity Range you can easily build custom performance patches this way.
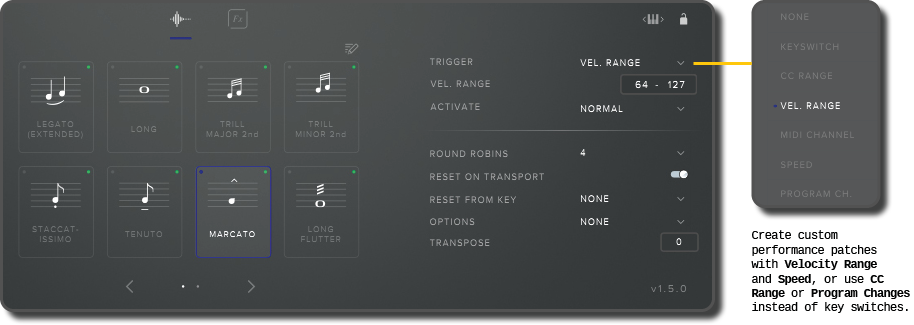
If you don’t want to block your keyboard with key switches, you can also select the trigger options CC Range or Program Changes from this list.
Attention: As already written in other places, Program Changes currently does not work with VST 3 in Ableton. You have to use the VST 2 plug-in!
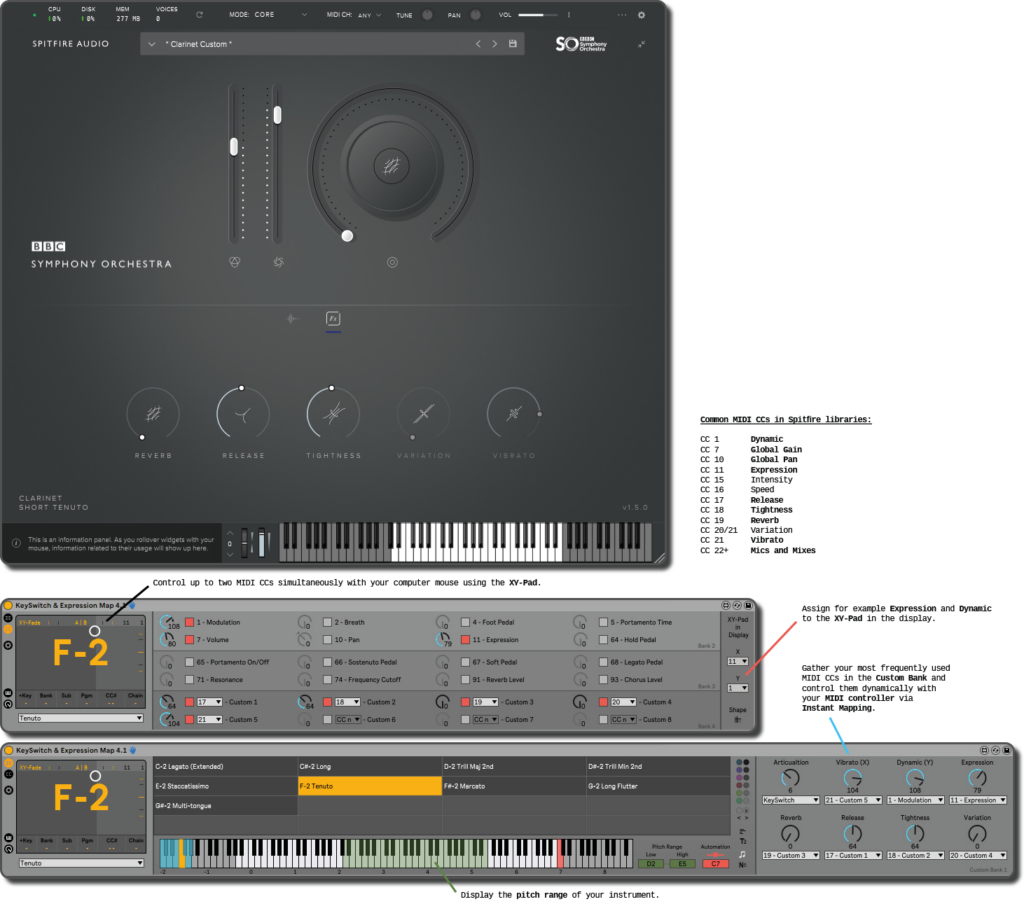
As with the other players, you may want to define additionally the pitch range of the instrument and assign the most common MIDI CCs to the Custom Bank or the XY-Pad in the display. Since Spitfire uses consequently the same MIDI CCs for all libraries, here is a small list of the common ones:
| CC 1 | Dynamic |
| CC 7 | Global Gain |
| CC 10 | Global Pan |
| CC 11 | Expression |
| CC 15 | Intensity |
| CC 16 | Speed |
| CC 17 | Release |
| CC 18 | Tightness |
| CC 19 | Reverb |
| CC 20/21 | Variation |
| CC 21 | Vibrato |
| CC 22+ | Mics and Mixes |
If everything is as you want it, you can finally export your key switches to easily use them in other projects. To do this, go to the Manager tab in the Settings of the KeySwitch & Expression Map, click on Export and save it as a JSON file to your desired location on your hard drive.
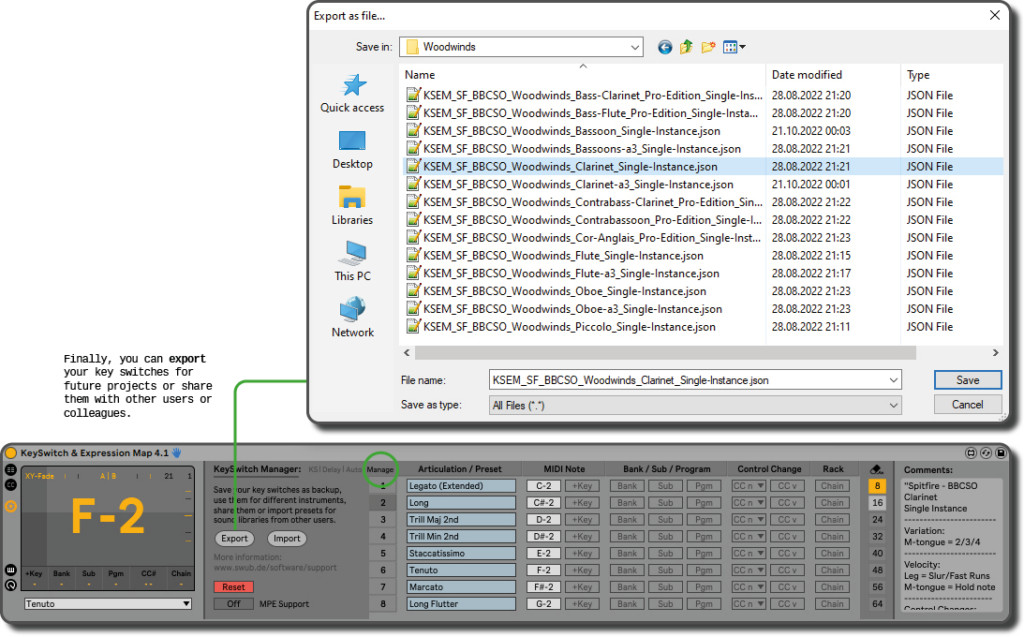
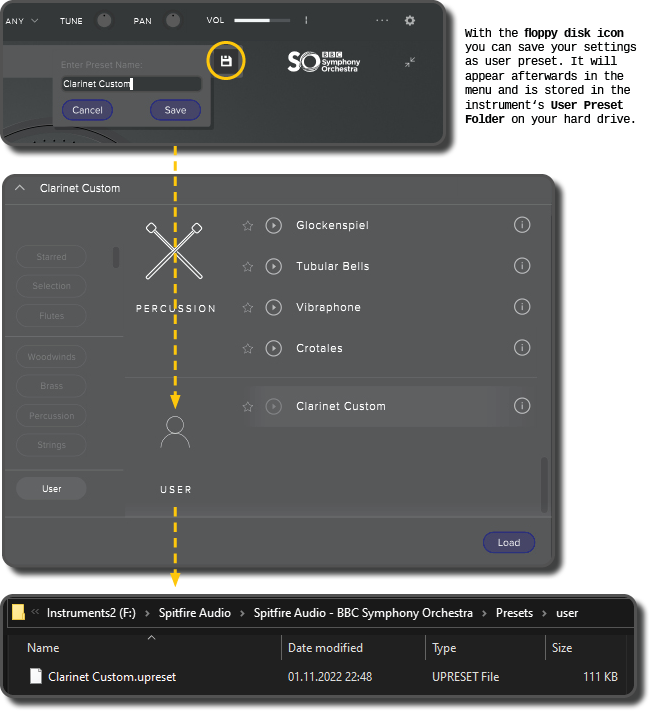
If you have changed something in the VST plug-in, you can also save these settings as a user preset and then find them in the menu or the User Preset Folder in the files of the instrument.
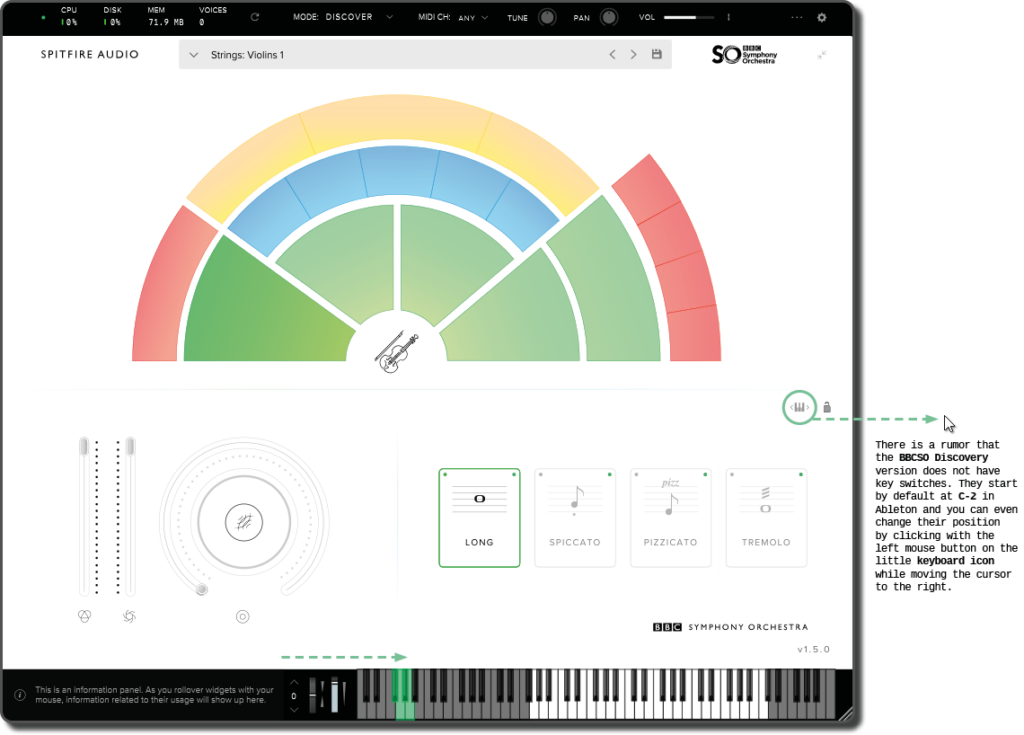
Since I have used the BBC Library in the example and several users have asked me about the Discover version: It also has key switches, which are by default from C-2 to D#-2 in Ableton. So they are only not visible at this place. If you click on the small keyboard icon and then slide to the right with the left button pressed, they will appear! 🙂
EastWest Sounds #
If you have been making music with orchestral instruments on your computer for a long time, the name EastWest might make you think directly of the libraries Hollywood Orchestra or Symphonic Orchestra.
Both libraries mentioned are a bit older, but especially the Hollywood Orchestra could be very interesting for beginners, as the quality of the samples has not changed, but all EastWest libraries are now available in the so-called Composer Cloud with a monthly or annual subscription for little money (20 – 30 EUR/month). So you can get a taste of the world of orchestration with DAWs without investing a fortune.
Sounds good, but there was a small catch: EastWest’s player Play was technically a bit outdated compared to the other players mentioned above. Even though it was further developed with smaller updates, the fresh colour could not change the fact that many contemporary features were missing. For example, you were either able to create own key switches nor changing articulations of provided ones. Furthermore, the loading times were rather long and the player was a bit RAM-intensive. However, it is fair to mention that this was also due to the many cross-fade features of the articulations (dynamics, vibrato, finger position etc.) and the low compression of the samples.
But here are the good news: EastWest has released their new player Opus. In addition, their flagship library Hollywood Orchestra has been overworked. Let us therefore start in the present with Opus and then I will give you some tips on how to create your own key switches in Ableton with the older player Play and how to reduce the RAM usage. I think that there are a lot of people, including myself, who still use the old Hollywood Orchestra on Play.
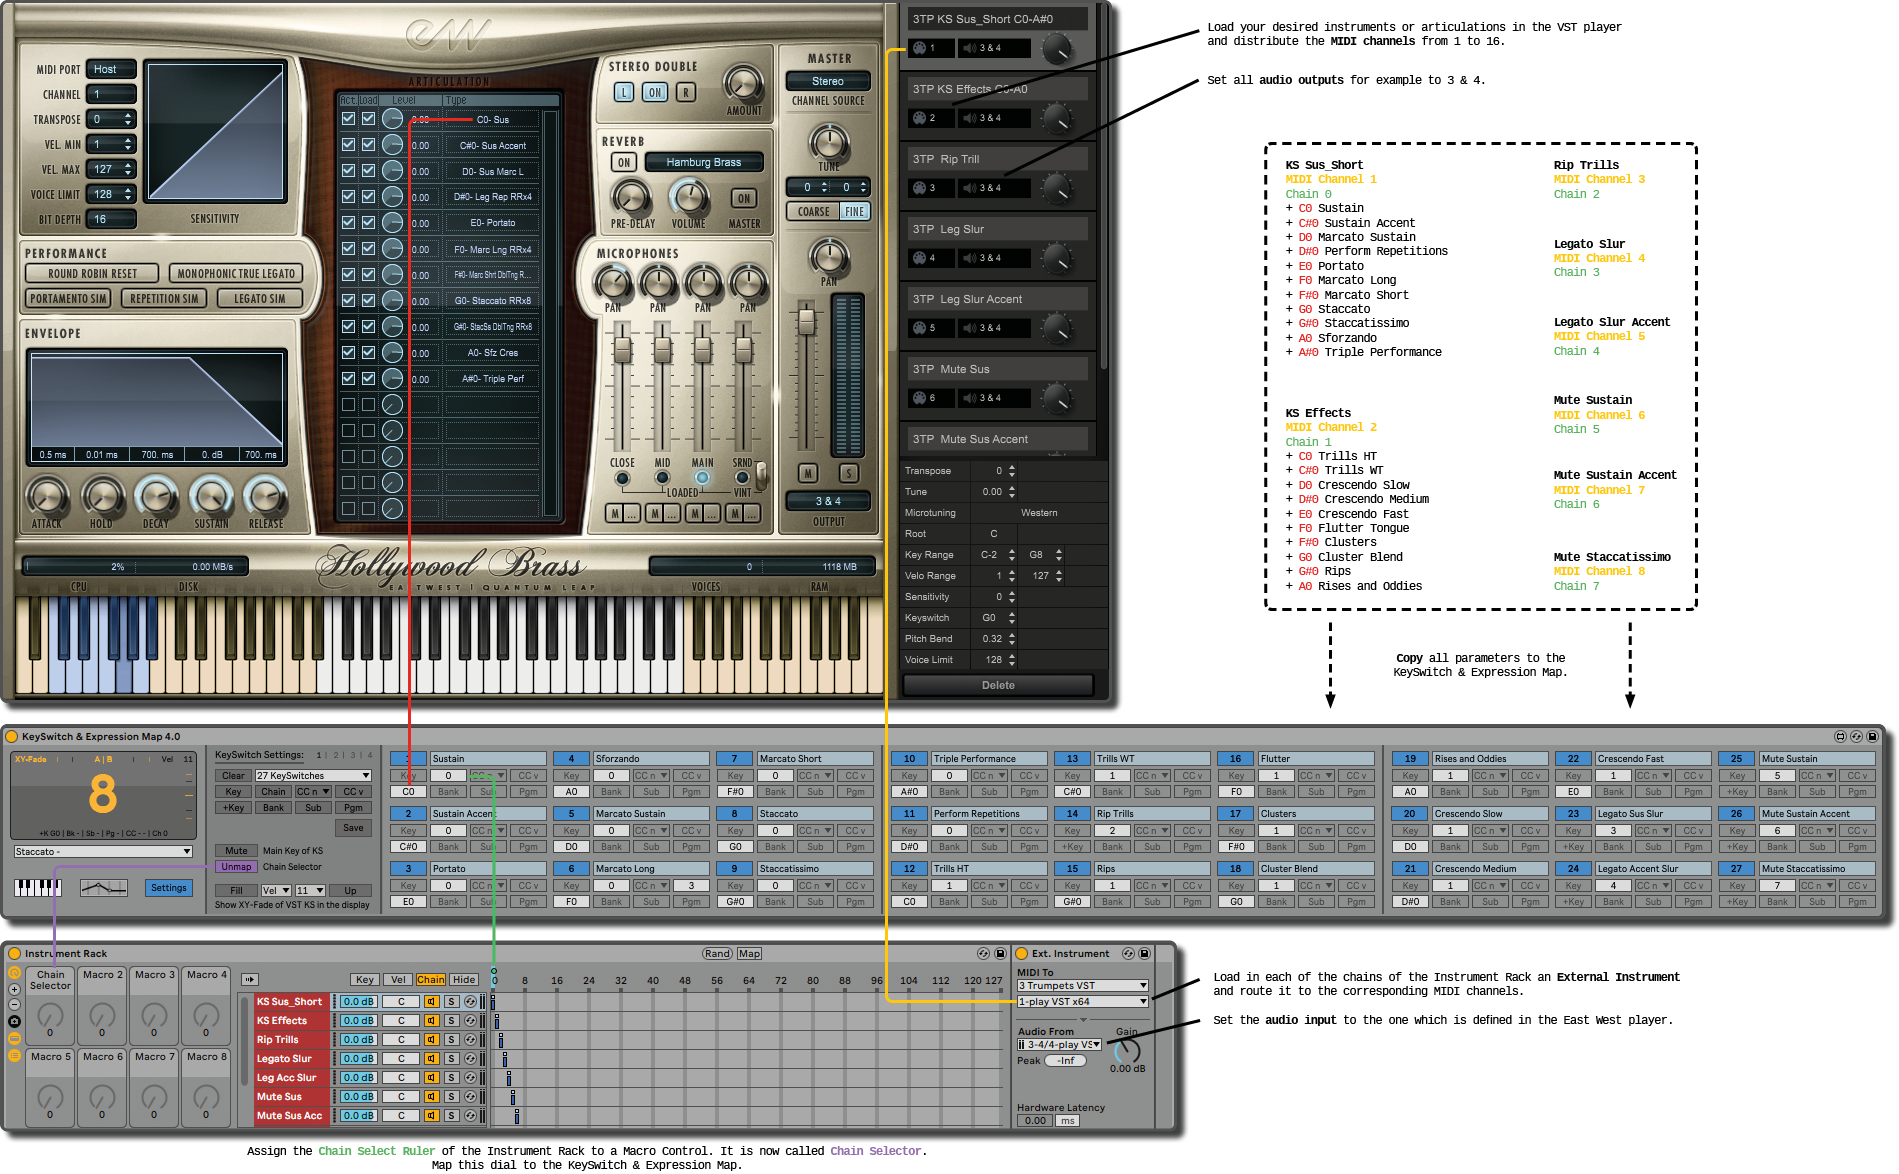
Opus #
With Opus Player you have two different kind of key switches:
- Most instruments come up with own key switches (KS Masters) in the Play Page which you can customize by choosing Articulations in the Window Selector of the Main Display.
- Or you build completely new ones on the Perform Page with the help of the Instrument Rack.
If your instrument from EastWest comes with provided key switches, then you should use them and can simply copy the parameters into the KeySwitch & Expression Map. This is faster and also the right way in case that you want to combine different legato patches in a phrase and switch between them. As far as I have experienced it (until version 1.2.2), the Perform Page and the Instrument Rack of the player does not support this.
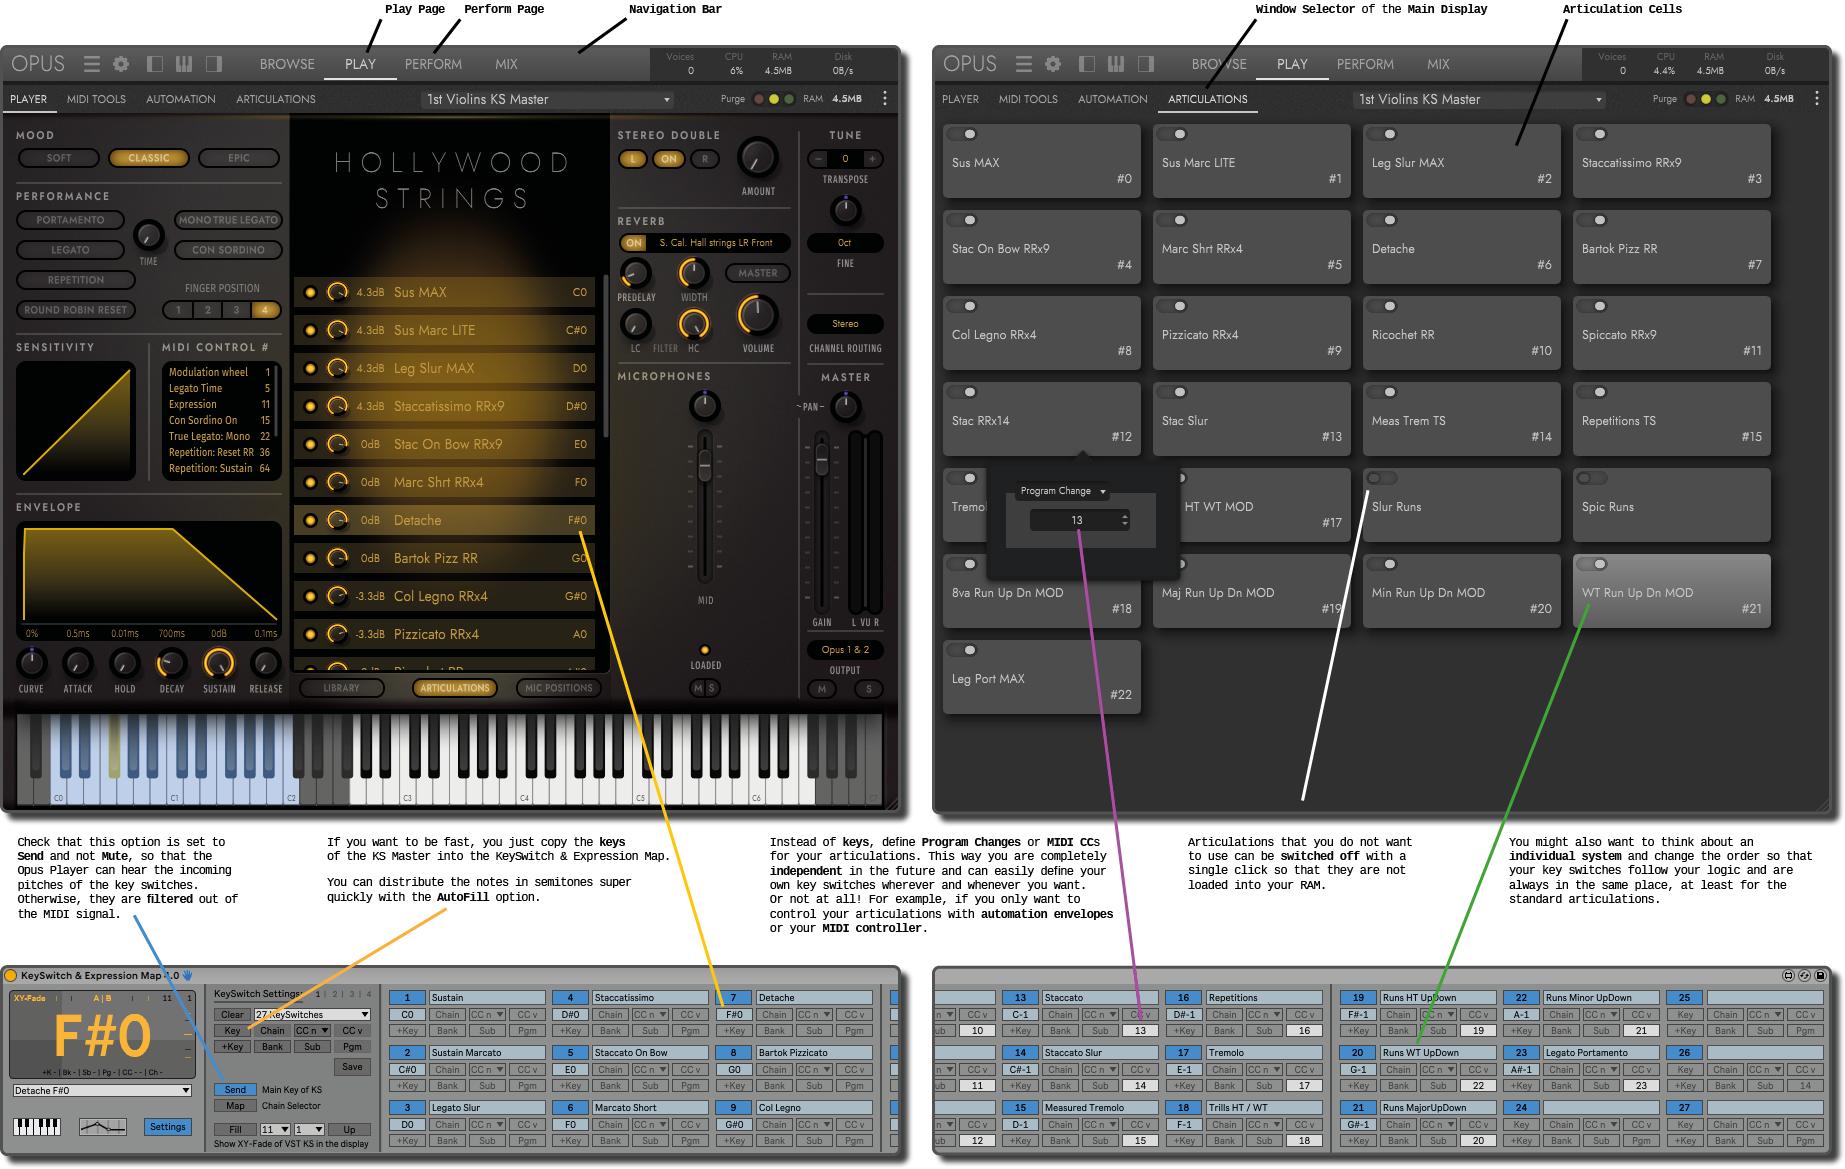
If you like, you can trigger the articulations as well with Key Switch Ranges, Program Changes, MIDI CCs or Velocity with a right mouse click on the Articulation Cell. Above I mentioned that I always prefer Program Changes. For Opus, I actually stayed at the MIDI note because there is not an option in the player to distribute the values automatically and you need to click thousand of times with the mouse to do the setting manually. Additionally, you select Program Change value “1” in the menu and finally “0” is displayed on the articulation cell. This is very confusing and I hope that they will change this at one point and stick either to 0-127 or to 1-128.
As shortly mentioned above, a second location to create and use key switches is the player’s Instrument Rack in combination with the Perform Page. You can build your own key switches here from scratch. This is definitely very interesting for EastWest libraries that do not offer key switches.
However, you have to watch out for your RAM usage in that case and using the “Purge” and “Update All Instruments” features like explained in the chapter about the Kontakt player. If your samples are hostet on a fast SSD, it also makes sense to deactivate the preloading of samples in the preferences of Opus.
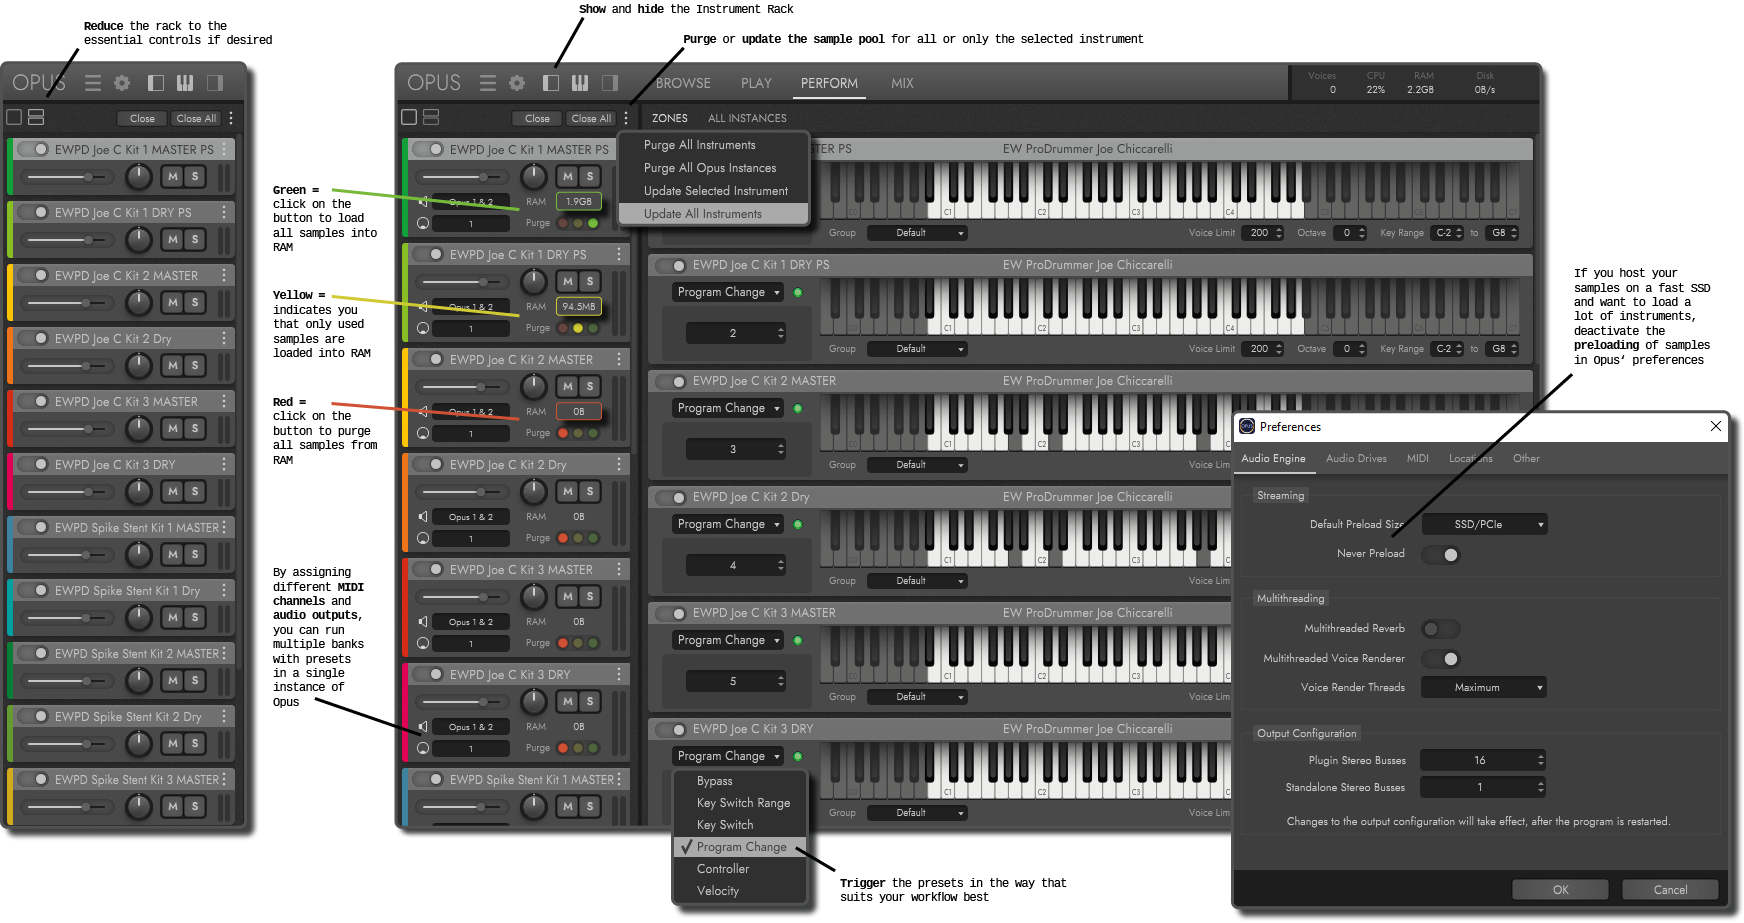
If you do not want to deal with the RAM stuff, as mentioned above, stay with the KS Masters because they seam to manage the RAM automatically and are more resource-friendly.
The Perfom Page becomes then only interesting, if you want to build additionally a few special patches in order to consolidate the articulations a little and thus be able to fit more articulations into the 64 slots of the KeySwitch & Expression Map. To do this, you use the perform page as a second “dimension”, similar to the Synchron Player, so that, for example, you do not have to assign two separate keys for Pizzicato and Pizzicato Bartok, but instead vary between them with MIDI CC or Velocity. Basically like EastWest’s MOD Speed articulations, where you can switch between slow and fast with the modulation wheel (CC 1).
For instance, this can be very useful with instruments such as the Solo Trombone, which offers you loads of effects that you can bundle a bit in this way. In the following example, I have combined the three Jazz effects of the Trombone and you can choose between the different variants Jazz Marc (0 – 42), Jazz Shake Med (43 – 84) and Jazz Shake Slw (85 – 127) with CC 70. For that reason, I loaded the key switch of the trombone into the Instrument Rack a second time, switched off all the other articulations cells and set their trigger method to None.
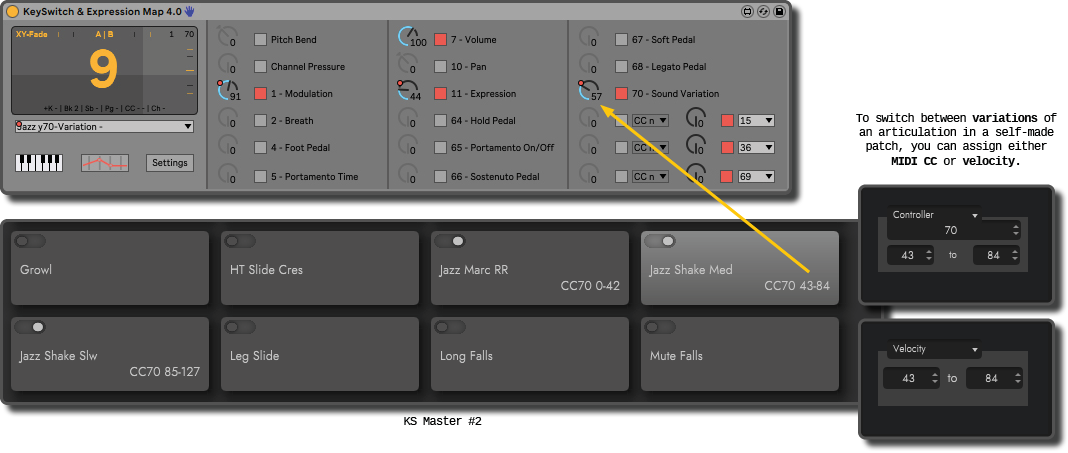
In this set-up, the player’s Instrument Rack is controlled with CC 0 (Bank, MSB) and the articulations in the KS Masters with CC 32 (Sub Bank, LSB). If you only use automation envelopes or your MIDI controller anyway, like this you will not be bothered by key switches on your piano. And if you do want to have some in the furture, you still can assign the Main Keys of the KeySwitch & Expression Map.

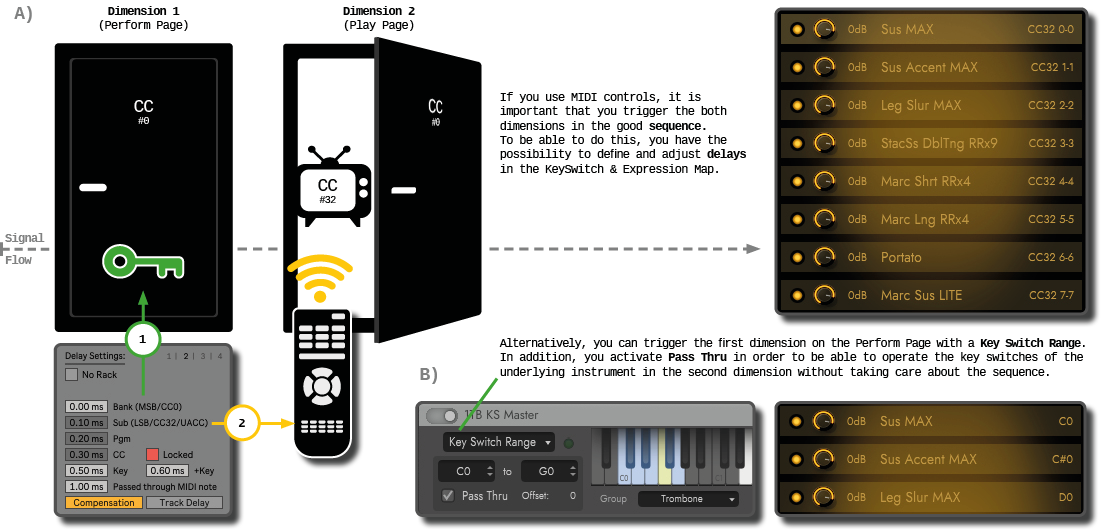
If you use the two key switches in that way, there is one more thing you need to know. In contrast to the Synchron Player, you can only switch the dimensions one after the other. Imagine two rooms. In the second room there is a television. With your infrared remote control, you can only switch the TV if you are physically in the second room or at least the door is open, because the infrared light does not shine through the wall. So you have to open first the door to go into the second room before you can change the channel!
For this reason, it is important that you set the delays in the KeySwitch & Expression Map correctly and send the parameters out in the right sequence. In the example (A), the articulations in the instrument rack are triggered first with Bank (CC 0) and only then is sent the value for the Sub Bank (CC 32) or other MIDI CCs for the articulations cells of the KS Master.
If you like, you can also have CC 70 shown in the display of the KeySwitch & Expression Map as X or Y-Fader and thus always know which variant is currently selected. Small lines as markers help you to quickly interpretate the fader’s indicator. The yellow lines divide the display into quarters and the black lines into thirds.
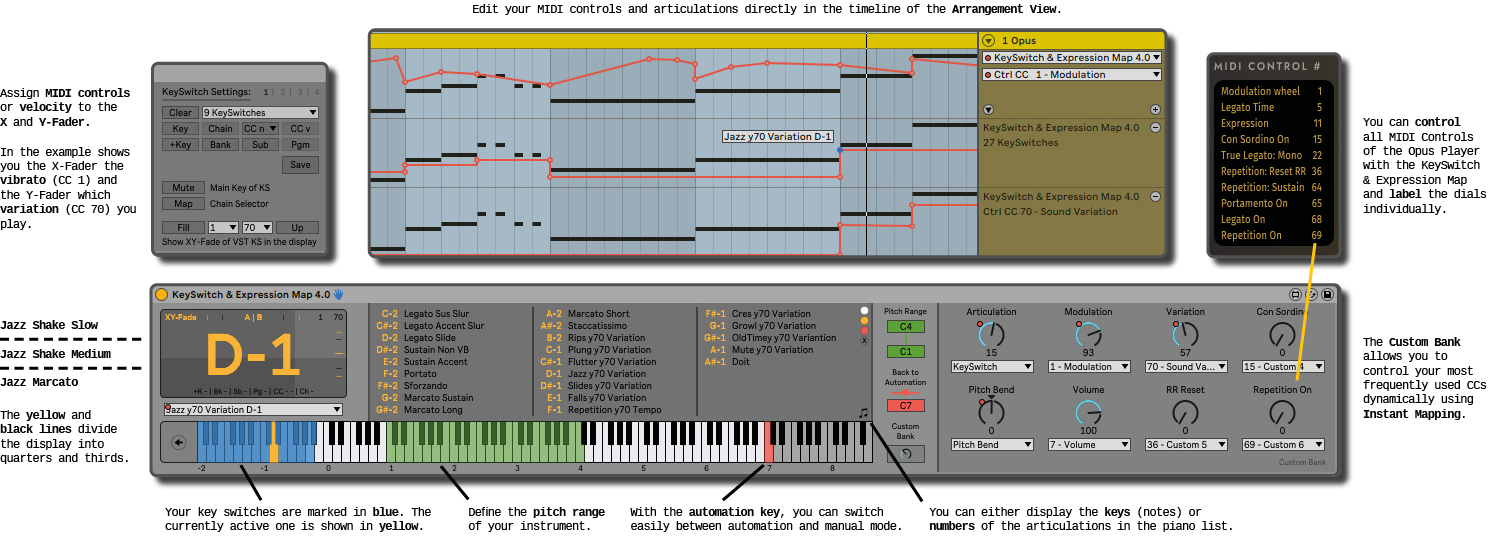
Generally, you can activate other MIDI controls of the library in the KeySwitch & Expression Map to edit them with a better overview in the Arrangement View. Furthermore, you can assign your most frequently used MIDI CCs to the Custom Bank to control them dynamically with your MIDI controller using Instant Mapping. Here is a list with all CC numbers of the Hollywood Orchestra Opus Edition:
- Modulation Wheel (e.g. Vibrato or MOD Speed) CC 1
- Legato Time CC 5
- Volume CC 7
- Expression (Dynamics) CC 11
- Con Sordino CC 15
- True Legato CC22
- RR (Round Robin) Reset CC36
- Sustain CC 64
- Portamento On/Off CC 65
- Legato On/Off CC 68
- Repetition On/Off CC69
Last but not least, you can also create combinations of instruments with the Perform Page which you can control then like a single instrument. This can be quite interesting if you compose with the same combination of instruments frequently – for example, you like to add a flute to the violins to make the sound softer. To do this, you select the same key switch for the articulations which the violin and flute are supposed to play together. You can save this preset afterwards in the menu as performance.
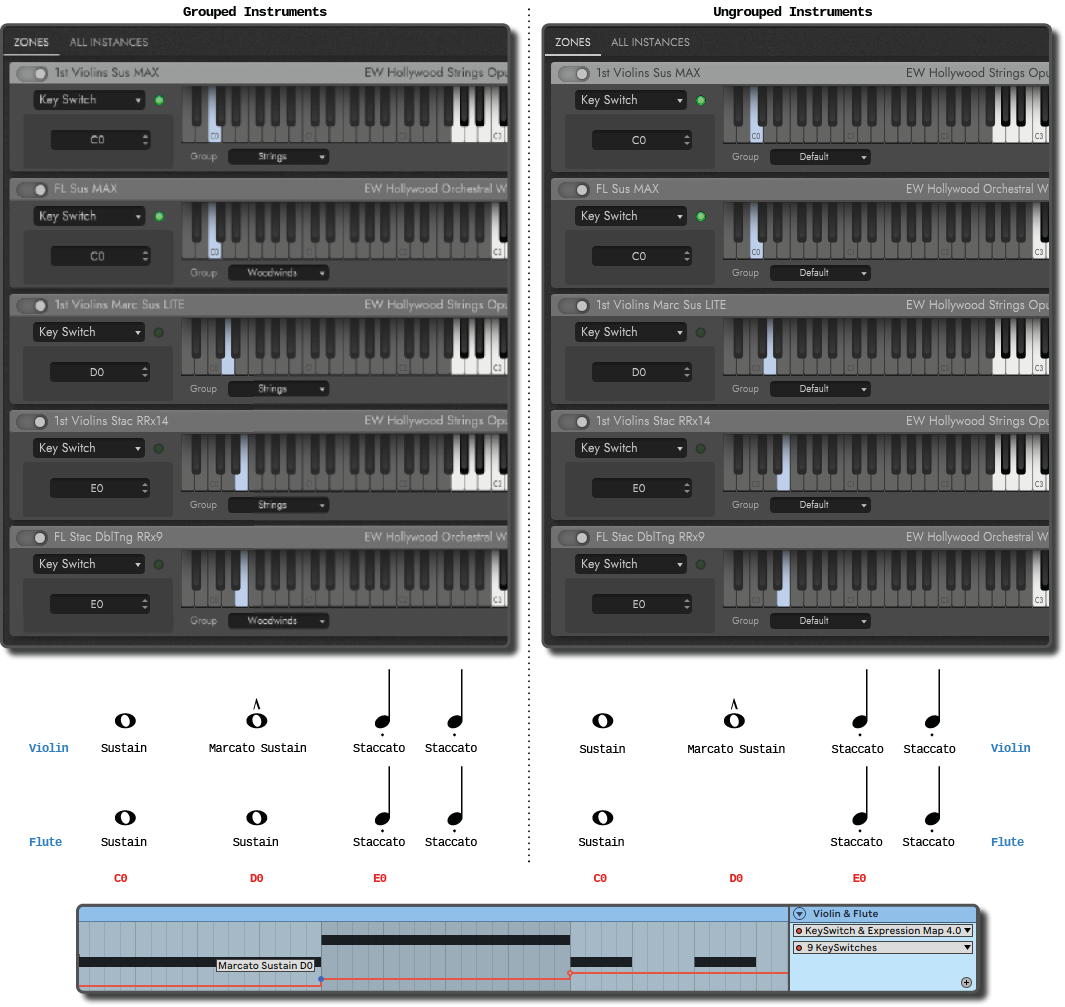
Since it took me a while to understand why and when you should additionally assign the instruments to a group, here is a small example to explain the difference. In the image, the violin changes from Sustain (C0) to Marcato Sustain (D0) and then to Staccato (E0). The flute, however, only changes from Sustain (C0) to Staccato (E0) and plays another regular Sustain at the violin’s Marcato Sustain. In other words, an instrument only changes articulation when a new key switch is triggered in the group. This was not the case with the flute. The key switch D0 does not exist in the group of woodwinds. In contrast, if all instruments would be set to default or if the flute and violin would belong to the same group, then the flute would not play along with the Marcato Sustain and would suspend at the note.
User Manual:
EW Opus
Play #
As mentioned above, the player has gotten a little old, but with the help of Abelton’s Instrument Rack, however, you can pimp up the player quite well and build your own key switches.
In addition to the provided key switch, you load further articulations into the other MIDI channels that you would like to have. You can then control the channels with external instruments in the chains of the Instrument Rack.
If you choose the articulations in a clever way, e.g. Shorts MOD Speeds, Legato Slur + Portamento combinations etc., you can control a lot of articulations in this way and still keep your instrument quite intuitively playable.
Theoretically, you can even create your own patches with the velocity zones of the rack. For the legacy versions of the Hollywood Strings, this could be for example a combination of Sustain and Marcato Sustain, articulations with bow changes, Runs down and up or Crescendos with different speeds. Depending on how hard you press the key on your piano, you then play one or the other articulation within the same key switch. The display of the KeySwitch & Expression Map can as well show you the velocity for better orientation.
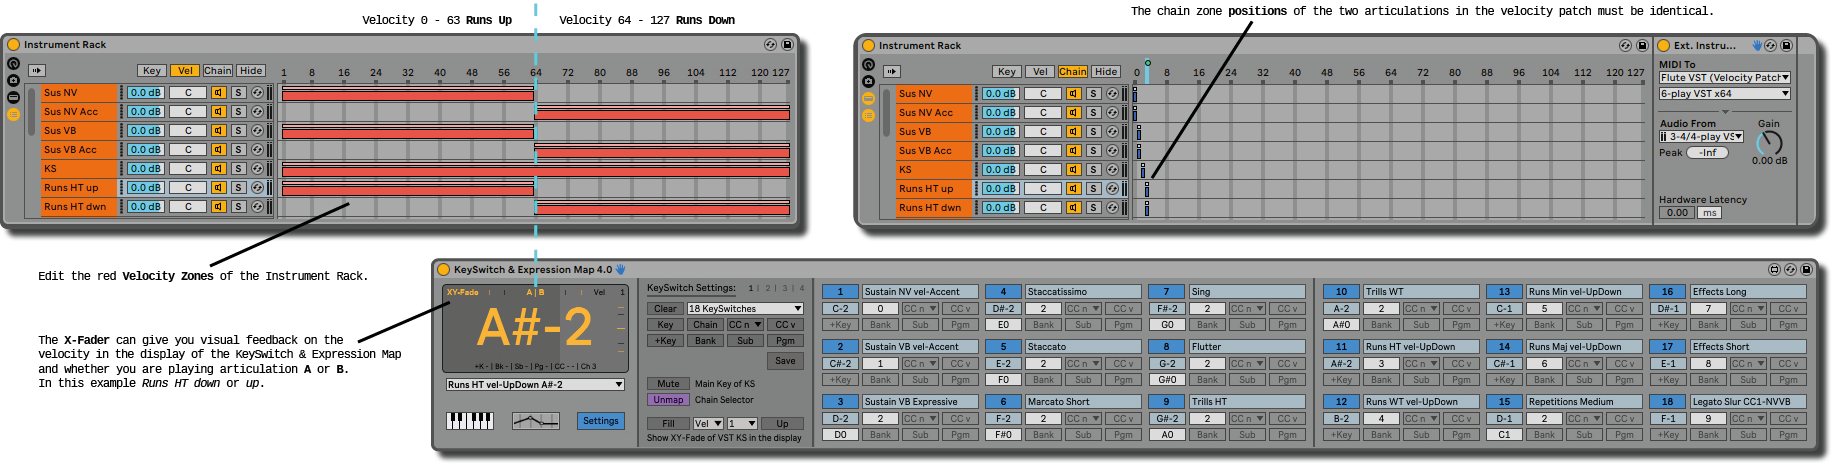
Also note that when using automation envelopes for your articulations in conjunction with an Instrument Rack, you must set the delays to use Ableton’s Chase MIDI Notes feature. That allows you to skip through the timeline of the Arrangement View and the note at that point will immediately play with the articulation set. This way the cursor in the timeline does not have to pass the next breakpoint first. In order that you do not have to adjust much, I have made several tests and created presets based on their average results. So normally you only have to …
- specify that you are using a rack
- define if you want to filter MIDI controls or not
- set the buffer size of your sound card

It should then work directly out of the box. For more details on how to use the delays of the KeySwitch & Expression Map, have a look here.
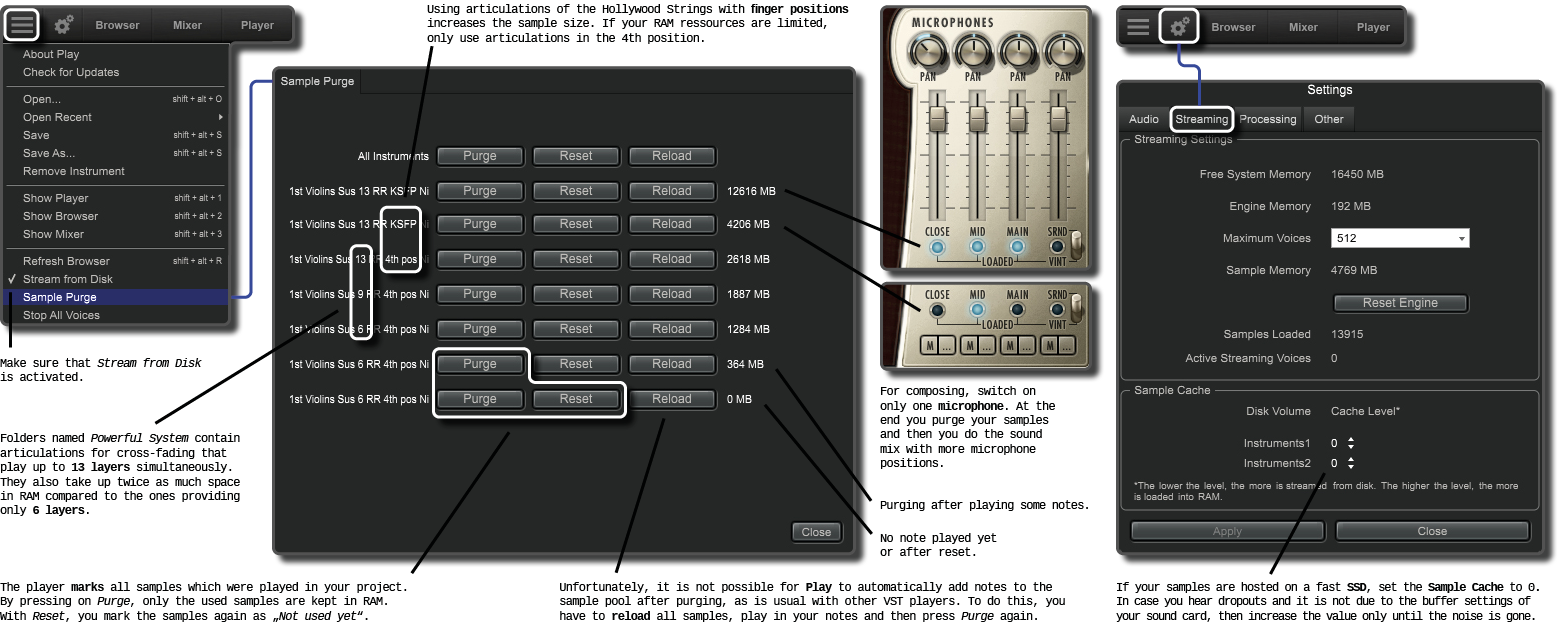
Finally, but also depending on your computer system, the only problem which stays might be the RAM. Especially, if you want to use a lot of instruments with many different articulations. Here are a few general tips on how you can reduce the player’s RAM demand a bit:
The player loads the beginning part of the samples into RAM to have time to find and start playing the sample. The rest of the sample is then streamed directly from disk. With the Sample Cache in the Streaming tab of the preferences, you can influence the size of this first part and choose a value between 0 and 5. If your computer has an SSD built in, be sure to set the Sample Cache to 0 or 1. The exact value depends on how many instruments are playing simultaneously in your project and whether you have an SSD with M.2 or SATA connection.
Next and as explained above, keep in mind that folder names with the label Powerful System sometimes play 13 voices at the same time, so that you can cross-fade the depth of the vibrato and the dynamics of the instrument as realistically as possible. However, this also means that for each note the first milliseconds of 13 samples are loaded into the memory. Therefore, think carefully if you need this when composing or if the 6 or 9 layers would do as well the job.
The same goes for the microphone positions. Only activate the ones you really want to use.
In the strings there are articulations where you can select the finger position dynamically with key switches. Select only the articulation in the fourth position of the instrument.
I think I’ve noticed that loading the included key switches also loads a few megabytes less into your memory, since the release sounds may be used more efficiently by multiple articulations? But it can also be that this is homeopathic wishful thinking;-) In any case, it allows you to use more than 16 articulations for your key switches, despite the limited number of MIDI channels.
In addition to the things mentioned above, the player also offers the possibility to purge all instruments or only individual ones. Play also marks the samples used and can unload all those not needed from RAM. Unfortunately, however, it is not possible to automatically reload the missing samples when needed, as it is the case with the other players above. To do this, you first have to reload all samples again, play your notes once and then press Purge again.
However, since the information about the sample pool is saved together with your Ableton project and therefore only the required samples are loaded when starting your project next time, you can compose for example in this way first with the restrictions mentioned above (6 instead of 13 layers, only one microphone position etc.) and “upgrade” your tracks one after the other when you finished your composition.
- Change e.g. from Sustain 6 RR 4th pos Ni to Sustain 13 RR KSFP Ni
- Reload all samples
- Play back your song from beginning to end, so that Play marks all samples used
- Press Purge
Now you have most likely removed some MB from your memory and still achieve in this way the best possible quality when exporting your finished song.
User manual:
EW Play 6
That’s it for the moment. As soon as a new library player crosses my computer, I will add it. As mentioned in the beginning, these are all the players I use myself. If your VST player was not included, I hope that the basic idea has become clear through the other examples.
If you have any further tips, feedback or still questions, please write me a mail or leave a comment.


