Ableton allows you to remotely control functions and parameters with your MIDI controller in two different ways. You can either use Manual MIDI Mappings / Assignments to permanently map the knobs, faders and pads of your MIDI controller to functions and parameters in Ableton, or you can use Instant Mapping to dynamically remote control only the currently selected device in Live at any given time.
Manual MIDI Mapping #
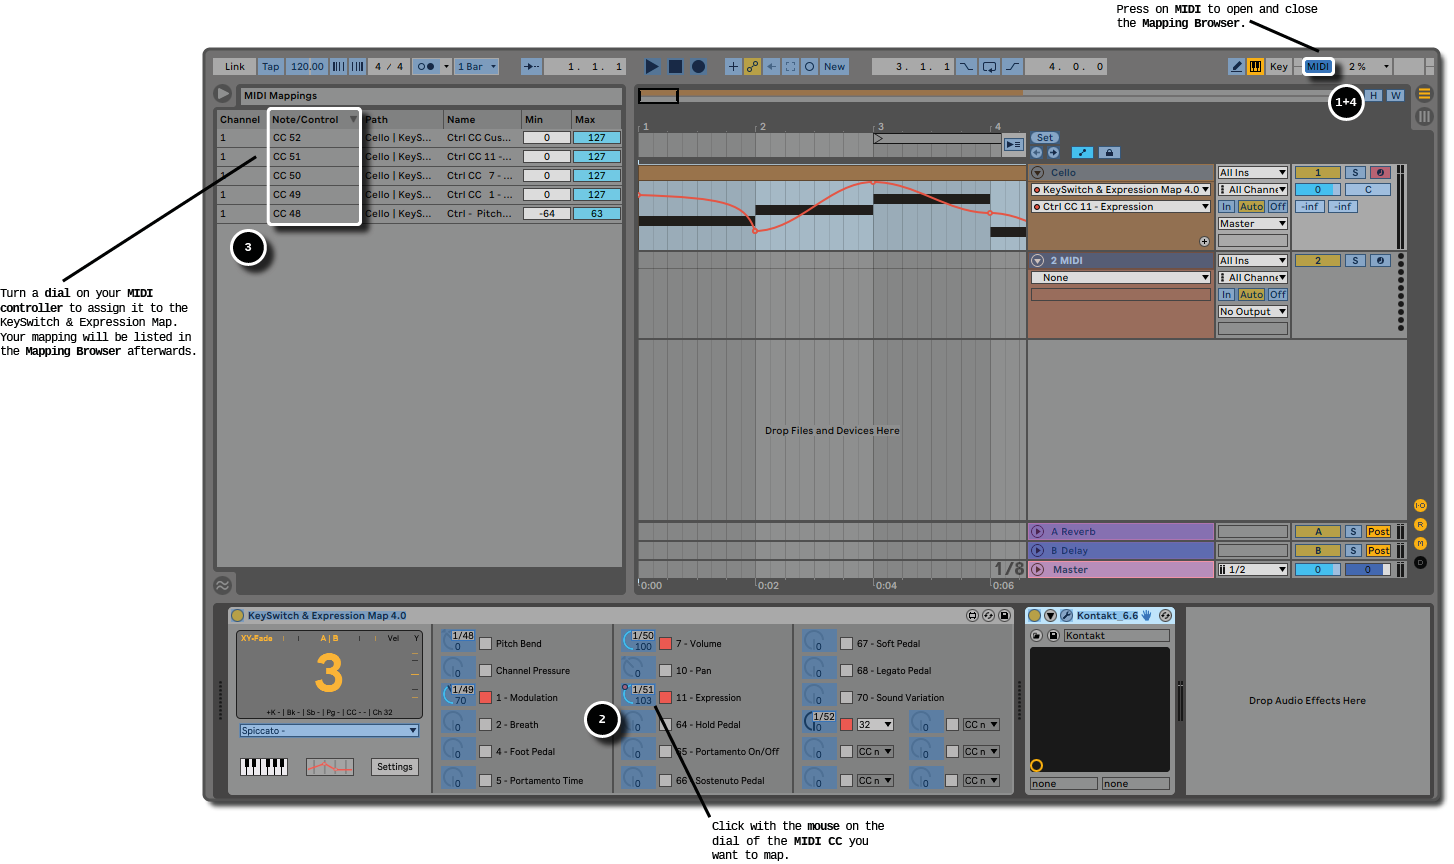
For the first method, you use the MIDI Map Mode. To activate it, press the MIDI button in the upper right corner of Ableton Live’s user interface (1). Then select a parameter in Ableton with the computer mouse (2) and turn / press a slider, knob or pad on your MIDI controller (3). Now the control is mapped to the parameter until you delete the MIDI mapping in the Mapping Browser. If desired, you can also limit the MIDI range of your controller by specifying a minimum and maximum value. Click again on MIDI to leave the MIDI Map Mode (4).
Instant Mapping #
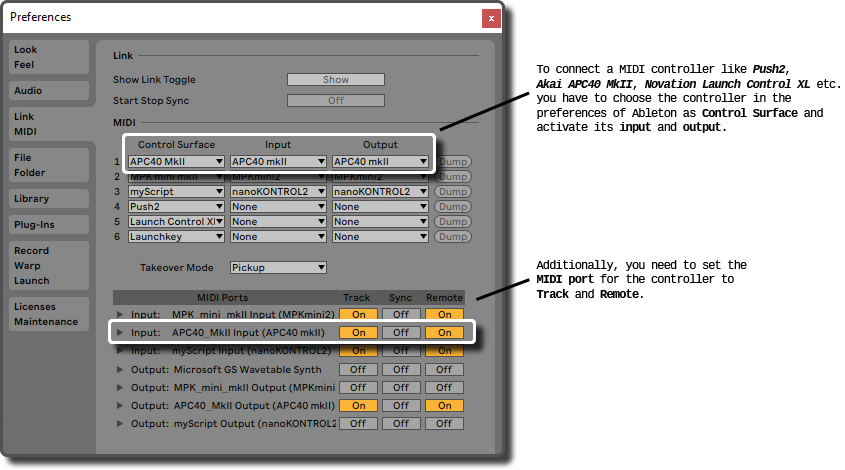
With the second method, the mapping of the controls happens automatically by selecting your MIDI controller as Control Surface in Ableton’s Preferences in the Link/MIDI tab. MIDI controllers such as Push2, Akai APC40 MKII or Novation’s Launch Controller, among many others, will be directly selectable there with one click and will work out of the box.
If your MIDI controller is not in the list, you can create your own Control Surface Script, or also called MIDI Remote Script. Here you can find a detailed tutorial how to do this if required.
You can also use this script to dynamically connect controls of your master keyboard to the KeySwitch & Expression Map. For example to record automation envelopes directly in the Arrangement View with your modulation wheel as you would normally do it for the MIDI clip.
What is the best way? #
Which method you should use basically depends on what you want to do with the KeySwitch & Expression Map. Usually, however, you probably want to use Instant Mapping, since it allows you to control and record only the key switches and MIDI controls of the currently selected instance or track.
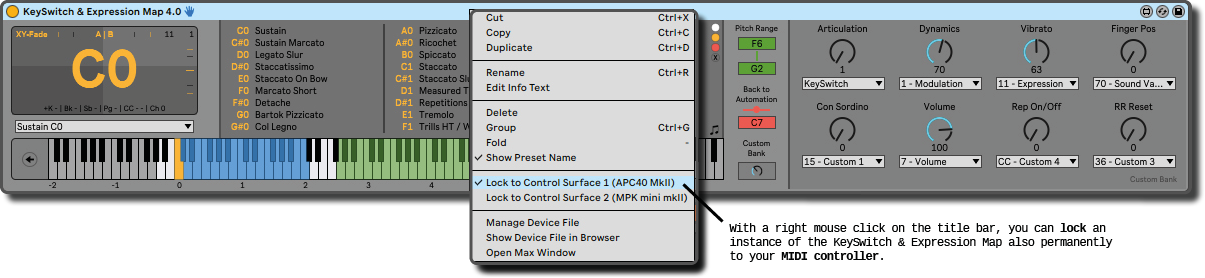
Info: If needed, you can use the right mouse button to map your MIDI controller as well with instant mapping permanently to just one instance of the KeySwitch & Expression Map.
The Manual MIDI Mappings are interesting for three scenarios:
- You only want to control one instance with a specific hardware controller anyway.
- You want to control several or all instances at the same time.
- You want to map only some of your device controls dynamically. For instances, you want to control permanently the Master Volume of Ableton by using controller 8.
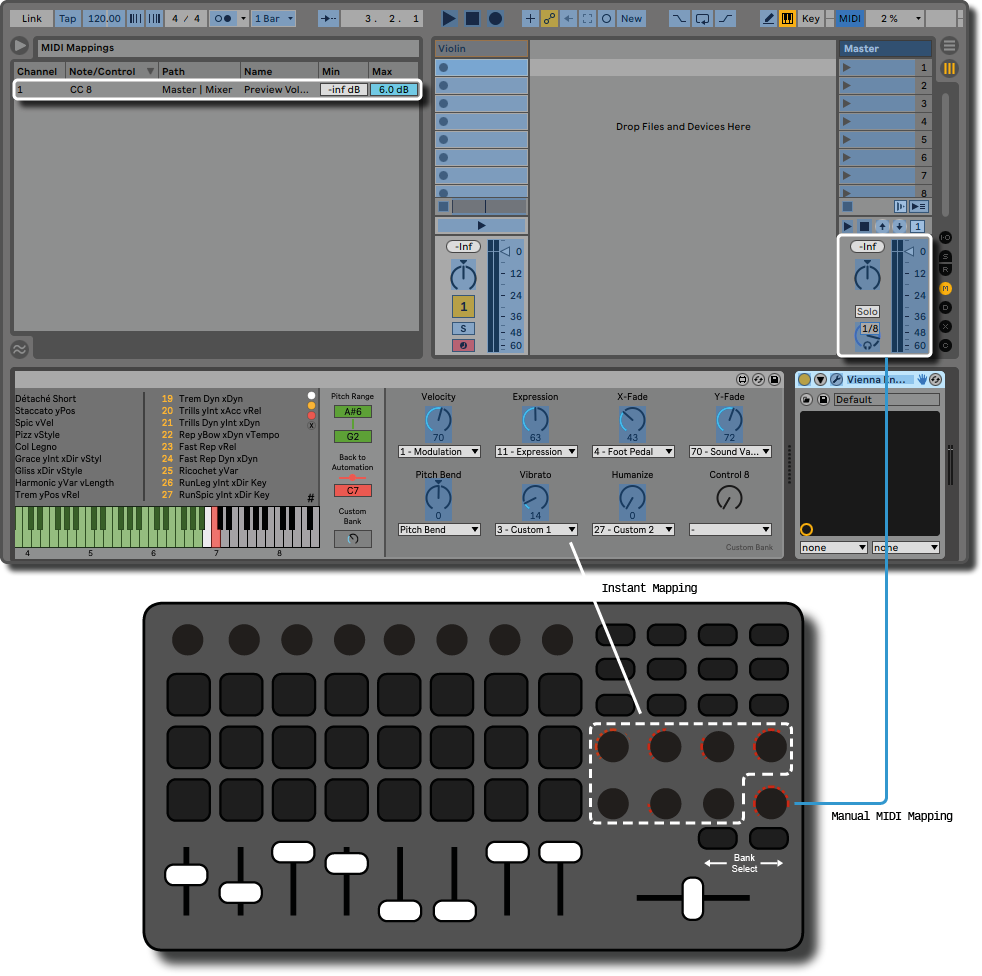
Please note: Manual MIDI mapping takes precedence over instant mapping. Conversely, this would also be a tip for trouble shooting, if one of the controls just does not want to work with Instant Mapping. In that case, check if the knob is listed in the MIDI Map Browser.
If you prefer to record MIDI CCs via the track’s MIDI input, take a look at the KSEM Router at the end of the page.
Examples #
Here are a few examples of how you can remote control the KeySwitch & Expression Map.
Device Control Encoders / Parameter Banks #
The MIDI controls are organized into four banks for Instant Mapping. You can easily switch from one bank to another. For a quick workflow, you can also customize the first bank to combine your most frequently used MIDI controls into eight device controls.
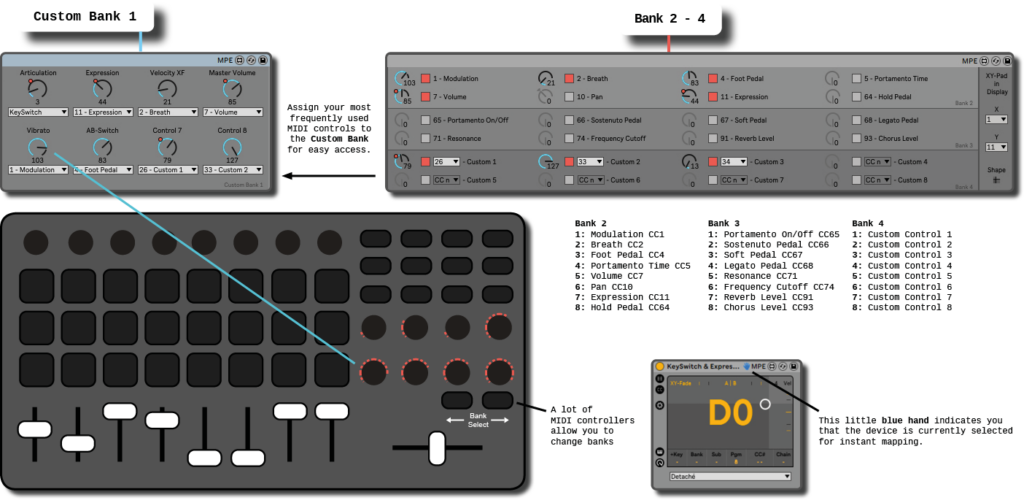
Additionally, the custom bank is also for those who use their own control surface script because their MIDI controller or keyboard is not natively supported in Abelton. With your custom script, you can probably only use one bank of eight device control encoders for instant mapping. With the custom bank you will still have access to an individual selection of all the MIDI controls in the banks 2 to 4.
To customize the first bank with its eight device controls, simply select the desired MIDI controls from the menu. If you like, you can also rename the labels from the default Controllers 1-8 to something more meaningful, so you always know immediately what they control.
The first controller allows you additionally to control your key switches.
Using a rack’s Macro Controls #
In addition or instead to the Custom Bank, you can load the KeySwitch & Expression Map into an Ableton Live Rack and then assign the Rack’s eight (16 with Ableton Live 11) Macro Controls to the parameters you want to control remotely.
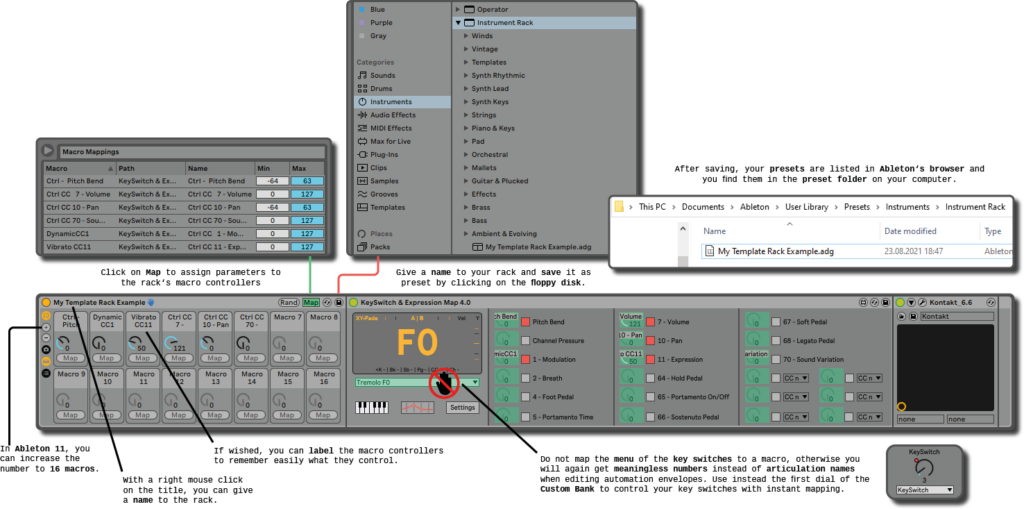
So if you can only use a control surface script with a single bank, as mentioned above, this would be a way to switch focus between the Rack’s macro controls and the KeySwitch & Expression Map’s custom bank with a mouse click and still be able to dynamically control 16 parameters.
Incidentally, you can do this with all the devices in Ableton that do not allow you to dynamically control parameters with Instant Mapping.
Grouping the Keyswitch & Expression Map together with your VST instrument into an Instrument Rack is also a way to create templates.
Attention: You can assign the Key Switch Menu to a Macro Control, but you will lose the possibility to edit the key switches with the automation envelopes by their names! You will then again see meaningless MIDI numbers for the breakpoints.
Pads for key switching #
To control your key switches dynamically with pads, set the pads in the editor software of your MIDI controller not to Control Changes (CC), but to MIDI notes. Here is an example for the Korg nanoPAD using the Korg Kontrol Editor:
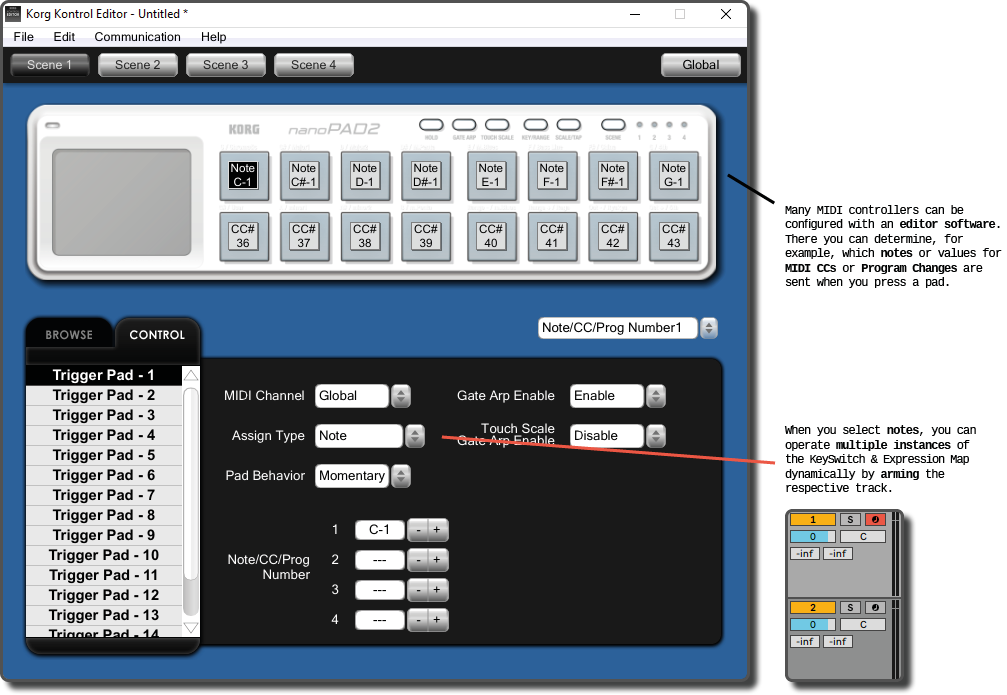
Probably the best way to do this is to select the octaves outside the range of a piano with 88 keys – for example C-1 to B-1. Thus, you can control all analog instruments with the pads and it does not matter what pitch range they have. Read more about the pitch ranges of different instruments and where it is best to place your key switches here.
KSEM Router #
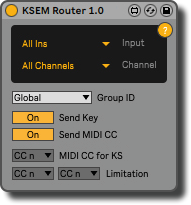
And last but not least. With version 4.2 the KeySwitch & Expression Map got support by a new
colleague – the KSEM Router. It is a free additional tool for Ableton 11.
As described here, the KeySwitch & Expression Map filters the signal of the MIDI CCs activated in it from the received MIDI signal of the track to avoid crosstalk with possible automation envelopes in the MIDI clip. With the KSEM Router, however, you can now receive the MIDI signal of a MIDI controller directly.
So if you have a MIDI controller that doesn’t have a native control surface for instant mapping, you can use the KSEM Router to record MIDI CCs as usual and bypass the MIDI clip. The same applies if you want to use the mod wheel of your keyboard, for example, to record the dynamics of an instrument.
You can download it in the Tools section. There you will also find more information on how to integrate it into your Ableton project and what settings you can make.


