You can also control sound banks or presets of external instruments like keyboards, synthesizers or drum pads with the KeySwitch & Expression Map. As an example, here is the setup with a KORK minilogue XD synthesizer.
Connect the External Instrument #
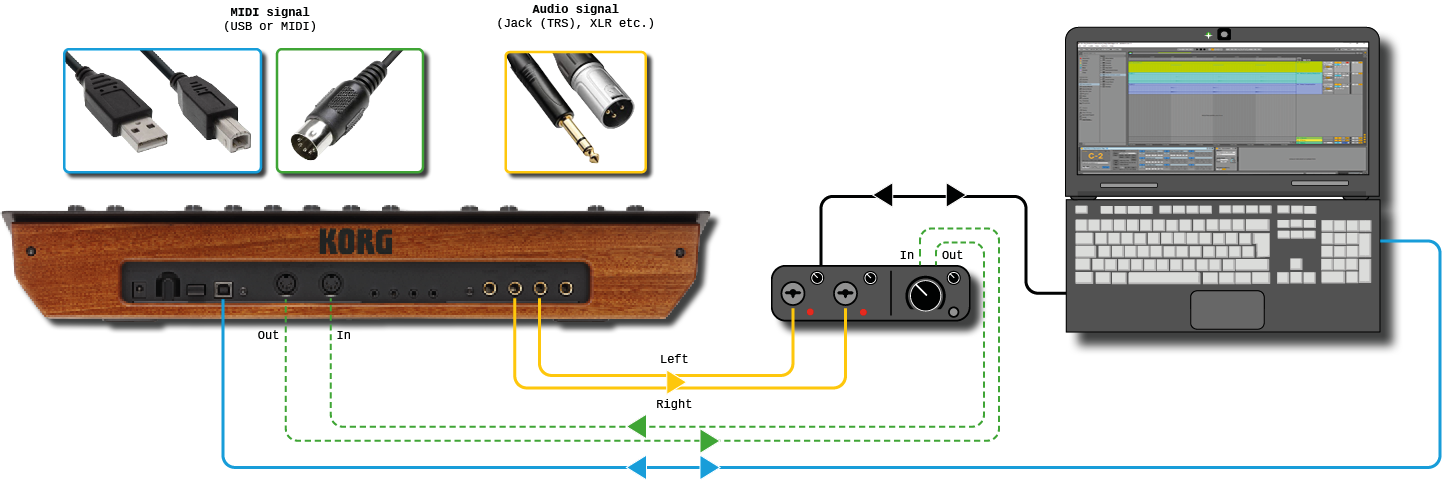
Connect the instrument with MIDI cables to your audio interface or directly via USB to your computer to send and receive MIDI notes and MIDI controls. To receive the audio signal from your device, connect its audio outputs to the audio inputs of your audio interface using an XLR, Jack (TRS) or other audio cables.
Make sure it is recognized by Ableton Live and that the MIDI inputs and outputs are enabled in the settings.
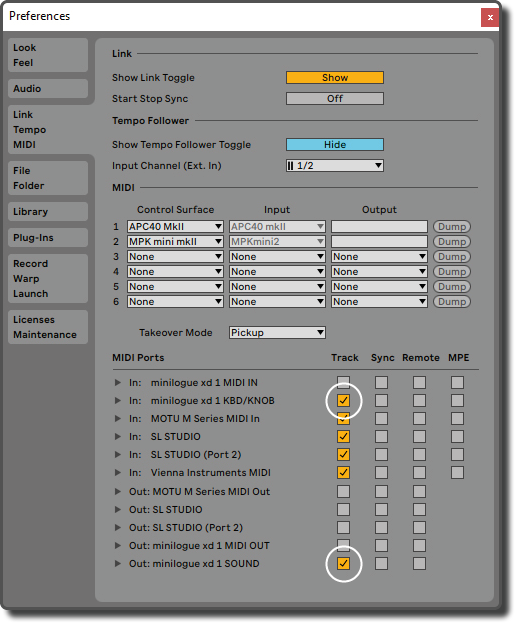
If your device is not in the list of MIDI Ports, restart Ableton and try it again. Not all devices will be detected by Ableton while it is running if they were only connected after the software was started.
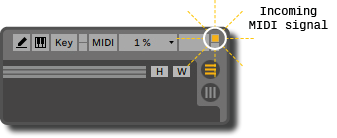
After you have made all the settings, you can easily check if MIDI data is being received from the instrument by observing the little box in the upper right corner of Ableton’s interface that should light up briefly when you play a note or turn a knob.
Next, drag an External Instrument from the Ableton Browser into an empty MIDI track.
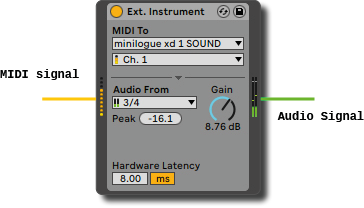
In the MIDI To menu, select the MIDI output of your audio interface or directly the device if you connected it using an USB cable. MIDI has 16 different channels to control multiple devices separately. Select the channel that is set in your device. By default, it will probably be set to channel 1. Otherwise you have to try a little bit or consult the manual of the instrument. Finally, in the Audio From menu, set the audio input of your sound card to which you have connected the instrument. Depending on the kind and number of audio outputs you have, this must be mono (1, 2, 3, etc) or stereo (1/2, 3/4, etc).
Arm the track and do a little test. Normally you should now hear something when you play the instrument. If necessary, you can adjust the volume with the gain control.
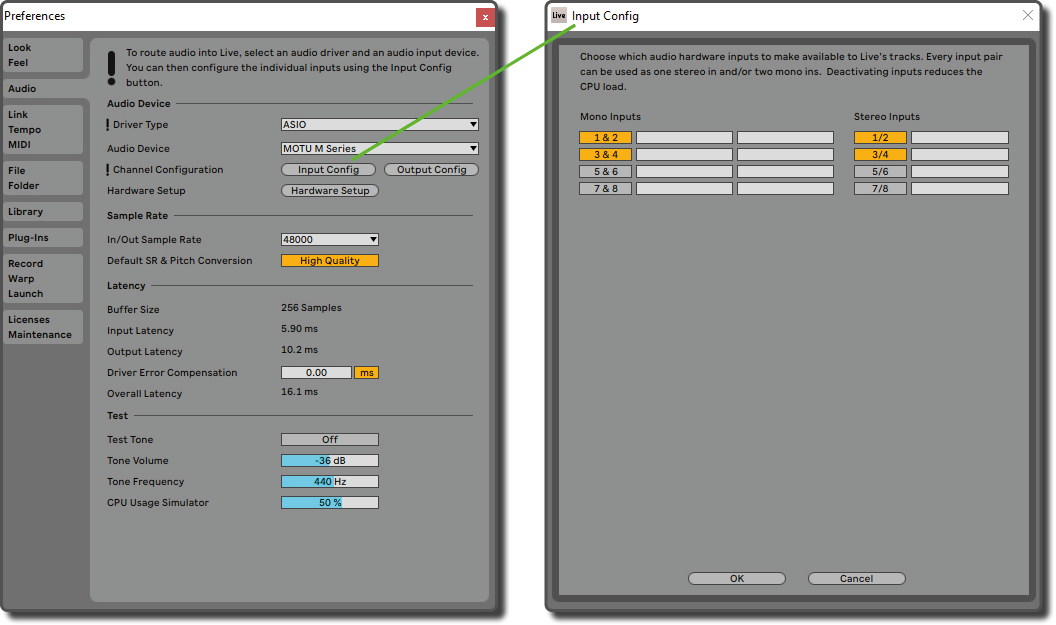
In case that you do not hear or see an audio signal and your audio interface has more than two audio channels, you might have to enable them in Ableton’s preferences.
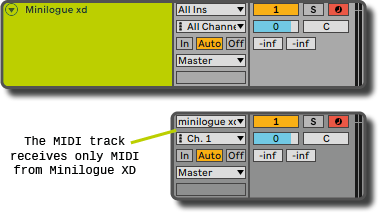
If you want to receive only the MIDI signal of this instrument on the track, you can also select the MIDI input of the sound card or the device instead of All ins.
Set the latency #
So far, so good. Now you can do some cosmetics and compensate the possible latency. This is caused by sending MIDI notes from Ableton to your instrument and then having to wait for it to come back as an audio signal. The duration of this latency can vary depending on your hardware.

To find out the exact time for your system, you can do a little test:
- Temporarily create an empty audio track and set the audio input to the MIDI track with the external instrument.
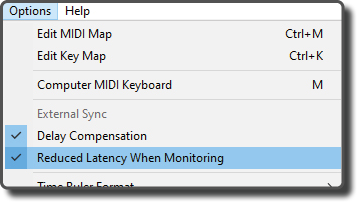
- Instead, you can choose as well directly the incoming audio signal. However, in this case you need to activate in Ableton’s options “Reduced Latency When Monitoring“.
- To avoid duplication of the audio, you should mute one of the two tracks.
- Select a sound on the device that has a short attack, e.g. a percussion sound, a plucked instrument or similar.
- Create a MIDI clip and draw a MIDI note into it
- Arm the audio track to record the MIDI note
- After the recording, zoom in to the beginning of the MIDI note
- Compare whether the waveform in the audio track starts at the same place as the drawn MIDI note above it.
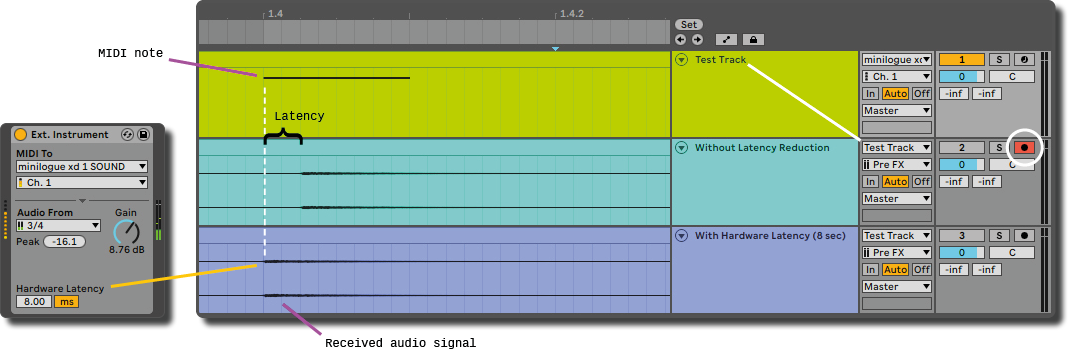
It will probably start a little later and to compensate it, you can set a latency in the external instrument. In the example it is 8 ms. To find the exact time, you will probably have to do some trial and error. It does not have to be super perfect! You mainly just want to prevent the sound of your device from being audibly late. The 8ms, for example, are not really dramatic and will only be noticeable with short drum or pizzicato samples. For sounds with a slow attack like a sustain note, played without accent or marcato with the bow on a cello, you probably will not even notice the delay.
Find here more informations about the latency of External Instruments and how to compensate it when monitoring an external audio signal.
Controlling presets and sound banks with key switches #
To be able to control sound banks of keyboards, synthesizers or other external instruments with Program Changes, Bank (MSB) and Sub Bank (LSB) MIDI messages in Ableton, you normally have to define them in a MIDI clip. As soon as you launch this clip in the session view or the time line cursor passes the clip in the Arrangement View, these messages are the first thing which will be sent out.
The KeySwitch & Expression Map allows you to control your hardware in a much easier and more comfortable way.
- For live performances you can control presets or sound banks either with key switches on your piano or using the knobs and pads of your MIDI controller.
- In your compositions, you can automate them simply with automation envelopes.
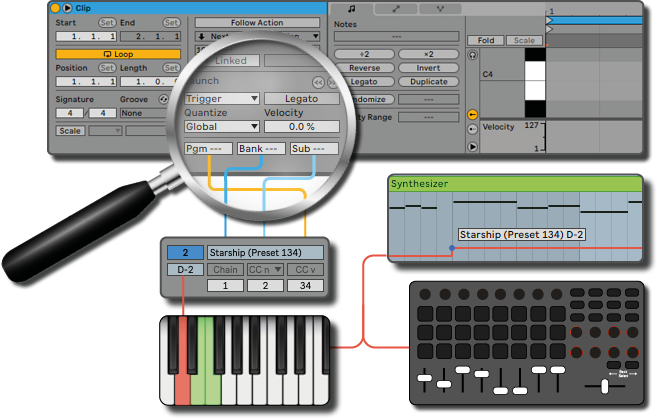
To do this, you only have to transfer the corresponding numbers of the presets to the KeySwitch & Expression Map. As long your device do not have more than 128 presets, most probably you only have to fill out the box with the program changes.
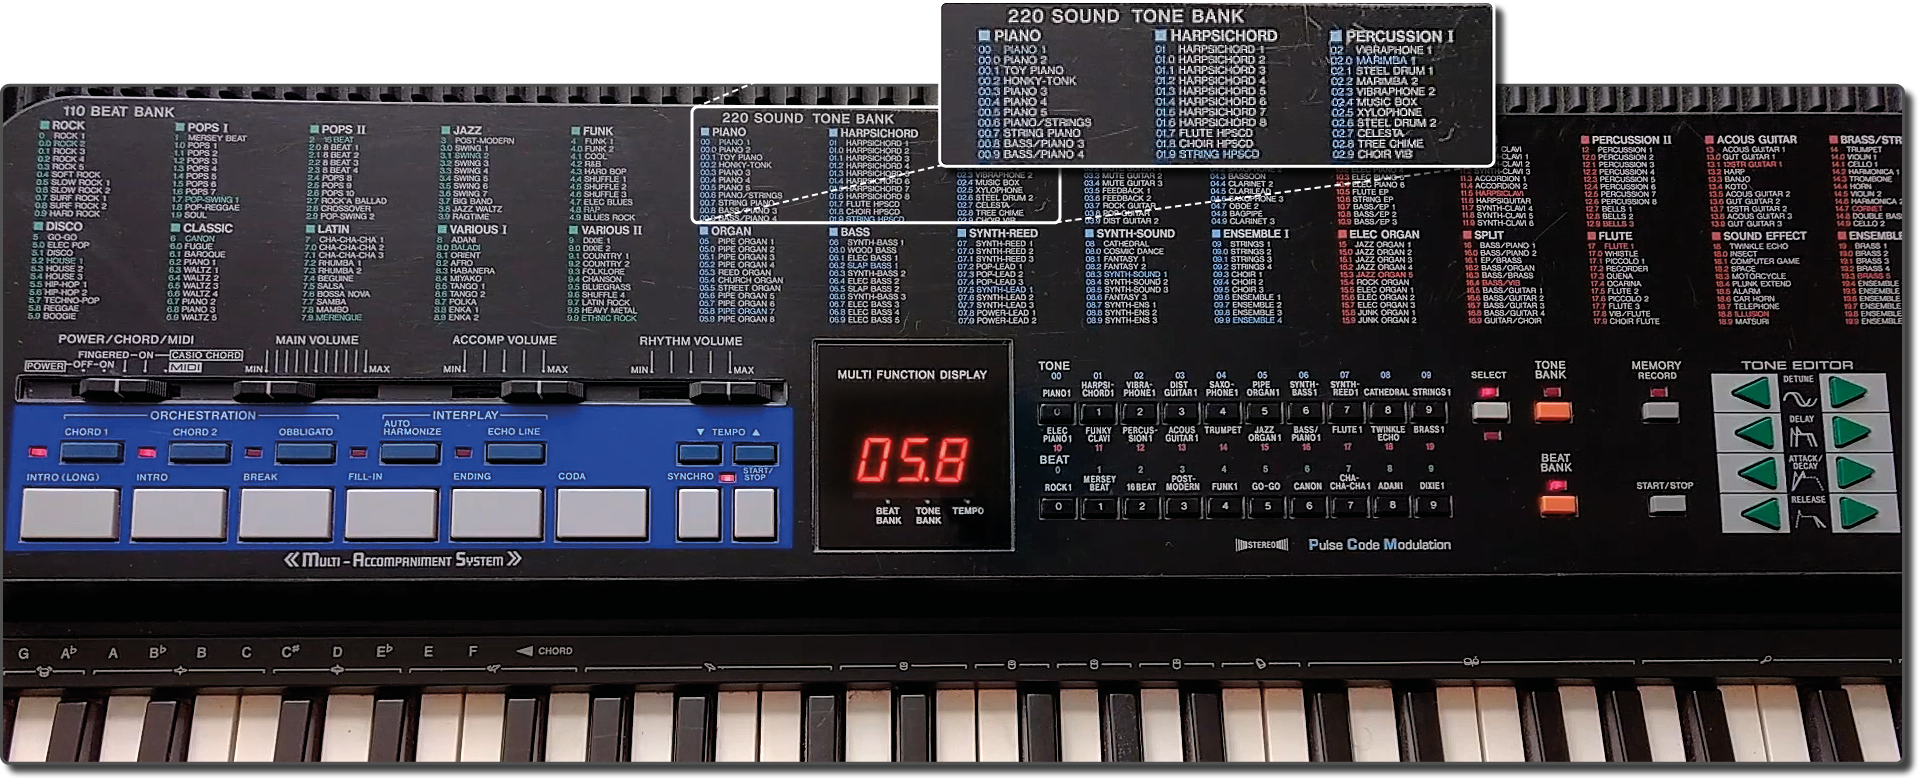
Where the number 128 comes from? This is because the MIDI range is restricted from 0 to 127 and thus to 128 possible values. In order to be able to control a higher number of presets or programs anyways, the sounds were split into several sound banks as for example it is the case for this old Casio keyboard.
However, the tone banks of this keyboard were still managed by assigning a MIDI channel to each instrument and switching then between its variations using Program Changes. This worked basically, but was still not ideal. To control the sound banks more convenient, special MIDI bank and sub bank messages were defined in the early 1990ies. Technically, they are actually Control Changes with the numbers CC0 and CC32 and were reserved in the past exclusively for the purpose of selecting instruments via MIDI signal from a sound bank – that is by the way why you cannot select them in the box of MIDI controls in Ableton’s MIDI clips. Combining Bank and Sub Bank in this way creates 128 x 128 = 16 384 different sound banks. So with Program Changes, theoretically 128 x 16 384 = 2 097 152 different presets would be possible.
Combining Bank, Sub Bank and Program Changes #
The KORK minilogue XD can store up to 500 presets, divided into 5 Sub Banks of 100 presets each:
| Bank | Sub | PGM | Preset | Example | ||||
|---|---|---|---|---|---|---|---|---|
| 1 | 1 | 001-100 | 001-100 | 001 = 1 1 1 | ||||
| 1 | 2 | 001-100 | 101-200 | 134 = 1 2 34 | ||||
| 1 | 3 | 001-100 | 201-300 | 245 = 1 3 45 | ||||
| 1 | 4 | 001-100 | 301-400 | 301 = 1 4 1 | ||||
| 1 | 5 | 001-100 | 401-500 | 500 = 1 5 100 |
It will look in the KeySwitch & Expression Map like this:
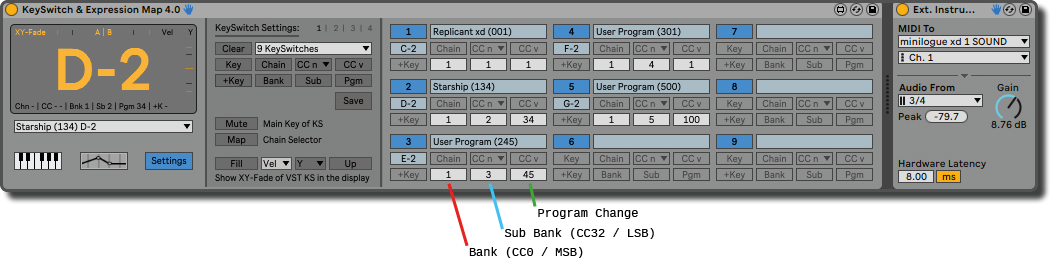
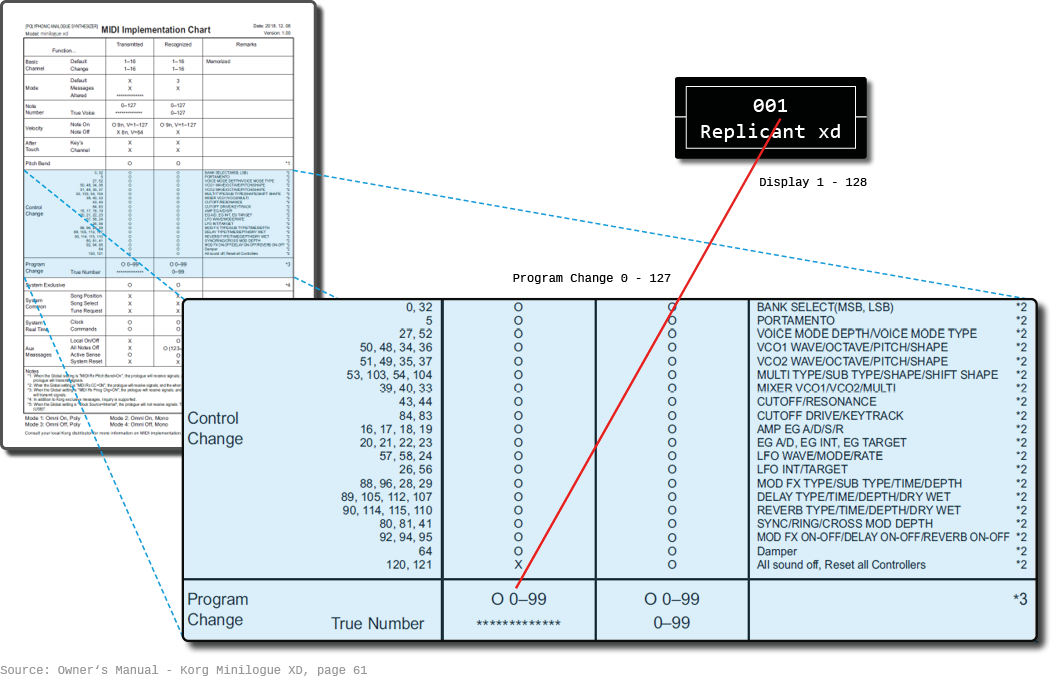
Sounds quite logical and simple, doesn’t it? Indeed it is! However, you can run into some little traps. As described above, the MIDI range is actually 0-127, but it is often displayed as 1-128 (also in Ableton). This way of displaying has probably become established, because we are used to start counting with the number one. It’s rather strange to say that you select the “zeroth” preset.
That means that you enter e.g. the value 10 for Program Changes, but the KeySwitch & Expression Map actually sends a 9 to your instrument. This is common practice also with the manufacturers of the instruments, as a view into the manual of the Korg Minilogue XDs shows. As you can see, the presets are indicated in the display as well with 1-100, but the device sends and receives 0-99.
However, especially with older devices the presets might be displayed as well from 0-99. In this case you simply have to increase the value for the KeySwitch & Expression Map. For example, for preset 15 in the display, you enter the value 16 in the KeySwitch & Expression Map.
Theoretically, it could also happen to you that a manufacturer has visually divided the programs or instruments into sound banks, but only uses program changes.
| Bank | Instrument | PGM | ||
|---|---|---|---|---|
| Keys | Piano | 1 | ||
| Grand Piano | 2 | |||
| Organ | 3 | |||
| Accordion | 4 | |||
| Strings | Violin | 5 | ||
| Viola | 6 | |||
| Cello | 7 | |||
| Double Bass | 8 | |||
| Brass | Trumpet | 9 |
If you have problems, take a look at the manual of your instrument. There you should most probably find on one of the last pages either a technical info about MIDI or even a detailed list with the names and corresponding MIDI values.
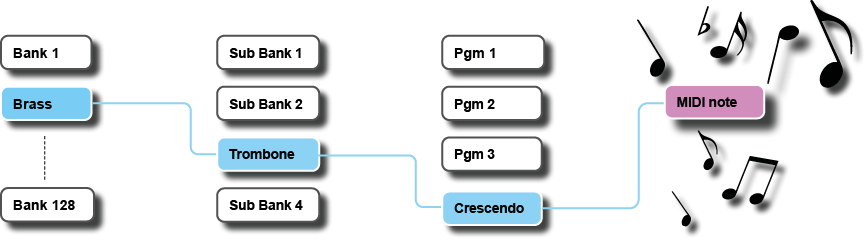
To use Bank-, Sub Bank- and Program Changes together, especially for hardware it can be important to consider the sequence of the output. Basically it is the same as if you want to open a file on your computer. For example, you first select the Brass Instruments folder, then the Trombone subfolder to finally open the Crescendo articulation.
The order is already preset in the delay settings of the KeySwitch & Expression Map. If you have changed something there and it leads to flaws, lock the editing of the sequence or double-click on the parameter boxes to set the default again.
Sound variations at the touch of a button #
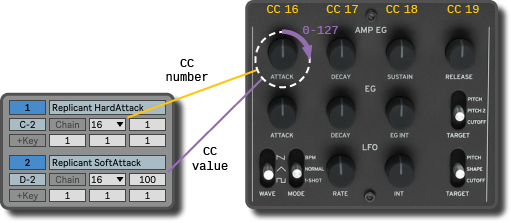
Finally, one last tip, just to have it mentioned at least briefly. You will probably want to control parameters like attack, filter cutoff, portamento or decay with the MIDI control section of the KeySwitch & Expression Map.
But you could also assign a CC number to the key switch in addition to the bank and program changes. In that way you can easily change with key switches between different variations of one preset for example at a concert (e.g. the same sound with different attack times). The CC numbers for all the knobs of your device, you will find as well in the manual. As you can see above in the excerpt from the manual for the Korg Minilogue XD, the Control Changes for the ADSR envelope (Attack, Decay, Sustain, Release) are CC 16, 17, 18, 19.