If your MIDI controller does not provide a native Control Surface Script (e.g. Korg nanoKONTROL2), you can create an own script to control at least the eight dials of the custom bank. It might sound a bit like a nerdy task for a programmer or computer specialist, but actually it is very simple and you can even connect the pitch bend or modulation wheel of your keyboard in that way.
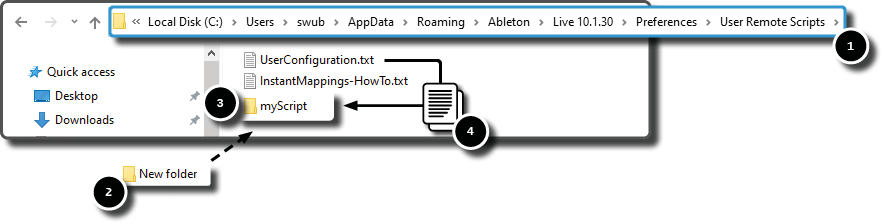
Open the path of Ableton’s preferences in the File Explorer or Finder (1) . You have to activate hidden items to see the folder “AppData”. Create a new folder (2) and give it for example the name myScript (3). Finally, copy the file UserConfiguration.txt in your new created folder (4). The name of the file needs to remain unchanged!!!
Mac: HD:/Users/[Username]/Library/Preferences/Ableton/Live x.x.x/User Remote Scripts
Open the script with an editor. On windows for example Notepad or Textedit on a Mac. Alternatively, you can also install the open source software Notepad++.
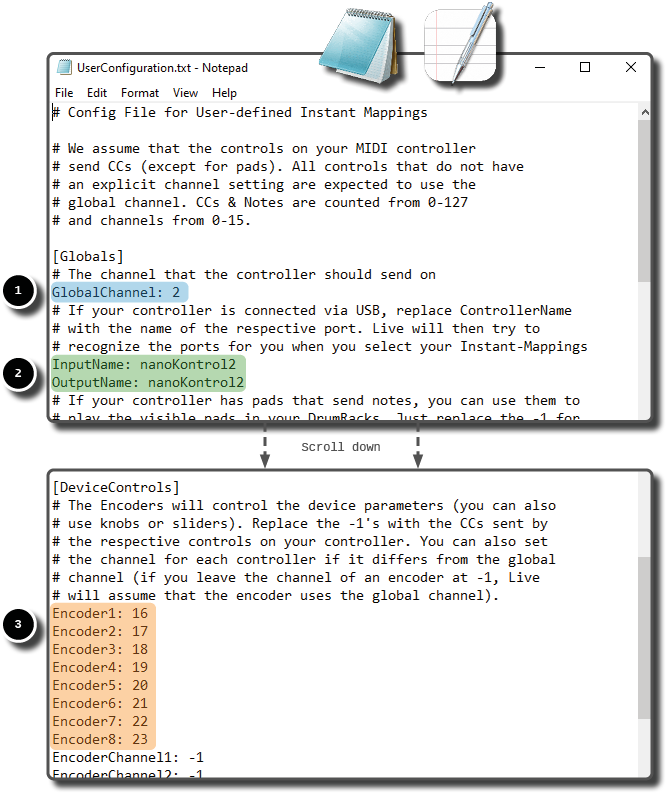
Let’s have a look to the script and edit three parts of it:
- You must define the MIDI channel on what your MIDI controller sends data.
- Type in the name of your controller. In the best case exactly how it is called in the preferences of Ableton.
- Scroll down and define the CC numbers of the dials (encoders) which you want to use.
The quickest way to find out these information is probably to switch on the MIDI assignment in Ableton.
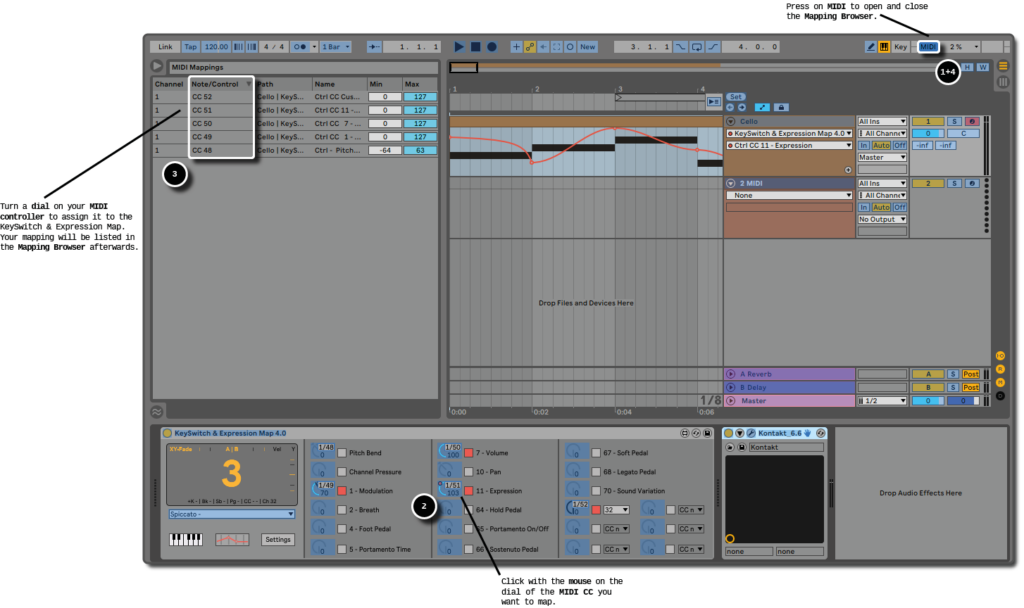
- Activate the MIDI Map Mode by pressing the MIDI button in the upper right corner of Ableton Live’s user interface.
- Then click for example on the Expression dial in the KeySwitch & Expression Map and turn the dial on your MIDI controller to find out its CC number and channel.
- The Mapping Browser will show you now the information we need to know.
In our example, you would write for the CC number Encoder1: 52, Encoder2: 51 and so on.
The channel is for all dials 1. Hence, it is enough to write only a value for the global channel. The lines with the channels of the encoder you can ignore and let it on -1. Ableton will assume that the encoders have the same channel as the global channel.
Attention: There is one little trap you can run into: The script counts the MIDI channels from 0-15, but the interface of Ableton displays them from 1-16. Therefore, you have to reduce the number by minus 1.
For this reason, we would write into the script GlobalGhannel: 0
- After you have found out all necessary information, delete all mappings and press again on the MIDI button to leave the MIDI Map Mode.
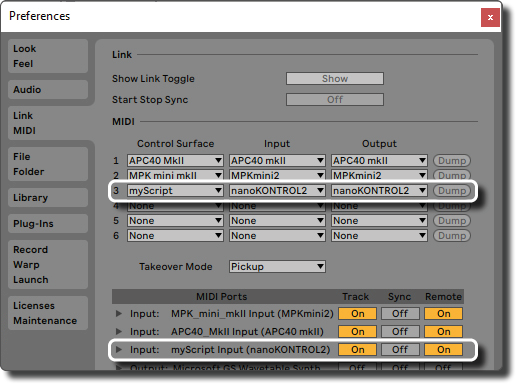
Save the script and reopen Ableton. Choose in the preferences your script as Control Surface and your MIDI controller as input and output. Do not forget to activate the MIDI port for Track and Remote.
Ready!